Category: Popular

  • How To Build A Micro Niche Site That Makes Money From Day 1!

    How To Build A Micro Niche Site That Makes Money From Day 1!

    So I’ve got another fun little experiment to share with you guys today.

    A while ago I heard about the idea of a “micro-niche site”, and a few months back I finally decided to build one. Not for any particular reason – out of procrastination more than anything. But it turned out to be a pretty fun project.

    As you know I’m always interested in new ways to build a life on the road, and along with blogging, freelancing, travel jobs, and the many other random ways to make money, this seemed like another interesting thing to try.

    For those of you ready for a new pet project, below is my complete guide on how to build a micro niche site that makes money from scratch. I’m going to share the whole process with you, how I built it, and how much money it’s made.

    What is a micro niche site?

    A niche site is just a fancy name for a website about a specific topic.

    For example, you might make a website all about school snacks for kids. You could post recipes or snack ideas or summaries on which snacks have the most sugar – whatever you want.

    A micro niche site is just a more narrowed down version of that. For example, you might build a site about school snacks for kid’s with allergies (or vegetarians or diabetes). Not the best example but hopefully you get the idea. The goal of the site is to give information to people about a very specific topic. Because your site is so niche, it makes it easier for people to find you.

    How to build a micro niche site

    As you know I like to keep things super simple around here, so I broke this down into 4 simple steps. To build a micro niche site you need to:

    1. Get a website up and running (duh).
    2. Choose a good niche.
    3. Write a bunch of helpful articles (keyword: helpful).
    4. Get traffic to the site.

    That’s really it.

    The best thing is how low-risk it is. You can do it from your bedroom, you don’t need to take a course or go to a special school, and it should cost you around $50 to get started. To start a mini-business that could make you a passive income from anywhere? That’s pretty cool.

    My micro niche site took maybe 30 hours to get it a money-making stage (I wasn’t really counting). I didn’t take any courses or read any books on how to build a micro niche site, I just read a few blog posts and tried it.

    Now it only takes me an hour a month to maintain and has already made a tiny bit of money – nothing I’ll be able to retire on, but it has paid back my investment in the first two months and is now just making me a cool $30-$50 per month on auto-pilot. If I want to scale it up I can, and if I want to just let it run, I can. So that’s pretty cool.


    Update: As of May 2020 the site is now making around $300-$500 per month. I now spend my time on my other bigger sites, so I only spend about 1 hour per month on it mostly answering comments. So it’s still mostly on auto-pilot!


    Let’s go through the process step-by-step:

    1. Get a website up and running

    If you haven’t owned a website before, this step may sound complicated. It’s actually super easy (shouldn’t take more than an hour). Getting your micro niche site up and running requires 3 things:

    1. Choosing a web host
    2. Installing WordPress
    3. Installing a theme

    All super simple steps – I’ll walk you through them.

    Setting up your web hosting account

    Getting hosting is like renting a piece of land on the internet where your website will sit. Without hosting space, you can’t own a site.

    Luckily web hosting is super affordable these days and even ten year olds can afford to have their own blogs.

    While there are thousands of web hosts to choose from, not all of them are good. And if you are going to start a website, trust me, you want a good host.

    I can’t stress that enough.

    A bad host where your site always crashes and is slow and the support team never answers your emails – it’s hell and you might as well not have a website at all (believe me, I’ve been there).

    I’ve been a site owner for almost 10 years now, have been with many hosts, and there is only one host I recommend now for new site owners: Dreamhost.

    • Super affordable! $2.50 per month on their Starter plan with this link.
    • Great support. When I migrated my sites to Dreamhost, the support team were great and responded to everything super quick.
    • SO EASY to use. They have a one quick WordPress-install, and you can even ask support to just do it for you.
    • Free domain name!
    • A great (and fast!) premium plan to upgrade to if your site starts to grow.

    Also, they are one of the official hosting recommendations by WordPress, so if you plan on using WordPress (if you’re reading this guide, then yes), they’re an ideal choice.

    Of course, you are free to choose any host you like, but Dreamhost is easily my #1 recommendation for new site owners. Simply head to their homepage and click on their Starter plan to get going:

    If you’re not sure exactly how to open your hosting account, I’ve got a guide below that will take you through it step by step. Simply click the orange box below.

    Getting started with Dreamhost (click to expand)

    Let’s get your hosting account set up! This should only take 5 minutes (probably less).

    First, head to the Dreamhost homepage by clicking here.

    This should take you to a page that looks like this:

    Click WordPress hosting as shown in the screenshot above, and you should get taken to their hosting options.

    If this is your first site, I highly recommend choosing the Starter plan. You’ll get hosting for one site, a free domain, one-click WordPress install, unlimited traffic and a free SSL certificate. That’s more than you’ll need!
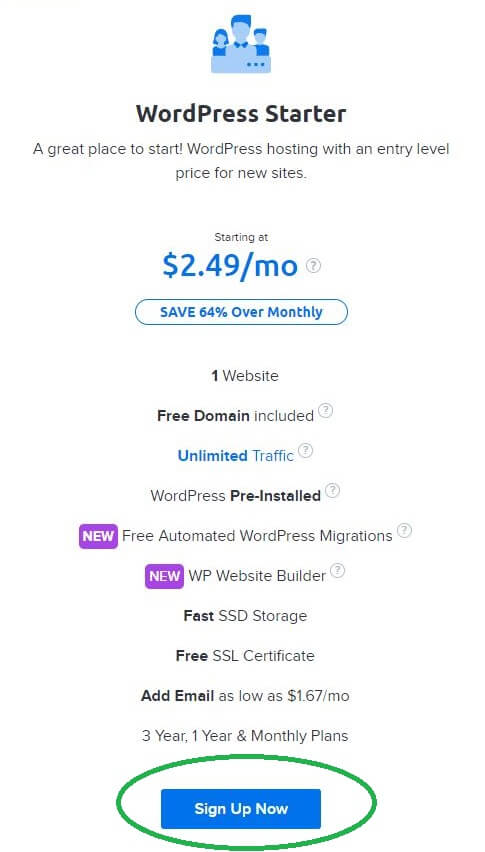
     

    Just click the Sign up Now button, and you’ll get taken to registration.

    The first screen is your domain registration. Since you get a free domain name with Dreamhost, this is where you choose it. Click the “Register a new domain” button:
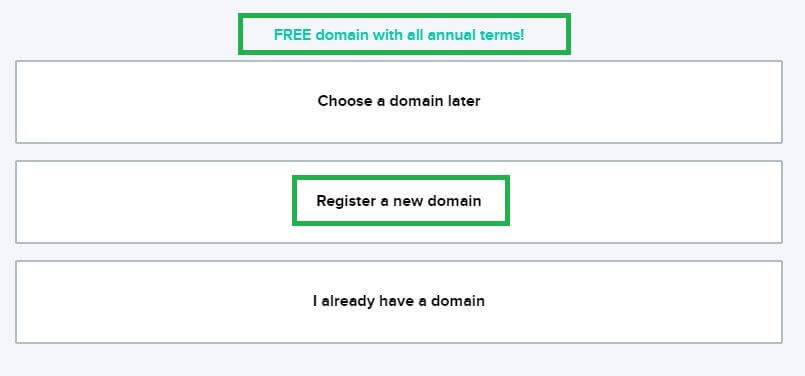
    It will then take you to a screen to enter the domain you want:
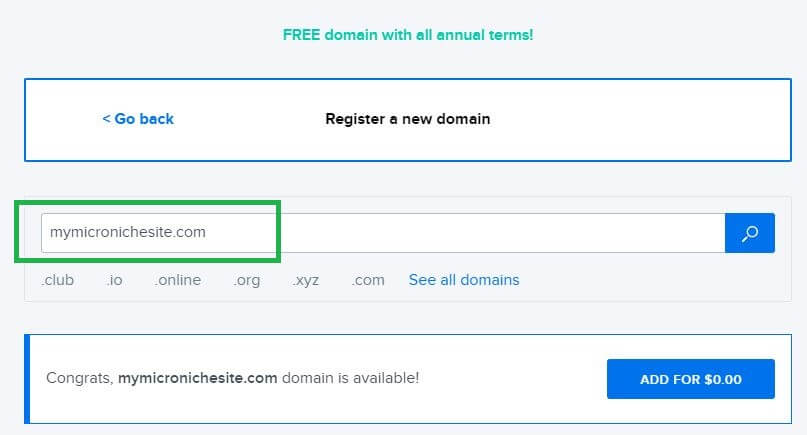
     If you know what domain you want, simply enter it now.

    Choosing a domain is bit of an art, there’s not really any right or wrong answers. However, you do have a choice of whether you want your domain to be more “branded” or for it to be informational.

    For example, a niche site on golf clubs could be “golfclubreviews.com” or it could be something more like “thehappygolfer.com”. It’s really up to you, I have seen both types of domains work perfectly fine, so I wouldn’t say one is more effective than the other. Just choose something that feels right to you!

    Once you’ve chosen your domain, you’ll get taken to the final screen for payment:
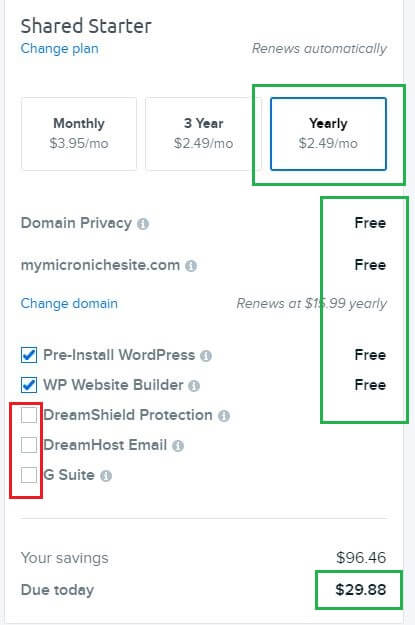
    The DreamShield and Dreamhost Email add ons will cost you extra, so I would just remove them, they aren’t essential.

    You can also keep the “Pre-Install” WordPress button checked so WordPress is already installed on your website for you. This is super convenient and it means you can skip the following section and simply get started on building your site.

    Once you enter your credit card or Paypal details and finalise your payment, you’re ready to go. Congrats! You’ve now got your very own website.


    Installing WordPress

    WordPress is the most popular website software in the world.

    If you want a fast, secure, nicely designed website, I would highly recommend using WordPress. Best of all, it’s 100% free. The other great thing about WordPress is it’s super simple to use. No nerdy stuff, no weird programming or coding. Just install and go.

    If you’re hosting with Dreamhost, WordPress will already be pre-installed for you, because they’re awesome like that.

    If you’re using another host, or if you forgot to check the “pre-install” WordPress button in the previous step, don’t worry. Installing WordPress on Dreamhost is as simple as clicking a button.

    Once you’ve set up your Dreamhost account, go to your Dashboard and click “One Click Installs” in the left hand menu:
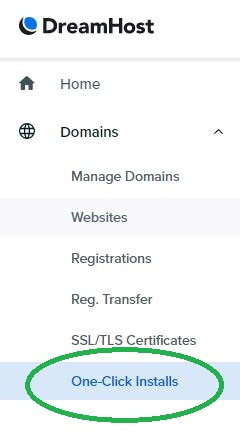
    You will get taken to the WordPress install screen.

    Simply choose your domain name from the drop down box (it will be the same domain you chose during signup) and click Install It For Me Now:
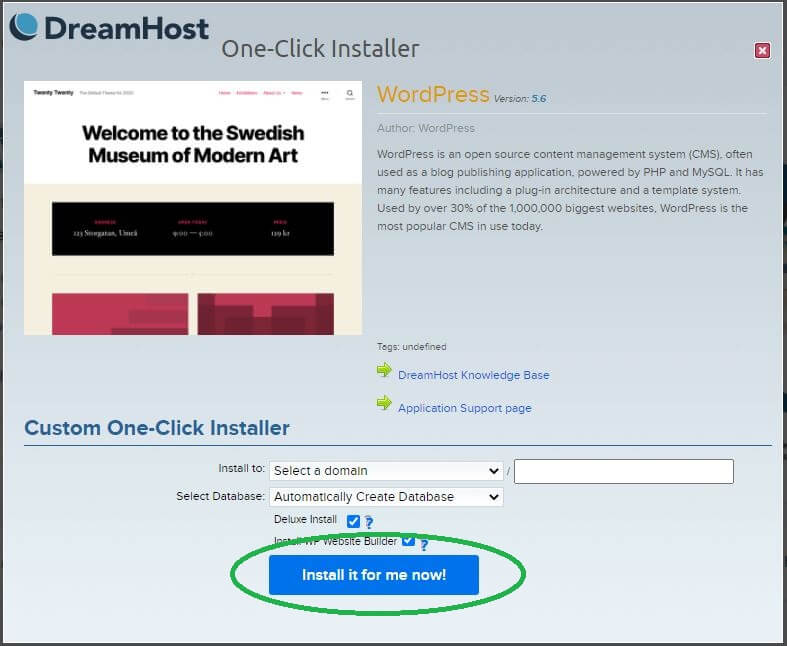
    That’s seriously it.

    Wait for it to do it’s thing, and you now have a working WordPress site 😉

    Installing a theme

    Now, your WordPress theme.

    A theme is like a pre-made design for your website. Instead of paying a web designer thousands of dollars to design a pretty website for you, you can just install a WordPress theme with one click and your site will look great. This is perfect for dummies like you and me 🙂

    If this is your first website, I’m going to recommend that you don’t buy a theme right away.

    Why? You’re probably going to spend days shopping through different themes, and it will just be a distraction from the more important tasks. There are millions of free themes you can use in the meantime.

    In fact, you can just use the default theme that WordPress gives you – that will suffice for now.

    Once you’ve written some articles and you have a better idea of how you want the site to look, you can look at investing in a theme. Changing a theme is as simple as one click, so no need to worry about this so early. Focus on building your site content and traffic.

    Of course if you want to buy a theme right away, that’s totally fine too. You will want to get a theme eventually anyway. Once you’ve written some articles and have an idea of how you want your site to look, it’s time to start theme shopping.

    My #1 theme recommendation right now is Thrive Theme Builder. It is simply the best theme if you want to customise your theme to look exactly how you want, without writing any code or going crazy.

    The blog you are reading right now was designed with Thrive Theme Builder in a few days. Highly recommended! Check out a demo of it right here.

    You can also see exactly how I designed this site using Thrive Theme Builder in my Youtube video here.

    2. Choosing a micro-niche

    Now that you’re all set up we can work on building the site itself. First, your micro niche. What’s your site going to be about? There are two things to think about here:

    1. Is it a subject you are knowledgeable/passionate about?
    2. Is it a subject other people are searching for online?

    To help you with this I’ll tell you about my own micro-niche. There’s a little backstory here:

    A while ago I had a big rash on my leg. I grew up with bad eczema so I figured it was just a flare up – the stress of blogger life maybe, no big deal. But then it started getting really red and itching like crazy, so I went to the doc. He looked at my skin and told me the bad news: Scabies.

    If you don’t know what scabies are, it’s a skin parasite that burrows under the top layer of the skin. It’s not a killer parasite like malaria or giardia, but holy crap are they annoying. I’ve no idea where I got it – probably from jiu jitsu, but anyway.

    The doc gives me some scabies cream and tells me to smother it on, it’ll be gone overnight. I think cool, no biggie.

    However, the cream doesn’t work the first time, and I’m kind of a hypochondriac. So I freak out a little bit.

    I spend the next two weeks reading absolutely everything I can about scabies on the web – the history, all the different treatments, all the horror stories, some people saying they’ve had it for 5 years and want to kill themselves.

    Now I’m thinking shit! I’m going to die from scabies! (nobody has ever died from scabies). So now I’ve gone really crazy, and I’m reading all the latest scabies studies, taking notes, reading up about all these weird plants and oils that are used in rural Indian villages and by the Aborigines and by the Ancient Romans. Then I go and try all the treatments, and spend a few days smothering different concotions all over my body.

    A week later I’m cured.

    I start writing up an email to my doctor about all the research I did, and I figure this information should really be public. Especially since many of my Google searches weren’t really fruitful, they just came back with people crying “Waa I’m dying” and things like that. Since not everyone has the time to be reading through pages of scabies studies like I did, I figured I could summarise it all and give people answers to treat scabies properly. Surely a site like that could be really valuable to people!

    So that’s the long story of how I became an armchair expert on scabies and decided on my micro-niche.

    Not the most glamourous subject, but perfect for a project like this.

    This might not be the best example of choosing a micro-niche, because it sounds like you need to go through some weird experience like that which is not the case at all. I actually had about 7 or 8 micro niche ideas, but I just chose scabies because it was (a) on my mind at the time, and (b) felt like the easiest the subject to write about.

    Also there probably weren’t many other sites to compete with, because who the hell wants to spend thirty hours writing a micro niche blog about scabies…

    The truth is, you can get a good micro niche out of any subject (yes, any). Games, parenting, fishing, avocados, BB guns.

    Seriously, anything.

    Try and think about an experience that caused you to start researching/buying new things, or a particular problem that you needed information on recently and started Googling.

    If you actually had trouble finding information, even better!

    Since a good site doesn’t exist yet, you can make it.

    Here are a few idea starters for helping you choose a micro niche:

    • What is something you have bought online recently?
    • What is something you purchased at the store recently?
    • What is a question you have asked a friend for advice on recently?
    • What is something you cook/make often? (niche recipe sites are excellent).
    • What is something you’ve typed into Google recently?
    • What is an item you spent a lot of time researching/shopping for?
    • What is something you bought that was expensive but you really needed it?
    • What was something that stressed you out recently that you needed help with?
    • What is something you’ve bought that has made your life easier?
    • What is something your friends are really into or spend a lot of money on?

    Remember, micro niches are about information. People are searching for information – you need to give it to them! 

    If you bought a juicer recently, you could make a juice recipes site, even micro niche it down further into specific juices for specific health conditions.

    If your kids are playing with new toys or games you could build a site around toys for “insert blank”.

    Another really good micro niche site idea:

    What is a hobby or interest you’ve taken up recently? If you have none, what is a hobby or interest you would like to take up?

    Start that hobby today, and start documenting your progress in a micro niche site.

    Example: Let’s say you want to get into archery. Go and buy a bow, gloves, arrows, find an archery club, start learning to shoot. After you’ve done all that, you now have five blog posts you’re perfectly placed to write:

    How to buy your first bow
    Which arrows to buy as an archery beginner?
    Do you need gloves as an archery beginner?
    What to look for when deciding on your first archery club
    Five things I learned at my first archery lesson

    Cool, right?

    There really are endless possibilities.

    Take thirty minutes to jot down some ideas of things that you’ve experienced/are knowledgeable about/are interested in. Write down everything – there are no wrong answers.

    In the next step, we’ll help decide which one is a winner.

    Validating your micro niche. Is it a site people want to read?

    Now you’ve thought of a niche(s), we need to see if people are actually interested in it.

    Are there enough people searching for your niche to make a site worthwhile?

    Luckily, Google has a free tool where you can type in a subject and see how many people are searching for it. Frikkin perfect.

    Now the following process might sound a little heavy. If it confuses you, don’t worry. Once you start doing it, it will start to make sense.

    So in my example, we want to find out how many people are searching for stuff about scabies on the webs. If only 500 people per month are searching for scabies information, probably not a great niche idea since nobody is interested it. However if it’s getting many thousands or millions of searches per month, we could be in luck.

    Here’s what Google shows:
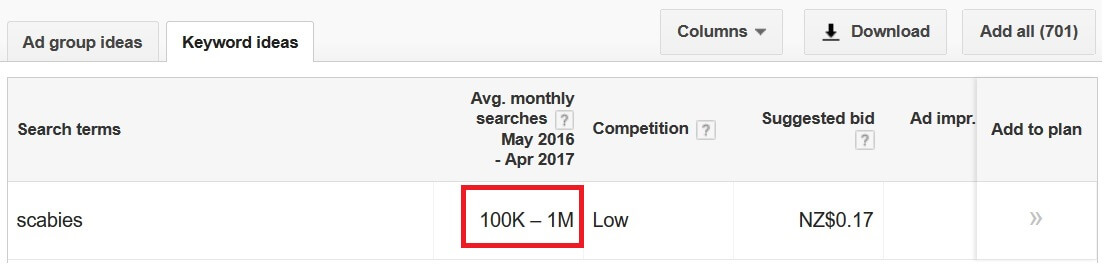
    keyword research for building micro niche site

    100k-1 million searches per month.

    That’s cool.

    Makes sense too – it’s one of the oldest ailments known to humans.

    But it is unlikely I’m going to rank highly in the Google search results for a term as broad as “scabies”. You’ll be competing with the Wikipedias and WebMDs of the world.

    Instead, it would make more sense to focus on long-tail keywords, or niche keywords.

    An example might be, “How to treat scabies with tea tree oil” or “How to kill scabies with natural treatments”.

    When people Google search those specific terms, it’s less likely that many sites have targeted those phrases, giving your micro niche site a better chance of ranking in Google.

    We are looking for phrases that have:

    1. Low competition
    2. Good search volume

    Luckily the Google keyword planner will suggest many keyword phrases for you. Here are some suggestions for scabies:
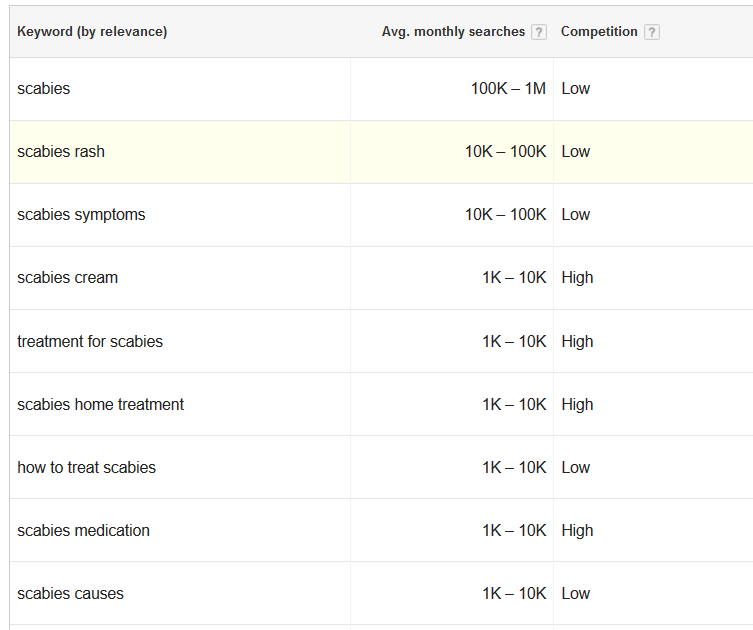
    keyword research for building micro niche site

    Now for a micro niche site you don’t need a shit ton of search traffic, but you still want as much as possible.

    1,000 searches a month would be a minimum. That means 1,000 people are going into Google typing that search term, meaning 1,000 potential visitors to your site. If you can target 10+ keyword phrases, that’s a decent amount of potential traffic.

    Then look at the competition. If the competition is high, it means a lot of sites are targeting that keyword. You’ll have a hard time ranking highly in Google search results. If competition is low, you have a better chance of landing on the first page and being found.

    To do this research I actually use a software called Keysearch.

    While this makes things easier, remember you can do all your research with free online tools such as Google’s Keyword Planner. Software like Keysearch just saves you a lot of time. As a guess, the information you can get in an hour from Keysearch might take you 3-4 days with the free Google tools.

    Keysearch is $17 per month. You probably only need it for a month anyway for your first site. If you can afford the extra $17, I strongly recommend it. It will make your life 100x easier.

    You can sign up for a Keysearch account here. Use the code KSDISC for a 20% discount 🙂

    The other reason I like Keysearch is, not only is it faster, it provides much more information.

    For example, it shows you the sites that are actually on the first page for that search term, so you can see who you’re competing with, how old those sites are, and gives you more detailed search numbers.

    Take a look at what comes up when you analyze the search term “how to treat scabies”:
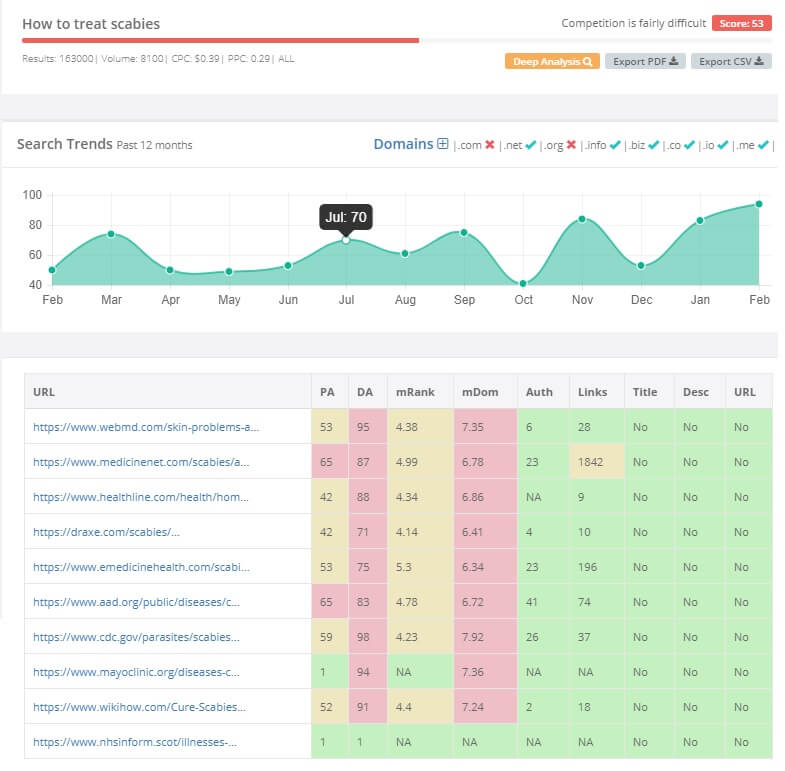
    Now I won’t go and explain all those columns for you, but basically red means very competitive (bad) and green means not competitive at all (good).

    Obviously we want to compete for words with low competition, so we want a lot of green in that table.

    This search term above has quite a bit of red, so it’s not a keyword phrase I decided to target.

    You can also see I’d be competing with sites like Healthline and Mayo Clinic which are super established – that will be difficult.

    After spending about 4-5 hours on this I did find some great low competition/high search volume keywords, which are the phrases I’ve targeted in my articles.

    A quick note about keyword research: It’s not everything!

    Some say good keyword research is everything in niche sites and if you can’t find many good keywords you should abort and choose a different subject.

    I disagree.

    I think the most important thing is you actually enjoy writing and learning about your niche. For me building a micro-niche site is not a job – it’s something you do on the side – a fun little challenge, like building a model airplane.

    If you make some money, great, but if not, it should still be enjoyable.

    The other, more important reason is, search stats change all the time. Maybe what you’re writing about isn’t popular today but it might be in 12 months from now.

    So as long as you’re writing about a subject you love and find interesting, then go ahead and make the site. In a few years maybe every 18 year old will be searching for your niche, and guess who’s site will be popping up first on Google? Your cool established micro niche site, of course!

    The truth is, if you’re interested in this niche, there’s bound to be other people in the world interested in it too. Like I said, this should be enjoyable. Of course do some research, but also ensure you choose a topic you love and have fun with it.

    3. Write quality articles for your micro niche site

    Now that we’ve found some keywords to target, what do we do with them?

    We integrate them into our articles.

    There are two types of articles you will need to write for your micro niche site:

    1. Two or three epic, in-depth, expert articles on your subject (1,500 words plus).
    2. A collection of smaller articles to publish regularly (500+ words).

    For example, one of my cornerstone articles is a huge 3,000 word guide on scabies treatment. Super well researched, lots of cited studies, super high quality.

    I have about three of those types of articles.

    All the other articles are minor, less important articles. “How to stop scabies itching at night” and things like that. Why do you need to publish these smaller articles?

    1. To show Google your site is being constantly updated (Google loves this).
    2. To target the less popular keywords and bring more people to your site.

    Now to keep publishing content you’re going to need a lot of article ideas. I’ll recommend you come up with at least 30.

    Why 30?

    Because that gives you enough content to publish an article every week for six months.

    After 3-6 months you should have a better gauge of your site’s profitability and can decide whether you’re going to continue and can work on your next 30.

    Now you might be thinking 30 articles is a lot, but it really isn’t. If we take my site for example, I’ve got all the usual articles like:

    “What are the symptoms of scabies”
    “How to treat scabies”
    “The best natural treatments for scabies”

    Those were the obvious topics and I came up with maybe 10-15 of them.

    But remember, not all articles need to be 1,000 words long and super detailed. I went back into my search history and looked at all the things I searched for when I was dealing with scabies.

    I had typed in things like:

    “Can you get scabies from the gym?”
    “Can you get scabies from jiu jitsu?”

    Ding! Those are two more article ideas I can add to the list. That led to all kinds of other possibilities like:

    “Can you get scabies from a spa pool?”
    “Can you get scabies from a massage?”

    Just think of the types of things people will be typing into Google. Those are the exact articles you want to write.

    Another hack is to find another site about your niche, and steal a few article ideas (obviously don’t copy the actual article, rewrite it in your own words and try to make it better).

    Remember your 2 or 3 cornerstone articles will account for 90% of your traffic. The main purpose of the other articles is to build credibility with Google and show your site is active.

    That means you can really post anything – answers to specific questions, some random thoughts on your niche etc. Even if the post is only 500 words, that’s fine too. As long as they add some value, it’s a good addition to your site.

    As for scheduling, I would suggest publishing your “epic” content straight away, and maybe 3 or 4 smaller articles. That should give your site a good foundation to start with, and from then you can aim to publish one article per week. Writing those initial articles may take some time, but niche sites are typically labour-heavy in the beginning and the workload starts to taper off after a few months. Hopefully by then, you’re already collecting revenue each month.

    For my particular site, the first few articles I wrote took more than an hour each, but now I’ve done all the big detailed guides, the shorter articles I write only take 15 minutes. That’s 15 minutes a week, or an hour a month! So it definitely gets much easier, just grind it out at the start.

    Target your keywords!

    To get found in Google, you need to target keywords in your articles. That’s why we spent all that time in the previous step finding good keywords to use.

    The way to “target a keyword” is to add that string of words within your article in a decent number of places. Why do we do this?

    Because this is how Google knows what your site is about. For example, if someone searches for “best vegetarian snacks for kids”, Google goes and scans the web for a relevant article. Obviously if your article has the phrase “best vegetarian snacks for kids” in it several times, Google will pick it up as relevant and return it to the searcher. This means it’s in your interest to make it as clear as possible to Google what your site is about.

    From a practical standpoint, this simply means including the keyword phrase within the body of your article 3 or 4 times, preferably near the start.

    You can also try and put the phrase in the URL of the article, and also the article title itself.

    SEO (Search Engine Optimisation) is a lot more complicated than that, but that should set you on the right path for now. If you’re new to this, I don’t really recommend diving into SEO right away – it’s heavy and will suck up almost all of your time.

    What I’ve told you above is enough to get started.

    Focus on getting your site up and targeting keywords in your articles. We can worry about the super geeky stuff later.

    4. Getting traffic to your site

    This is easily the most difficult and least enjoyable part of the process.

    Why?

    Because so much of the advice out there is scammy, secret tricks, “spam your website all over the internet” type stuff.

    This is why I haven’t really done that much traffic generation, but of course it’s a necessary part of the building your site.

    One source of traffic we’re going to rely on is Google, but this doesn’t happen instantly. Because your site is new, Google doesn’t know whether it’s good or not. Usually gaining traction in Google takes around 6 months or more. That’s okay, in the steps above we’ve set ourselves up for Google success in the long term. But we also want to get results from Day 1, remember? Here are some traffic sources that will help us do that:

    Facebook – If your site is about one of your hobbies, and it’s something people often ask you about, you can share your stuff on your Facebook page. Obviously treating scabies isn’t a hobby of mine and not something I think everyone wants to hear about, but it might be different for you.

    Pinterest – This is actually a really great tool for promoting your site. I would recommend starting a new Pinterest account for your site, make some professional looking pins in Canva and then start sharing them. You can share on your personal Pinterest too. Pinterest has been my main traffic driver so far.

    Youtube – You can rank videos super easily in Youtube. If you do a specific title like “How to treat scabies with tea tree oil” you’ll probably rank on the first page within a day. However the challenge is actually making a good video that people will watch. I just uploaded a crappy Powerpoint presentation and it ranked almost instantly, but never drove any traffic. At this stage I don’t think I’ll be investing any time making a proper video, but if this was more than just a side experiment I’d definitely consider it.

    Quora – Lots of people ask questions on Quora all the time, like “I dropped my iPhone in jelly will it still work?” If you search for questions like this related to your micro-niche, you can then post an answer and link back to your site. It’s a rather untapped resource that you should definitely check out.

    Reddit – There is most likely a subreddit related to your niche. Post your articles up there, you might be surprised.

    Forums – Always a great place to promote your site. If anyone has questions related to your niche, answer them and then direct them to a relevant article on your site. Great way to build backlinks too.

    Stumble Upon – Super easy to use – just submit your pages and see how they do. I would choose 1 or 2 sources to start with and focus on those. If you see any success keep going, and if you don’t, try something else. Which one is most effective really depends on your promotion style and the niche itself, so just keep trying. Just for reference, here’s what my site traffic has looked like in the 2.5 months since going live:

    how to build a micro niche site

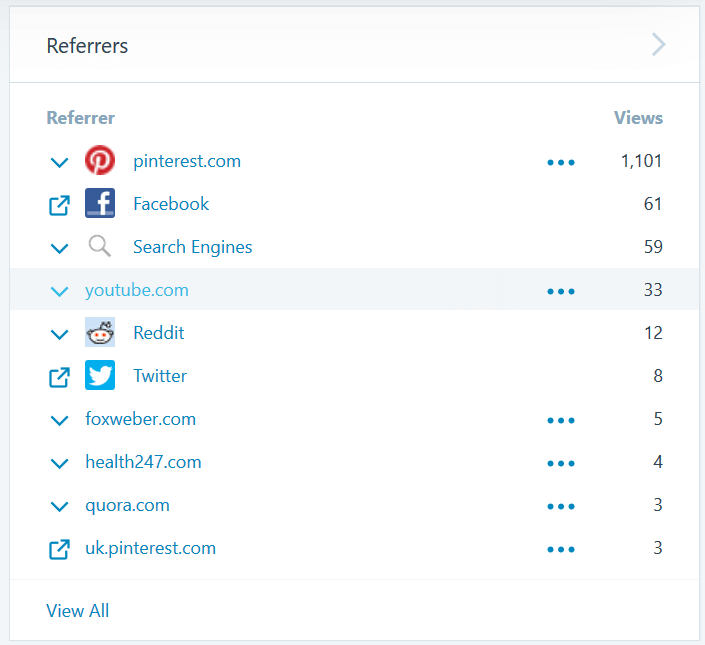
    And here’s what my referrals look like:
    getting traffic to your micro niche site

    As you can see Pinterest is the clear leader. I’ve also been getting a bit of traffic from search engines already, which is nice and hopefully will grow as the site gets older. Honestly two months is still early days, so if you’re struggling with traffic after that long, don’t flip out. Traffic generation takes time.

    Update 2018

    The site has been growing! I haven’t really been doing much, as there’s not much left for me to write. If I can I write one new post per month, otherwise I just keep pinning on Pinterest and that’s about it. Here’s what the traffic growth has looked like:

    how to build a niche site 2018

    And here’s how the traffic sources have changed:
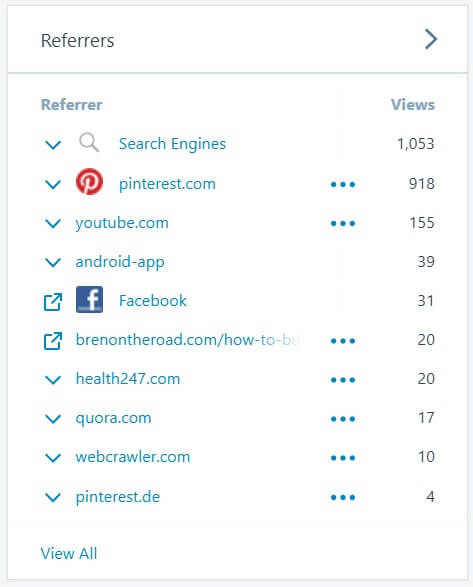
    As you can see, Google has picked up the website and delivered much more traffic over the last few months. Search is now the biggest traffic driver, with Pinterest a close second. I think the reason traffic is grown is because Google is getting smarter and my posts are really in-depth. It goes to show hacking SEO isn’t everything – if your content is top quality, Google will find you eventually.

    Update 2020

    Traffic in 2019 was almost double 2018 at 137,000 page views. I did barely any updates in 2019, maybe just a few new articles, but most months I didn’t do anything. The site has simply grown organically:

    As for traffic sources, it’s almost all Google traffic now. I still get some from Pinterest and Facebook, but it’s a much lesser percentage:
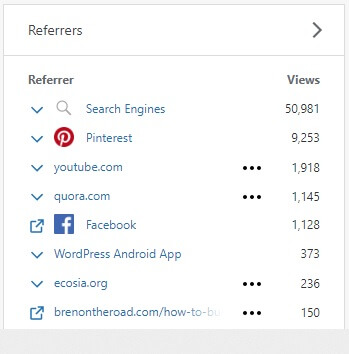
    Earnings have also grown, which I’ve shared in the monetisation section below.

    5. How to make money from your micro niche site?

    Now you’ve got people visiting your site, we need to turn this traffic into dollars. There are two ways I’m going to recommend for making money from a micro-niche site. One is advertising, the other is affiliate marketing.

    Advertising

    Advertising is most easily done through Google Adsense.

    Simply sign up for an account, enter your site details and if your site isn’t a spam factory you should be approved. Then you can start copy-pasting the ads up around your site. When a reader clicks one of those ads, you’ll usually earn between 10 and 50 cents. Simple.

    The downside with advertising is it requires a lot of traffic before you see any results. To me, advertising is a more long term strategy for once your site and traffic matures. If this is your first micro niche site, I would highly recommend using affilate marketing.

    Affiliate marketing

    If you want your site to make money from Day 1, I would suggest using affiliate marketing. Affiliate marketing is when you earn a commission for recommending a product or service. You put a special link to a product on your site, then if someone clicks that link and makes a purchase, you get a commission.

    If this is your first site, I’d recommend using the Amazon affiliate program. How this works is you post affiliate links on your site for anything on Amazon (Amazon will provide the links for you). If your readers click that link and then buy something, Amazon will pay you commission of between 1-5%.

    The program is particularly great because their affiliate links are valid-store wide. That means if someone clicks a link for coconut oil on your site, but while on Amazon they end up purchasing a laptop, you’ll get commission for that too. Once you get more familiar with building sites you can start looking at other, more lucrative programs, but Amazon is a great one to get started.

    Other things to think about:

    • If your micro niche involves products people will need to buy (for example, if you made a site about coconut oil recipes your readers will obviously be buying coconut oil) it makes more sense to monetise with Amazon. Why? Because you can link to coconut oil (or whatever product) on Amazon and collect commissions.
    • If your micro niche is more informational and people generally won’t be buying things (for example, philosophy or meditation) then it makes more sense to monetise with Adsense.
    • Lastly: Make sure you build your site first before submitting an application for either Adsense or Amazon’s Associate program. Post some articles to your site and make it look full and active. When you apply, they are going to review your site to see if it fits their guidelines. This sounds daunting but it’s really not. As long as your site doesn’t look like shit (and it shouldn’t if you’ve followed my guide above) you should have no trouble getting approved!

    How much money did my site make?

    Since my site was based around home remedies (lots of oils, powders, plant products etc) I included Amazon affiliate links to all those things in my articles, and people have been clicking them and buying them.

    At first I was pretty surprised that this was happening, but then I remembered when I was treating myself I was also ordering all the same things! The whole point of the site was to recommend people the same treatments that I used, so it made total sense in the end. The site was working exactly as I intended.

    Here’s what the first couple of months looked like:
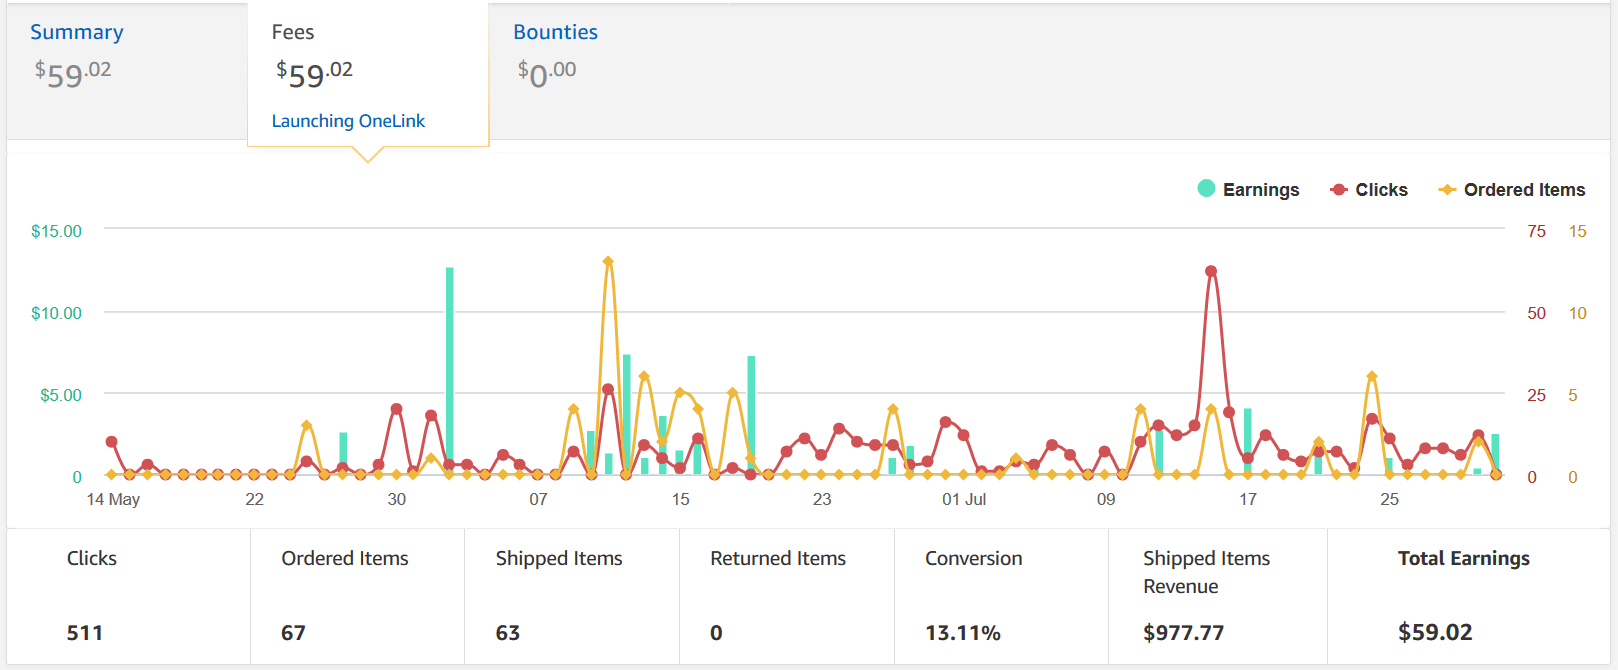
    how to build a micro niche site

    If you can’t read that, it means the site made $59.02 in its first two months. That doesn’t sound like a lot, but it’s actually more than this blog you’re reading now! (which made zero dollars in its first two months).

    Having a site make money from its first month is actually quite rare. However, if you write good content and promote it with a monetisation plan in place, there’s no reason you can’t do it. Even if this site just chugs along making $60 every two months, that’s still $360 per year, with potential to go a lot higher.

    Pretty cool for a little side hustle you can put together in just a couple of weekends.

    It’s also not uncommon for niche sites like this to be making $1,000+ per month after a bit of love and growth. I’m sure if I dedicate significant time to this site it could reach that level. For reasons I’ll share below I probably won’t do that, but if you want to build a serious niche site income stream it’s definitely possible!

    Update 2018

    When I first wrote this article the site was making $30ish per month. Now it’s making around $100. Considering I’ve barely done any work on it, that’s pretty cool. Obviously I don’t rely on this site to make a living or anything, so I’m happy just leaving it making pocket money, but it’s fun to watch it tick along.

    Update 2020

    Earnings have definitely been growing consistently since the site started. It’s been fun to watch. The income has been mostly passive, and even though there are things I could do to improve the site, I’ve tried to leave it as passive as possible for experimentation’s sake. The goal was to create a passive income asset so that’s what it’s being treated as.

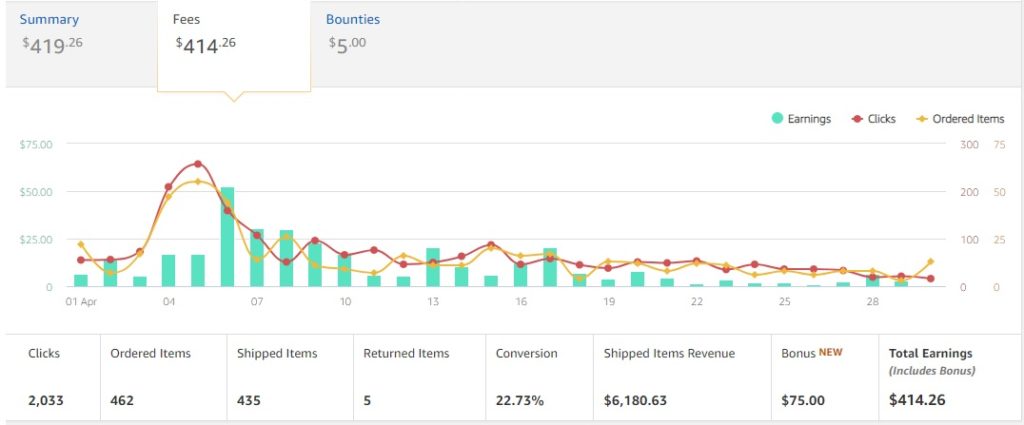
    Below is last month’s income (April 2020) which came in at $414.26. It’s a little higher than usual, normally it’s closer to $300-$330. Just shows that if you invest a few weekends to build a micro niche site, and do it properly, it will continue to pay you for years.
    Update 2022

    The last monetization method I hadn’t tried was selling a product.

    Of course the goal was to experiment with everything possible on this site so I wrote an ebook, which was basically a treatment plan summarised into about 20 very short and easy to follow pages. The goal was to create something that someone could read through in 15 minutes instead of spending an hour scouring through all the blog posts for the information they needed.

    I created the book in Canva (free) and split tested it — one page was selling at $10 and the other was selling at $27. 

    Surprisingly, they sold exactly the same amount of copies, so obviously I went with the $27 price point.

    I really wasn’t expecting much from ebook sales, but it’s actually turned out to be the top income generator for the site (a testament to the importance of experimenting and testing everything!) The ebook has now brought in $2,500 in sales: 
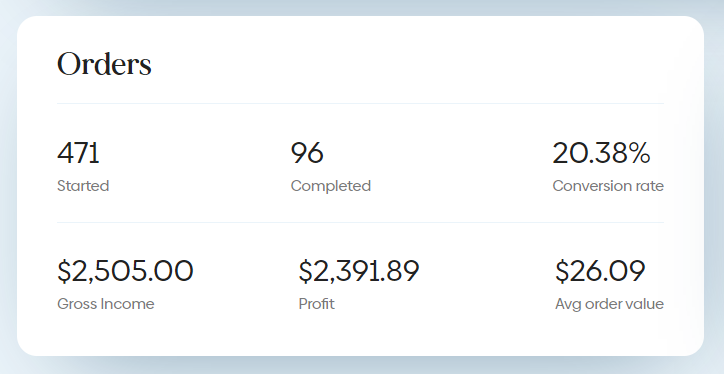
    To sell ebooks, I use Sendowl.

    Rinse and repeat

    I have since used this exact same method to build several more micro niche sites which around more lucrative topics. Obviously I can’t share all of those with you, but this site I’ve shared with you is a good example of how you can make a profitable niche site about pretty much anything!

    Get started today, maybe your first site will bomb, but it’s the learning process that is important. Once you have successfully built one site, there is nothing stopping you from building 10 or 50 or 100.

    My advice? Start today! Here’s a cheat sheet for you to get started below:

    Summary: Building Micro Niche Sites That Make Money From Day 1

    1. Get a website set up. I use Dreamhost and highly recommend them. If you’re ready to get started, click here.
    2. Choose your micro-niche. Try and choose something you’re knowledgeable/interested in.
    3. Think of 25-30 article ideas.
    4. Write 2-3 epic articles to start with (ultimate guides etc). Monetise with affiliate links. I recommend using Amazon Associates if this is your first site.
    5. Target your keywords to make sure Google can find your site. I recommend Keysearch.
    6. Start making your site look reputable with a professional design. You can do this yourself with a WordPress theme. I use Thrive Theme Builder.
    7. Start promoting on social networks like Pinterest, Facebook and Stumbleupon.
    8. Publish one article a week to keep search engines happy.
    9. Watch your site grow and collect your money!

    It’s seriously that simple. There’s nothing intellectual or difficult about it. Just set aside the hours to do the tasks and you’ll have a micro niche site that makes money.

    If you have any questions, hit me on my Facebook page. I’m here to help.

    Most importantly: Have fun!

    One last piece of advice I want to give to anyone trying this is don’t take it too seriously. People always say you need to treat your websites like a business and struggle struggle struggle etc.

    I disagree.

    It’s going to cost you maybe $50-$100 to get this thing going – there’s no risking your life savings here. Choose a subject you enjoy reading and writing about, say stupid things in your articles, swear if you want to, add stupid photos. There’s nothing worse than slaving over a site about some boring shit that reads like a high school textbook. Treat your new website like a video game and just have fun with it. Even if you only make $2 from it in the end, at least you learned something new and had a good time. And if you do genuinely enjoy what you’re doing, I promise you’ll make much more than that 🙂

    Bren
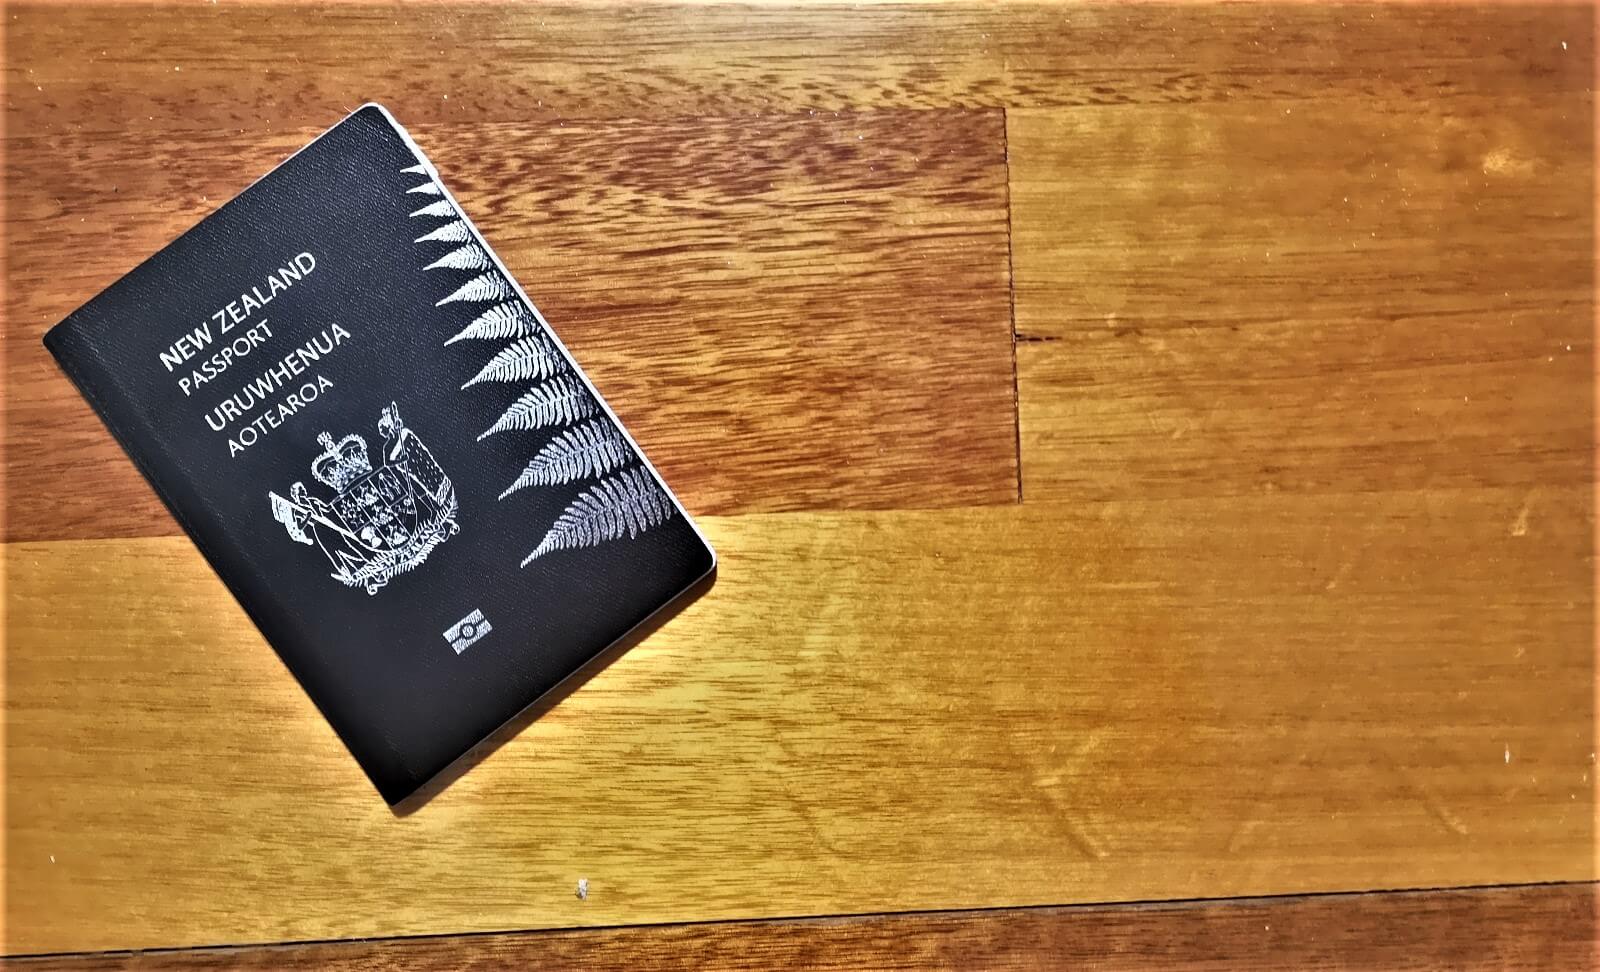
  • Can New Zealanders Stay In The Schengen Area For More Than 90 Days?

    Can New Zealanders Stay In The Schengen Area For More Than 90 Days?

    This article is a part of my travel tips series for New Zealand travellers. If you’re not from NZ, this post won’t apply to you. You can see the rest of the Kiwi traveller guides by clicking here.


    If you’ve travelled to Europe, you will be familiar with the 90/180 days Schengen visa rule. Citizens of Annex 2 countries, of which New Zealand is one, can enter and stay in the Schengen Area for 90 days within a 180 day period without a visa. Your 180 day count begins from the first day you enter a Schengen Area country, and you can leave and enter as many times as you wish, as long as your total days in the region do not exceed 90 for that 180 day period. Pretty simple. Currently, the Schengen Area includes the following 26 countries:

    • Austria
    • Belgium
    • Czech Republic
    • Denmark
    • Estonia
    • Finland
    • France
    • Germany
    • Greece
    • Hungary
    • Iceland
    • Italy
    • Latvia
    • Lithuania
    • Luxembourg
    • Malta
    • Netherlands
    • Norway
    • Poland
    • Portugal
    • Slovakia
    • Slovenia
    • Spain
    • Sweden
    • Switzerland
    • Liechtenstein

    There are no border controls between these countries, and you can move freely between them without a passport.

    New Zealand’s bilateral agreements

    Important: The information below is exclusively for New Zealand passport holders, who have slightly different Schengen rules to other countries. If you are not a New Zealand passport holder, this post will not apply to you. You can read about the standard Schengen rules here.

    For New Zealanders the rules are a bit different. Before the Schengen agreement was inked, New Zealand had signed bilateral visa waivers with many European Schengen countries (as far back as the 1950’s). The visa waivers mean that the 90/180 day rule applies to each country individually, rather than the Schengen Area as a whole. This means you can stay in Spain for 90 days, then France for 90 days, then Germany for 90 days and so on.

    (Trust me, this is a big deal. Some backpackers are willing to give a left nut and a pinky for a second 90 days).

    The countries with this bilateral visa waiver agreement are as follows:

    • Austria
    • Belgium
    • Denmark
    • Finland
    • France
    • Germany
    • Greece
    • Iceland
    • Italy
    • Luxembourg
    • The Netherlands
    • Norway
    • Portugal
    • Spain
    • Sweden
    • Switzerland

    The New Zealand government confirms the European Commission still honours these visa waivers and that they override the Schengen agreement.

    You can read more here. This is an official government website.

    In case the site is down, here’s the official statement as at January 2025:

    But does it work?

    All our government websites caution that immigration officers may be unaware of these agreements. The advice was to contact the relevant embassies and get confirmation that the agreements are still recognised in the countries you plan to visit.

    Since I wasn’t quite sure where my Eurotrip would end up, and also for the sake of this blog post, and also because I have no life, I just contacted all of them.

    Using the embassy listings provided on Go Abroad, I sent an email to all of them. Here’s what I said:

    Hi!

    My name is Brendan, I’m a New Zealander travelling in Europe at the moment. I got your details from the Embassy listing on Goabroad.com.

    I’ve been told we have a bilateral agreement with [country], that allows me to spend 3 months in [country] visa-free, regardless of any time spent in other Schengen countries. I was advised to email you to confirm whether this bilateral agreement is still valid?

    From Safe Travel:

    “However, New Zealand has bilateral visa waiver agreements with many of the individual countries in the Schengen area [country included]. These visa waiver agreements allow New Zealanders to spend up to three months in the relevant country, without reference to time spent in other Schengen area countries.  The European Commission has confirmed that these agreements continue to be valid.  These agreements thus effectively override the Schengen area restriction (which would otherwise be imposed on New Zealand passport holders) of no more than 3 months out of a 6-month period in the Schengen area as a whole.”

    https://www.safetravel.govt.nz/travel-tips-travel-europe

    Thank you so much!!

    Here’s what they said:

    The short answer

    YES means they still honour the waivers. NO means they don’t. A question mark means I couldn’t find embassy details, or they didn’t reply after several tries.

    AustriaYes (kinda)
    BelgiumKinda but not really
    DenmarkYes
    FinlandYes
    FranceYes
    GermanyYes
    Greece?
    IcelandYes
    ItalyYes
    Luxembourg?
    The NetherlandsYes
    NorwayYes (kinda)
    PortugalNo
    SpainYes
    SwedenYes
    SwitzerlandYes

    The long answer

    Here’s the exact email each embassy sent me.

    Austria

    “The bilateral agreement between Austria and New Zealand is currently still in force.
    It allows you to stay in Austria for an additional 90 days, if you can prove that you have left the Schengen Area after the first 90 days, and have not had any stopovers in other Schengen countries during the second 90 days. Further please note that it is not a guarantee that the bilateral agreement will be honored by all other Schengen Member States and that you might still be fined for overstay when you leave the Schengen Area.

    Therefore, you are well advised to have proof of your stay (Hotel receipts, tickets etc) in each state of the Schengen area readily available.”
    For more information you may also want to visit the following websites:
    https://ec.europa.eu/dgs/home-affairs/what-we-do/policies/borders-and-visas/visa-policy/schengen_visa/index_en.htm

    -Austrian Consulate

    Belgium

    “Referring to your email below I can inform you that a New Zealand passport holder does not need a visa for a stay of up to 90 days in any 180 days period in the Schengen area.

    In addition the Embassy can inform you that, according to the SPF Foreign Affairs of Belgium, the actual bilateral agreement formally confirmed through an exchange of Notes on 1 November 1951 between the two countries, entitles New Zealand citizens to stay for two more months without a visa in Belgium after 90 days spent in any other Schengen country. When entering Belgium you will need to be able to prove you have not stayed in the Schengen area for more than 90 days. At the end of the 2 month period you will need to leave from Belgium and cannot visit another Schengen country.”

    -Belgian Embassy

    Denmark

    “Dear Brendan,

    Yes, this is correct and still valid. For more information, please see link below:

    https://www.nyidanmark.dk/en-us/coming_to_dk/visa/Visa_free_travel.htm

    -Danish Consulate General

    France

    “Good Afternoon,

    Yes the bilateral agreement between France and New Zealand is still in place.

    For more information :
    https://www.mfat.govt.nz/en/countries-and-regions/europe/france/new-zealand-embassy/living-in-france/travel-within-france-and-europe/

    -French Embassy

    Finland

    “Yes, you can stay in Finland for 3 months [regardless of time spent in other Schengen countries].”

    -Finnish Consulate

    Germany

    “Dear Brendan,

    New Zealand citizens can travel visa-free to Germany for visits of up to 90 days per half-year. Times spent in other Schengen member states do not count towards these 90 days. However, as there are no I internal border controls, it is up to you to prove to immigration on departure that you have not spent more than 90 days in any one country.”

    -German Embassy

    Iceland

    “Hi Brendan,

    Yes I can confirm this is correct. NZ has an old bi-lateral agreement with Iceland and a few other European countries, that the Schengen Area agreement does NOT override. This was an unintended oversight when the Schengen agreement was signed but it stands.

    So you can on a NZ passport spend up to 3 months in Iceland regardless of your other European travel.

    In the unlikely event you will have any issues about this in Iceland, you can contact the Icelandic Foreign Affairs as they know all about this and you could also show this email as a proof.

    Have a good trip to Iceland.”

    -Icelandic Consulate

    Italy

    While Italy originally told me the waivers are no longer valid, a reader has since emailed me an updated reply that says the waivers are still in fact recognised:

    “We confirm that the bilateral agreement between NZ and Italy is in place. This means that you are allowed to a 90 day tourist stay in Italy even if you have already spent 90 days in another country in the Schengen Area.”

    -Italian Consulate

    This is also confirmed on the website of the Italian embassy:

    The exchange of Notes signed on 25 January 1961 between Italy and New Zealand, entitles New Zealand citizens to stay in Italy without a visa for 90 more days irrespectively from other periods spent in other Schengen Countries.

    Netherlands

    “Once the 90 days for the Netherlands have been used up you cannot return for 180 days.

    If you wish to stay longer pleased contact the IND (www.ind.nl) from within the Netherlands to request an extended tourist/visitors visa.

    In principle, New Zealanders benefit from the short-stay visa waiver, as long as they (a) do not intend to work; (b) hold a passport valid for at least 3 months after date of return; and (c) have a return ticket. Border officials in EU countries may ask for other supporting documents such as an invitation letter, proof of lodging, return or round-trip ticket. For the precise requirements contact the local consular services of the EU country in question.

    Therefore, New Zealand passport holders can freely travel in this period to countries in the Schengen Area: Austria, Belgium, Czech Republic, Denmark, Estonia, Finland, France, Germany, Greece, Hungary, Iceland, Italy, Latvia, Lithuania, Luxembourg, Malta, Netherlands, Norway, Poland, Portugal, Slovakia, Slovenia, Switzerland, Spain and Sweden.

    On top of the overall Schengen visa waiver, New Zealand concluded bilateral visa waiver agreements with many of the individual countries in the Schengen area before the Schengen Agreement came into force. The countries with which New Zealand has bilateral visa waiver agreements are: Austria, Belgium, Denmark, Finland, France, Germany, Greece, Iceland, Italy, Luxembourg, The Netherlands, Norway, Portugal, Spain, Sweden and Switzerland.

    Persons of New Zealand nationality are, according to the Bilateral Visa Waiver Agreement, entitled to stay in the Netherlands for 90 days and consecutively go to one of the other countries (length of stay depending on the agreement of New Zealand with that country!). Or the other way around, first visit one of those countries and then the Netherlands afterwards.

    As stated before there is no border control between these countries, but there will be when you leave the Schengen area. You might be questioned about the length of your stay if it is more than 90 days. You are strongly advised to gather evidence (e.g. airline tickets, hotel bills, receipts, etc.) that show the duration of your stay in each different Schengen/EU country. That way you have the best option to prove that your stay in the entire Schengen area was legal.”

    -Dutch Embassy

    Norway

    “Dear Brendan

    New Zealand citizens travelling on New Zealand passports are exempt from the visa requirement for entering Norway. They can stay in the Schengen area for up to 90 days during a period of 180 days. Their stay can be for 90 consecutive days, or divided into several stays. The six-month period starts on the day of first entry into the Schengen area. A new six-month period starts immediately after the expiry of the previous one, thereby allowing another stay in the Schengen area of up to 90 days. However, although a stay will stretch from one six-month period to the next, they may never stay inside the Schengen area for more than 90 days each time. It is their own responsibility to make sure that they are not in breach of this requirement.

    Further information regarding visa waiver countries as well as other visa matters can be found at the Norwegian Directorate of Immigration’s website: https://www.udi.no/Norwegian-Directorate-of-Immigration/Central-topics/Visa/.

    For stays longer than 90 days, a residence permit is required. There is no way to extend the 90 days visa free period. Please note that overstaying the 90 days visa free period may lead to expulsion and a future entry ban to the Schengen area.

    However, please be advised that there is currently a separate bilateral agreement between Norway and New Zealand allowing stays for up to 90 days visa free in Norway in addition to any days spent in a non-Nordic Schengen country. As a consequence, New Zealand citizens will not be refused entry to Norway due to time spent in e.g. Spain. Whether or not non-Nordic Schengen countries will disregard time spent in the Nordic countries before entering the non-Nordic country must be confirmed with the appropriate immigration authorities.

    For more information regarding the bilateral agreement between Norway and New Zealand, please contact the Norwegian Directorate of Immigration.”

    -Norwegian Consulate General

    Portugal

    “Visa matters are handled by our Consulate General in Sydney. The Consul General has advised that, contrary to the information contained in some official websites, the Portuguese authorities are of the opinion that the Schengen Agreement superseded the earlier bi-lateral agreements.

    Tourists are permitted to stay in Portugal, without a visa, for a period not exceeding 90 days, in the aggregate for all Schengen countries. If you require further information, please contact the Consulate General in Sydney.”

    -Portugese Consulate

    Spain

    “Yes, as a NZ citizen you may stay in Spain without visa for up to 3 months regardless of the time you have spent in any other Schengen area countries.”

    -Spanish Embassy

    Sweden

    “To my knowledge and as far as I am aware – nothing has changed concerning the bilateral agreement.”

    -Swedish Consulate General

    Switzerland

    “Dear Brendan,

    Thank you very much for your enquiry.

    Please find required information on our website:

    https://www.eda.admin.ch/content/dam/countries/countries-content/new-zealand/en/Visa%20waiver%20for%20New%20Zealanders%20for%20long-term%20stays%20in%20Switzerland.pdf

    New Zealand citizens do NOT require a visa to visit Switzerland for a period of up to 90 days within a 180-days period. New Zealand citizens benefit from this short-stay visa waiver, as long as they:

    (a) do not intend to work;

    (b) hold a passport valid for at least 3 months after date of departure;

    (c) have a return ticket.

    Border officials in EU countries may ask for other supporting documents such as for example an invitation letter, proof of lodging, return or round-trip ticket.

    Moreover a bilateral visa waiver agreement signed between Switzerland and New Zealand allows holders of New Zealand passports to stay in Switzerland up to 90 days irrespectively from other periods spent in other Schengen countries. In this case, New Zealand nationals are advised to carry evidence of the period spent in Switzerland (e.g. passport stamps, accommodation receipts, ATM slips).”

    -Swiss Embassy


    What about the other Schengen countries?

    Remember we do not have bilateral agreements with every Schengen country. That means the 90/180 day rule for the Schengen region as a whole still applies to the following countries:

    • Czech Republic
    • Estonia
    • Hungary
    • Latvia
    • Lithuania
    • Malta
    • Poland
    • Slovakia
    • Slovenia

    And also Portugal, and possibly Luxembourg and Greece as we discussed above.

    Therefore, my advice for anyone visiting Europe would be to visit the above countries first, use up your 90 days, and then continue your travels into the countries with the New Zealand visa waivers. Again it is up to you to prove you have complied with all the visa restrictions, so keep your bus and train tickets and accommodation receipts. You won’t have passport stamps as there are no border controls within the Eurozone.

    It is also worth noting that Macedonia, Croatia, Bosnia and Herzegovina, Montenegro, Albania, Bulgaria, Romania, Serbia, Moldova, Ukraine, Russia, Belarus, Andorra, Monaco, San Marino and Vatican City are countries in Europe that are not a part of the Schengen zone and therefore will have their own visa/immigration rules. You can check those here.

    This means you can go to one of these non-Schengen countries for 90 days, reset your 180-day counter, and then re-enter the Schengen zone for a new 180 day clock. This is the “90 days in/90 days out” planning strategy that many long-term travellers use to stay in Europe for extended periods. Of course you only need to do this if you want to visit the Schengen countries that don’t have a bilateral visa waiver with us.

    Did it work for me?

    Here’s how it all went down:

    When it came time to leave Europe, the first task was choosing a country to leave from. I’d been in the Schengen Area for 184 days.

    I’d been told Spain and France simply do not care if you have overstayed, probably because their workday is only 20 minutes long so they don’t have time to bother with silly travellers like us. We’re all too broke to pay the stupid fine anyway.

    That wasn’t good for me because, as you know, I like to live dangerously. Like, right on the edge. I don’t even watch the safety video or turn off my phone during take off. So I made it a point to leave from the strictest country. I wanted to make sure I got checked, questioned, and see for myself whether our “special rules” checked out. For the sake of a blog post I was willing to miss my flight and risk that nasty overstayer stamp that would banish me from Europe for life. Life! (Actually I think it’s two years but whatever).

    So who is the strictest? Word on the street is: Germany and Switzerland. They apparently check everyone, every time. No surprises there.

    So I arrange to fly out from Zurich airport. Ideally the customs officer would know the deal and just stamp me through. But I had all the papers from all the websites printed out, ready to bust out on the table like Ally McBeal if things got crazy.

    Finally I get to customs. Moment of truth. I take a look at the lineup. There is an art to this, you know. It goes like this:

    Young, fun looking guys don’t give a toss when it comes to this stuff. Usually if you overstay 3 or 4 days somewhere they just stamp you through because they only care about going home to play Xbox later. And they hate paperwork. So if I’ve overstayed somewhere, I always try to choose a counter with a young smiley dude in his twenties. Young women are the next easiest. Try and look for the happy ones, hopefully they’re crazy in love with some hunk and not even thinking straight and won’t want to be mean in case it messes with their happiness. However, there’s a flipside. If you choose one that’s moody you’re gonna get it in the ass. There’s a 300% chance she’ll bust your balls and go high and mighty on you. So make sure she looks cheery. Next is the older guys. These guys are hit and miss. Sometimes they’re like your cool uncle and might just smirk at your cheeky overstay and give you a wink before stamping you through. Other times you might get that old school guy that just has to do everything by the book and will ping you. And then older ladies are usually the toughest. If you overstayed and you choose the counter with the older lady, she’s gonna smoke you. But usually she’ll be really nice about it, like a loving grandmother disciplining a toddler. Unless of course someone pissed her off that morning. Then you’re in for a long afternoon.

    So I check out the lineup, and remember, I’m trying to get pinged here. But there’s no grumpy looking girls. No meticulous looking grandmothers either. So I go for the grumpiest looking old guy.

    I rock up and he hasn’t even looked at my passport for two seconds before he asks, “And how long have you been in Europe, sir?”

    Switzerland lives up to the rep. It’s on.

    “About six months,” I tell him.

    I pull my shoulders back and smile. In these situations you gotta have confident body language and stuff, you know.

    “Mmm about six months,” he nods, flicking through my passport.

    “Says you came in on June 6, through…Algeciras?”

    “Oh yeah I entered in May but I went to Morocco for a couple of weeks and then I came back.”

    He nods again slowly, flicks through a couple more pages, and then starts talking to the young mid-twenties guy in the booth next to him. He’s waving my passport at him, and he’s talking Swiss German so I don’t understand anything, but I hear him say New Zealand a couple of times, tapping the front of my passport. He’s talking like a Dad so I figure he’s explaining the intricacies of the special visa rules we have. Of course this young guy looks like he couldn’t give two shits about it.

    Then he inks his stamp, still blabbing away, stamps my passport and says, “Have a safe flight!”

    Didn’t even take two minutes. I get a little rush of satisfaction. I’m through!

    Planning to stay in the Schengen Area for over 90 days?

    So it worked out for me, let’s make sure it works out for you too.

    In the space of six months, I’ve noticed information change on various of the websites above multiple times. As of writing – November 2016) – the information in this post is current, but if you’re planning to (legally) overstay your 90 days, I would do exactly as I did:

    • Email the embassies of the countries you want to visit
    • Print them
    • Print out the policies on their immigration websites too
    • Print out the NZ safetravel page on the bilateral waivers
    • Have them all ready at customs

    As you saw in my little story some customs officers know their shit, but I’m sure many others don’t.

    If in some strange scenario the embassy has okayed you and customs won’t accept it, at least you can show you did everything you could to comply and you may just get a warning instead of a ban and a hefty fine.

    This is annoying since New Zealanders should be able to enjoy this arrangement without all the hassle, but this is what our government recommends.

    Also note, the countries you visit isn’t actually too important. It’s the country you leave from that matters. You move freely without border checks in the Schengen Area, so it’s only when you fly out of the area that you’re going to be checked.

    If you’re really anxious about it, try and leave from a country that has expressly stated on their immigration website that the waiver is valid (Switzerland, Denmark, France).

    Hope this helps, have a safe trip and enjoy Europe!

    -Bren

    Update April 2018:

    As you can see from the comments this post has become quite popular and is now #1 on Google for this topic. While this is great, it might also mean that all the embassies now have hundreds of Kiwis emailing them each day asking to confirm waivers. As you can imagine this is eventually going to piss off the staff and that could even result in some waivers being pulled altogether.

    Let’s work together and try and make this more efficient. Here is my suggestion:

    I am suggesting you only email for waiver confirmations from the country you actually intend to leave from. That is where you will be checked and questioned, so you really only need confirmation from that particular authority. I also encourage you to please come back here and share any confirmations you get from embassies and your experiences with the waivers at customs. Teamwork makes dreamwork. Thanks!

    Update January 2025:

    This post is still very popular and while the waivers still exist the rules are ever-changing. I haven’t been to Europe for several years so I’m not familiar with many of the changes. Use the information in this post to your best judgement, and if you can, come back and update us with your recent experiences in the comments (which country you exited from, any problems you had etc). I am still actively monitoring and approving all non-spam comments. Thanks!

    Heading To Europe And…

    Looking for tours and activities at an affordable price? I use GetYourGuide! Always great deals and local perks.

    For travel insurance, I always use World Nomads – get protected for just a few dollars a day!

    Somewhere to stay? Booking.com gives you the biggest selection and the best rates.

  • I Don’t Like Turkey…Yet

    I Don’t Like Turkey…Yet

    In all my years travelling I’ve never really come across a place I didn’t like.

    I think that’s changed.

    Turkey.

    When I landed in Istanbul, I didn’t really know what to expect. I’d heard in passing conversations that it was an amazing city and there was a lot to see there, but I hadn’t really researched it in any real depth. I was simply going to land, explore, and see what the city gave me.

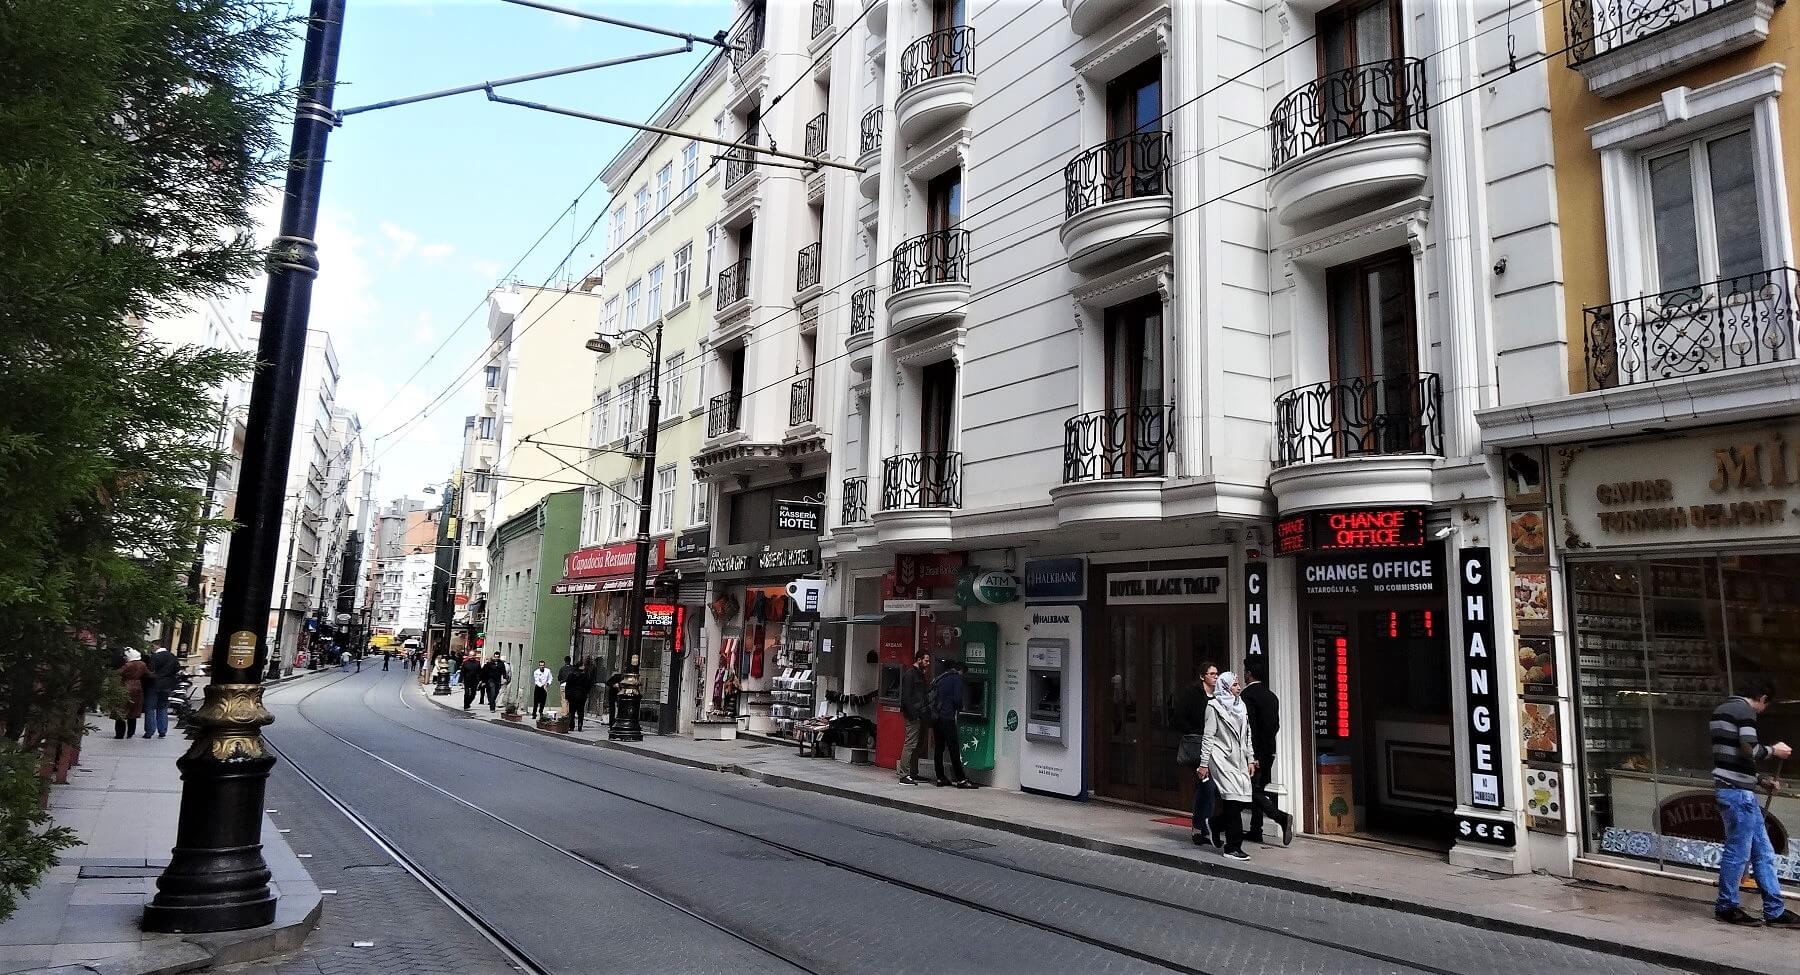
    I ended up spending four nights in Istanbul before heading west to Gallipoli, knocking off the major sights while eating my way through the city. The Topkapi Palace, Blue Mosque, spice market, Istiklal Street, Kadikoy, all while eating as much Turkish food as my stomach would allow.

    The city itself was stunningly beautiful. Lots of little alleyways and coffee shops hidden amongst cobblestone streets, a deep history to explore, and a cheap and functioning public transport system to get you anywhere you needed to go. Regular ferries carted people between the Asian and European sides of the city for only a couple of dollars, and the food was delicious, just as I’d expected.

    What let the city down was my interactions with the local people. During my limited time in the city and the rest of the country, I found the Turkish to be quite an insular community – not hostile in any way, but just a bit cold and stand-offish. It can be easy to quickly disregard this as plain unfriendliness, so I wanted to dig a bit deeper to understand why I was getting this vibe.

    Over my remaining days in Turkey, I spent most of my time closely examining my interactions with the locals. I found the Turkish often fell between two extremes – while some showed extreme friendliness and kindness, the others were so dismissive it was as if they were offended I was even talking to them.

    One example was the man sitting next to me on the ferry, who I hadn’t spoken a word to, buying a handful of fridge magnets off some kid and then insisting I take one as a souvenir of my visit to Turkey – a completely random act of kindness that I was quite taken aback by. On the other hand, there was the guy at the bus office who gave me a look that just said “f*ck off” the moment I walked in and refused to talk to me, and his colleague who I had to practically beg to sell me a bus ticket.

    Unfortunately, I had many interactions in line with the latter. There was an indifference about them, a feeling that they really couldn’t care less that I was a visitor in their country. And of course, I never expect anything more than that. In their country, they are welcome to treat me however they please. What I still couldn’t figure out though was, why? It’s typical of most countries to welcome foreigners and try to give a positive impression of their country, but this didn’t seem to be the case in Turkey. Why?

    At first I assumed it was the lack of English spoken. Almost all locals I interacted with weren’t able to communicate in basic English, even those working in tourist-related areas, and the ones that could were people who had made the conscious effort to seek out and study the language. Perhaps I’d confused unfriendliness with them simply avoiding English interaction with foreigners. Once I learned a few Turkish words, even simple things such as “hello” and “thank you”, people did seem to warm up considerably.

    There was bit of a chicken and egg scenario here. Did they not speak English because they didn’t care to learn about the outside world, or did they only seem that way because they couldn’t speak English? Who knows.

    My next observation was that the coldness came almost exclusively from the men. I’m no Adam Levine, but the women were always extremely friendly and helpful whenever I interacted with them. If I asked questions at the restaurant, they did their best to explain. If I asked for directions, they pulled out their phones and tried their best to help. If I asked the men, they shook their heads or shrugged their shoulders and waved me away. As I walked down the street, I noticed various men give me the glare or a suspicious once-over. What was going on here?

    One interesting experience was on my bus out of Istanbul. We’d just been served our snacks and drinks, and once the guy in the seat next to me had finished he casually placed all his trash onto my tray table, folded his table up and went to sleep. I was so shocked that I started laughing. Had we been in New Zealand I would’ve kindly placed the trash back in his lap and smiled, but I’ve learned on the road it’s always wise to tread a little carefully. Besides, he did in such a blasé and casual way I started wondering if maybe this was just normal behaviour in Turkey?

    In the end, I just put it down to a symptom of the culture. Turkish people in general seemed to be very direct, no-nonsense and in-your-face, and I just accepted it as the way it is. It wasn’t something I could really figure out in my short time there, and probably never will.

    Funnily enough, my fellow travellers seem to fall between two extremes as well. Some were churning through all the sites at light speed so they could just leave the country as soon as possible, while others were in love with Turkey and were trying to extend their stays. As one girl put it, “I just need to see Cappadocia and then I can get the f*ck out of here!”, while another girl had spent 20 days in Istanbul and was already planning her next trip back.

    For me, travel has always been about the people. The most magnificent city in the world is nothing if it does not have warm and interesting people to create the kind of energy and community that a city needs to be great. And while I never really felt unsafe or threatened in Turkey, I never felt very comfortable or welcomed either.

    To be fair to the Turkish, these are all generalisations from a very short visit, and I did come across many friendly and welcoming people during my time there. For every bus driver that rolled his eyes at me, there was a waiter or waitress who did try to show some warm Turkish hospitality. Like I said, a case of two extremes, and it made for an interesting visit if nothing else.

    I ended up cutting my visit short and actually missed out on a lot in Turkey – Pamukkale, Cappadocia, the beach towns in the south and a bunch of other famous sites. But in a country where I never truly felt welcome, seven days felt like long enough.

    Have you been to Turkey? What did you think? Let me know in the comments below.

    Note: If you’re planning a trip to Turkey, don’t let my observations stop you. The country itself is beautiful and Istanbul is certainly a must-see city, unlike any other I’ve ever seen. There’s also a good chance your experience will be completely different to mine. Go with an open mind, explore and enjoy! (the food is incredible, too).

    Heading

  • Ten Important Things You Will Probably Forget To Pack On Your Next Trip

    Ten Important Things You Will Probably Forget To Pack On Your Next Trip

    Ever get overwhelmed by packing?

    I’ll be honest – I’ve witnessed some absolute packing meltdowns. People literally crying while trying to rush for a plane. I can’t say that’s ever happened to me, but I’m far from perfect myself. Even though I pack lighter than most and have a very short packing list, there are still things I always seem to forget.

    Below is a list of things I’ve forgotten at least once on my trips, and usually that’s gotten me into trouble somewhere along the way. If you’re putting together a packing list for an upcoming trip, make sure you add the following items to it – it’s pretty simple stuff, but for some reason it’s always the simple things we don’t remember!

    1. Passport Copy

    passport

    Thankfully I have never lost my passport on the road, but that doesn’t mean it won’t happen. I’ve found most passports are “lost” because bags/purses are stolen or lost, rather than the passport itself. It does happen often, and it is probably one of the worst possible things you can lose while travelling.

    To minimise the chances of this happening and to make life easier if it does happen, make sure you do the following before you leave home:

    • Take multiple photocopies of your passport, and make sure you have one copy in each item of luggage and one on your person (in your wallet/purse).
    • Take a colour scan of your passport photo page (and visa if you got one) and save it in your email so you can access it anywhere.
    • Try not to carry your passport with you on the street every day. Instead, carry one of your photocopies. In the years I’ve been travelling I have not once been asked to produce my passport randomly on the street. I generally wouldn’t carry it around unless you’ve expressly been told to.

    2. Passport Photos

    passport photos

    Make sure you’re always carrying at least a handful of passport photos of yourself. You might think one or two is fine, but I’ve applied for visas (such as the volunteer visa in Tanzania) which required four passport photos for four different forms. If you’re travelling around the world you can never have too many of these.

    Also note the different sizes available. In New Zealand a passport photo must be exactly 3.5cm x 4.5cm, however in Vietnam a visa photo must be 4cm x 6cm. I usually carry around 10 different photos of different sizes. I also get them taken professionally at a photo shop, as many countries are extremely strict about what they will accept and what they won’t. A stack of ten shouldn’t cost you more than a few dollars.

    3. Pen

    Probably the thing I forget most often, which annoys me a lot once I get to the airport and need to fill out those stupid forms. Even more annoying is when the airport doesn’t provide pens. Take a pen! It will make life so much easier.

    4. Gifts

    coins

    You are going to meet a lot of people on the road, and you are going to say goodbye to a lot of people as well. Very often I wish I had something from home to give, like some chocolates or some souvenir, especially to people who have shown me great hospitality, but of course I don’t have room to travel with stuff like that. Instead, what I do is carry a bag of New Zealand one dollar coins, and give these to the good friends/students/hosts I meet around the world. It’s sort of like a souvenir, and also an invitation to come visit me one day so they can spend it. I’ve seen other people carry things like bag patches or bracelets, but it doesn’t really matter what you choose – just make sure you have something.

    5. Vaccination Passport

    vaccination passport

    It can be hard to keep track of all the needles you’ve had jabbed in you, especially if you’ve been through Africa or South America. In my travel wallet I keep a “vaccination passport” from the travel health centre which details the shots I’ve had, when I had them, and how long they’re good for. I’ve never had to present it, but if anything ever happens to me and the doc needs to know what cocktail of vaccinations is inside me all I need to do is hand him my little booklet (which is great, because at this stage I have no idea what I do and don’t have).

    6. Lock

    locks

    I’d be willing to bet every backpacker has left home without a lock or found themselves without a lock at least once. It just happens. Plus, it’s only once you’re on the road that you realise how handy they are (hostel lockers, gym lockers, check-in baggage etc).

    I’d recommend taking a few locks actually (two or three), because:

    • They get lost easily.
    • You often need to lock more than one thing (especially if hostel lockers are small and you can’t fit everything in).

    Use a code lock rather than a key lock, because having a key just gives you one more thing you could lose. It’s also a good idea these days to use TSA approved locks like this one or the one in my photo above. You can click here to check out some good, affordable locks on Amazon.

    7. A second bank card

    bank cards

    Bank cards get lost easily on the road – wallets are common targets for pickpockets, ATM machines sometimes swallow them, and they’re small and fall out of bags and pockets pretty easily.

    I carry around three bank cards, and I also have my money spread over 3 different bank accounts. That means if one card gets lost, or my bank decides to shut off my access due to “suspicious activity”, I’m not left broke and starving in the middle of the jungle somewhere.

    Looking for the best bank in the world for travellers? Click here.

    Another good tricks, if you have multiple cards, is to leave one of these cards at home. Save the credit card number in your cellphone or in your email. That way, even if you lose all your cards, you still have an active card at home that you can use to book flights and hotels online with.

    Obviously, be discrete here. Don’t save it in your phone as “Credit card number”. Otherwise you might as well save it as “PLEASE STEAL MY PHONE AND USE THIS NUMBER TO BUY A CAR”. Just save it as Sally or John or something.

    Check out my guide to the best credit cards for New Zealanders here.

    8. Universal Adapter

    I always used to head to the local markets or some cheap hole in the wall electronic store to buy an adapter when I landed in a country. It’s only recently that I discovered the joy of owning a universal adapter, which allows you to charge your stuff in any country in the world (these days they have USB slots as well, which is extra handy).

    The adapter I am currently using is this GearIt model which has been awesome – super lightweight and you can charge three things at once on it (this usually just means all my dorm mates start charging their crap on it too). You can check it out here on Amazon.

    9. VPN

    I’ve written about the woes of public wifi security before, but I will mention it here again. If you’re sending/accessing sensitive information online while travelling, especially things like Paypal/Credit Cards/Bank Accounts, make sure your connection is secure. Using a VPN will ensure your connections are encrypted and mitigate the risk of your bank accounts/cards getting skimmed or locked. The VPN I use is Private Internet Access, which is awesome value for money and has always worked well for me.

    If you are travelling and plan on using free wifi in hostels and cafes, I highly recommend travelling with one. The VPN I use is only around $3 per month and is worth every penny. You can check out the plans for Private Internet Access by clicking here.

    10. New US Dollars

    usd notes

    Cash is king. Always make sure you have at least a couple of hundred USD on you, which will come in very handy for visa payments at the airport or staying alive in a town where there are no working ATMs. I usually carry around $200-$300, which should be enough to get you out of trouble if you’re ever in a fix. Also, try to carry newer USD (at least Series 2009 and up). Some countries will not accept your notes if they’re too old – I’ve had 2004 notes rejected once before in Africa.

    Travelling soon?

    • For affordable accommodation, I highly recommend using Airbnb. In many cities you will be able to find high quality apartments and guest rooms at much cheaper rates than hotels. You can get $25 of Airbnb credit, absolutely free, using this link.
    • I highly recommend travelling with travel insurance. Many things can go wrong when you travel, and it’s important to get covered so you’re protected and reimbursed for any missed flights, hospital bills, lost baggage and so on. For a beginner’s guide to travel insurance, why you need it and where to buy it, check out my post Travel Insurance 101: Everything You Need To Know.
    • Looking for more packing tips? You can check out some of the things I carry on my trips by checking out my post, What’s In My Backpack. Safe travels!

  • Kiwi Food Frenzy: 33 Things To Eat On Your Trip To New Zealand

    Kiwi Food Frenzy: 33 Things To Eat On Your Trip To New Zealand

    Back in 2011, I took my first solo trip overseas; a full time Spanish course in the south of Spain. Each day, the lessons would have a different underlying theme, and the class would use that theme to try and explain (in Spanish) various aspects of our life back home.

    It started with the weather, and the Swiss girl in class talked about the snow, the Swedish girls talked about the grey skies and I talked about the hot Auckland summers and rainy Auckland winters.

    Then came sports, and the Swiss girl talked about skiiing, the Russian girl talked about boxing and I of course talked about New Zealand’s obsession with rugby.

    Then one day we finally had a lesson about food. The Swiss girl talked about Switzerland’s cheesy raclette, the German girl talked about Germany’s love for sausages, and I……had absolutely no idea what to talk about.

    Lamb?

    Shellfish?

    Pies?

    What do people eat in New Zealand? I had no immediate answer, and spent much of the lesson struggling to come up with something that I could share as my country’s national dish.

    In the end, I just said we drink a lot of milk (lol). But it left me wondering; what is New Zealand food? What are our most beloved culinary inventions? And what, if anything, would be considered our national dish?

    Since then the question has remained largely unanswered, and still to this day I struggle to come up with something when people ask me, “What is the food of New Zealand?”

    However, over the last few months I think I’ve finally come up with an answer. I’ve been tripping around the country, exploring some of my country’s iconic foods and indulging in a few old childhood favourites. New Zealand cuisine is simple, but it’s also comforting, delicious, and loved. The list I’ve compiled below is a collection of those special NZ foods; things that all Kiwis seem to know and love, and things that have unarguably cemented their place in Kiwiana food history.

    What food is New Zealand known for? Let me show you!

    1. Cookie time

    Photo & Video Sharing by SmugMug

    Cookie Time’s “Original Chocolate Chunk Cookie” is a timeless Kiwi favourite and the recipe has remained unchanged from when I had my first one over 20 years ago. As kids we always used to break our cookies open and see who could find the biggest chunk of chocolate – and seriously, you can find some massive ones in these things. Another popular thing to do is nuke it in the microwave for about 10 seconds, giving you a softer, chewier cookie oozing with warm melted chocolate. Delicious.

    Get it at: Any NZ supermarket, service station or dairy (convenience store). There’s also a Cookie Time cafe you can visit. 

    2. Lamingtons

    Photo & Video Sharing by SmugMug

    Lamingtons are a sponge cake, coated in rasberry or chocolate and then sprinkled with shaved coconut. It’s common to cut them in half and fill them with cream or jam, but in most cases it’s simply eaten as is. A very popular snack enjoyed during morning or afternoon tea.

    Get it at: Any supermarket or bakery.

    3. Sausage sizzles

    Photo & Video Sharing by SmugMug

    I still remember back when I was in primary (elementary) school, we would all arrive on Friday mornings with our precious $1 coins clasped between our palms. This, of course, was for Sausage Sizzle Friday, a weekly lunch event where the school would fundraise by selling stumpy pork sausages in pieces of fresh bread, lathered with tomato sauce and if you were lucky, a handful of grilled onions. However this wasn’t unique to my school; sausage sizzles happened all over the country, and while they began as a fundraising initiative (due to the cheap ingredients) they’re now considered a classic Kiwi comfort food enjoyed at family barbecues, food markets and special events up and down the country.

    Get it at: Often sold at sports events and food markets, and quite often there are sausage sizzle fundraisers outside Bunnings and The Warehouse. Of course, the easiest thing to do is to cook them yourself. NZ sausages, onions, fresh white bread and a bottle of Wattie’s tomato sauce – all available at any NZ supermarket.

    4. Hokey Pokey ice cream

    Photo & Video Sharing by SmugMug

    Hokey pokey is one of the most popular ice cream flavours in the country; a timeless combination of hokey pokey (honeycomb) balls and rich vanilla ice cream. Plus it goes well with everything – cake, waffles, cones, banana splits. It’s the perfect ice cream! And so classically Kiwi. Once you try it, you may find it difficult to eat plain vanilla ever again.

    Get it at: This is a Kiwi favourite so any ice cream stand or supermarket will have it. If you’re looking for something special, one of the best hokey pokey ice creams is at Giapo in the Auckland CBD. Giapo does some pretty unique things with gelato and ice cream – just check out their ‘gram! Definitely put them on your bucket list when you get down here.

    5. Fish and chips

    Photo & Video Sharing by SmugMug

    Food in New Zealand often takes influence from British roots – this is one good example. This takeaway treat has become so ingrained in our culture that it would be criminal not to include it here. Every Kiwi will surely have romantic memories of ripping open a steaming hot bundle of greasy goodness; perhaps a crispy battered fillet of Hoki or Tarakihi, a handful of crinkle cut chips and maybe a few other greasy bits from the menu, all wrapped up in yesterday’s newspaper and paired with a bottle of Wattie’s tomato sauce. It doesn’t get much more Kiwi than this!

    Get it at: Any takeaway joint in the country will serve this, just ask around. My favourite fish and chip shop in Auckland has now closed (nooo!) but if you’re looking for something special, my new favourite is the Fresh Fish Market in Tauranga).

    6. Marmite

    Photo & Video Sharing by SmugMug

    You have probably heard tales of the legendary Marmite, which is a standard item in every New Zealand pantry and an absolute must eat in New Zealand. In fact it is so loved that when the Christchurch earthquake damaged the country’s lone Marmite factory in 2012, a national “Marmite shortage” was declared which resulted in a mild panic throughout the nation (call me a traitor, but I actually prefer Australia’s Vegemite anyway).

    So, what is it exactly? In very simple terms, it’s a yeast extract combined with a few different herbs and spices. The taste itself is really too hard to describe and is something you’ll just have to try yourself, but be warned, it’s a very acquired taste and if you didn’t grow up eating the stuff it probably won’t agree with you right away.

    If you’re a Marmite virgin, the best way to pop your cherry would be an extremely thin spread on toast, perhaps with a dash of butter. However if you’re a little more game you might like to try the legendary…

    7. Marmite & Chip Sandwich

    Photo & Video Sharing by SmugMug

    Traditionalists would say you need to use Salt and Vinegar chips for this, but I just say go with whatever you want (I like Kettle chips, personally). The recipe is simple enough – white bread, chips and a light spread of butter and Marmite. A common item in every Kiwi kid’s lunchbox.

    Get it at: Marmite will be found at every NZ supermarket. You should also note NZ Marmite is very different in flavour to the British Marmite.

    8. Tuatua

    Photo & Video Sharing by SmugMug

    A New Zealand delicacy! Tuatua are an indigenous New Zealand shellfish that you won’t find anywhere else in the world (as far as I know). While very similar in shape and size to pipis, tuatuas have a milder flavour than most shellfish and a softer, creamier texture as well. As New Zealand is an island country the vast amount of shoreline means we are spoiled with shellfish, and the native Maori are said to have enjoyed this one quite a bit back in the day. As I’m told, the tuatua was, and still is, one of the ultimate favourites (definitely one of mine as well!).

    Get it at: Tuatua can be collected for free during low tide at many sandy beaches around the country (ask a local about the good collection spots). However, the easiest way to get them is simply to buy them at a seafood shop, especially around Auckland where finding them on beaches is becoming increasingly difficult. A dozen will cost you around $8. If you’re cooking them yourself here’s a decent recipe to try.

    9. Hangi

    Photo & Video Sharing by SmugMug

    I still remember my first hāngi. I was around 7 years old, and was at school one morning watching a couple of guys dig a massive hole in the middle of our sports field. Later they lowered in some baskets of food, sitting them on top of hot rocks, and then filled the hole in burying our food beneath the ground. The food slowly cooked over the course of the day, and when lunchtime rolled around I was treated to my first hāngi meal: chicken, pork, potatoes, pumpkin and a few other veges, all cooked beneath the soccer field we used to play on each day. This is a traditional method of Maori cooking that dates back many generations, and is still used today in various Maori communities. If you’re looking to try traditional New Zealand food, this is about as close as it gets.

    Get it at: For hāngi food actually cooked in the ground, your best bet is to head to Rotorua; a city with a large Maori population and often considered New Zealand’s centre of Maori culture. The many Maori village tours will include traditionally cooked hāngi meals in their itinerary. Alternatively you can head to Kiwi Kai, a small kitchen in the city that offers hāngi meals, among other traditional Kiwi food and Maori food. If you’re in Auckland, try The Hāngi Shop.

    10. Steamed pudding

    Photo & Video Sharing by SmugMug

    I know absolutely nothing about this dish, other than the fact that Kiwis like it (somehow it has eluded me for the last 28 years). It was described to me as a “Christmas cake without the fruit” and it’s usually drenched in custard, milk, ice cream, or all three at once. Of course I didn’t know this when I tried it, so like an idiot (as you can see in the photo) I just ate it plain like a muffin or a cake. Still tasted fine to me!

    Get it at: Seems to be popular at the Maori/Pacific Island food stalls at the food markets. You can find microwave puddings at the supermarkets too.

    11. Fairy Bread

    Photo & Video Sharing by SmugMug

    Every kid’s birthday party in New Zealand will have three things: potato chips, cheerios and fairy bread. This party treat is made by sprinkling hundreds-and-thousands (you might better know them as ‘sprinkles’ or ‘jimmies’), over a slice of buttered bread and then cutting them into triangles. It’s also worth noting hundreds-and-thousands are not just any type of sprinkle; they refer specifically to the tiny rainbow-coloured spheres (as opposed to the many other shapes and colours available).

    As I’m told, the cool kids now use Nutella instead of butter; somewhat of a fairy bread on steroids. Stuff like this is pretty typical New Zealand food – making something out of nothing in the pantry, like the Marmite chip sandwich above. Delicious though!

    Get it at: I doubt you’ll find this for sale anywhere, so just pick up the ingredients at a supermarket and make them yourself.

    12. Mince & cheese pie

    Photo & Video Sharing by SmugMug

    Every time I eat a mince and cheese pie it instantly brings back memories of the rainy days at high school, rushing to the tuck shop (school canteen) at lunchtime to warm the senses with a steaming hot pie. And of course, like every Kiwi kid I have memories of hurriedly biting into the pastry and having the scorching mince leave a little burn on my lip as I impatiently gobbled it down.

    A good, classic mince and cheese will be served hot, filled with mince and gravy, have a generous layer of cheese under the crust and be finished with a nice, flaky pastry on top. Not all pies are created equal, but if you do find a good one it will leave you with a big fat smile on your face, guaranteed.

    Get it at: Any bakery in the country. If you want the best, try the mince & cheese from Greenland Bakery & Cafe in Auckland – the current title holder of New Zealand’s #1 pie (in photo).

    13. Whitebait fritter

    Photo & Video Sharing by SmugMug

    Whitebait is a delicacy in New Zealand and currently demands the highest price of any fish in the country. The preferred method of cooking is the whitebait fritter; a simple combination of eggs, flour and whitebait, fried like an omelette and then topped with lemon, salt and pepper. As you can see from the photo it’s a very tiny fish (as they’re not fully matured) and the the strong fishy flavour can be a little off-putting to some. However a perfectly cooked fritter with just the right amount of crisp will quickly turn you into a loyal fan.

    Get it at: During whitebait season (Aug – Sept) many cafes and restaurants will have whitebait fritters on the menu. You can also purchase fresh whitebait at seafood stores to cook your own (frozen whitebait is sometimes available in off-season but can be difficult to find). For the enthusiasts, head to the South Island’s west coast, a region famous for it’s incredible fritters.

    14. The Original Kiwi Dip

    Photo & Video Sharing by SmugMug

    The Original Kiwi Dip is a simple mixture of a Maggi Onion Soup packet and a can of reduced cream (usually a splash of vinegar, too). This dip is so loved throughout the country that both the soup and cream are marketed as official ingredients (as you’ll see in the photo above). Purists would argue that it must be enjoyed with Bluebird chips, another Kiwi favourite, however the dip tends to go well with pretty much anything.

    Get it at: Both ingredients are cheap and easy to find at supermarkets around the country (both have instructions on the side too).

    15. Chocolate Fish

    Photo & Video Sharing by SmugMug

    This chocolate covered, fish-shaped strawberry marshmallow is one of New Zealand’s most iconic pieces of confectionery. While obviously not seafood, it’s almost an icon of New Zealand food culture as we are an island and take much of our culinary influence from the ocean. Chocolate fish have always been a favourite Kiwi treat – as a kid you would sometimes get a sticker or a lollipop for being good, but receiving a chocolate fish was always the ultimate prize.

    Get it at: Any corner store, service station or supermarket.

    16. Feijoas

    Photo & Video Sharing by SmugMug

    Feijoas are actually native to South America but are commonly grown as a garden plant in New Zealand. Every summer you’ll find feijoas trees fruiting out of control, and it’s common for people to give bags full to their neighbours as a healthy tree produces far too much fruit for one family to consume alone.

    The taste and smell is extremely unique; somewhat tropical with a texture mildly similar to that of a kiwifruit. Works beautifully in juices and smoothies too.

    Get it at: The season runs from around March to June each year. Reasonably cheap from any fruit shop or supermarket.

    17. Peanut Slab

    Photo & Video Sharing by SmugMug

    Whittaker’s has been serving up chocolate to Kiwis for over a century now and are famous for their creamy, full flavoured milk chocolate. Over the years they’ve developed a wide range of different products, however their greatest creation would certainly have to be the original Whittaker’s Peanut Slab.

    Instantly recognisable from it’s bright gold wrapper and stumpy oblong shape, this block of roasted peanuts and Whittaker’s famous milk chocolate is a true Kiwi icon, and probably the most beloved chocolate bar in the country. Do try it.

    Get it at: Every supermarket, corner store and gas station will definitely have them.

    18. Bluff Oysters

    Photo & Video Sharing by SmugMug

    Down at the bottom of New Zealand lies the small town of Bluff, world famous for it’s rich, succulent oysters, which are often considered the best on the planet. If you’re an oyster freak like me you’ll go crazy for these things, however they don’t come cheap or easy; you’ll need to wait until they’re in season (March – August) and they’ll cost you around $25 a dozen.

    The taste is very different to the regular Pacific oysters; a much more intense, fishy, almost metallic flavour. I prefer them raw with just a dash of lemon, but they also fry beautifully with a light layer of flour and a sprinkle of salt and pepper.

    Get it at: Any seafood store and some supermarkets, only when in season (March – August).

    19. Griffin’s biscuits

    Photo & Video Sharing by SmugMug

    Griffin’s is a New Zealand biscuit company that has created several Kiwi favourites over the years. As a kid my biscuit of choice was always the strawberry filled Shrewsbury, however I would say either Mallowpuffs or Toffee Pops would take the title of New Zealand’s favourite. Their many other creations, such as Gingernuts, Squiggles and Macaroons all have their loyal followings as well. I guess you’ll just have to try them all.

    Get it at: Any NZ supermarket.

    20. New Zealand Mussels

    Photo & Video Sharing by SmugMug

    New Zealand green lipped mussels are native to New Zealand and can be found on restaurant menus all around the world. What better place to try them than in the motherland itself? Eating a steaming hot pot of mussels is a definitely one of New Zealand’s great pleasures – pulling apart fat juicy shellfish with mussel sauce dripping all over your hands and face and then wiping the bowl clean with a bowl of fries or a few slices of fresh bread. How can you not love that?

    Get it at: Cooking your own mussel pot is easy enough, and mussels are reasonably cheap from NZ supermarkets. If you’re in Auckland, the Belgian cafes do a mussel pot special each Monday. However, if you just look around you’ll find mussel pots on quite a few menus around the country.

    21. Pineapple Lumps

    Photo & Video Sharing by SmugMug

    Pineapple Lumps are chocolate coated, pineapple flavoured chews and were invented in the small town of Oamaru back in the 50’s. Since then they’ve become one of New Zealand’s favourite confectioneries, and because similar candies are difficult to find elsewhere they are often a popular gift to send to Kiwis expats overseas. Incredibly addictive.

    Get it at: Any NZ supermarket, corner store or service station. 

    22. Boil-up

    Photo & Video Sharing by SmugMug

    Boil-ups are particularly popular in Maori communities in NZ and are cooked by boiling different ingredients together like a soup, usually with a pork base. Popular ingredients are pumpkin, potatoes, pork and watercress. It’s also common to add Maori style dumplings, known as ‘doughboys’ into the mix. Perfect if you’re craving a bit of hearty, home cooked comfort food.

    Get it at: More of a home cooked meal, but you can buy yourself a nice little boil-up meal at Kiwi Kai in Rotorua (in photo). The Hangi Shop in Auckland also sells it, although I haven’t tried theirs (yet).

    23. Fried bread

    Photo & Video Sharing by SmugMug

    Fried bread is another treat very popular within Maori circles, in fact I’d never even heard of it before until I went down to Rotorua looking for it. Whether you partner them with a soup or stew or just lather them with butter and jam, these things will make your stomach very happy indeed. If you’re looking for a soup to try them with, I had mine with a seafood chowder and that was a near perfect combination.

    Get it at: Several stalls at Auckland’s night markets sell Pacific Island food. The fried bread in the photo is from Kiwi Kai’s stall at Rotorua’s Saturday morning market.

    24. Goody Goody Gum Drops ice cream

    Photo & Video Sharing by SmugMug

    Goody Goody Gum Drops is a NZ ice cream flavour, consisting of classic bubblegum flavoured ice cream mixed with small, gummy fruit lollies. It’s one of the iconic New Zealand desserts and will be sold everywhere. Every kid used to have a different way of eating it; some would spit the lollies out and eat them all at the end, some would spend most of the time sucking on the gumdrops from each mouthful and others would just gulp the whole thing down. Whatever your style, this flavour definitely makes dessert time a little bit more fun.

    Get it at: Any NZ supermarket.

    25. Rewena bread

    Photo & Video Sharing by SmugMug

    While tripping around the country putting this post together I stumbled upon this popular Maori bread, something I’d never heard of before. As the story goes, the Maori cooked up the receipe for rewena after the British introduced them to flour, and since then it has become a favourite among the Maori community in NZ. The bread is made with flour and potato, and follows a recipe similar to that of a sourdough. A nice, subtle difference to your regular loaf of white.

    Get it at: The bread in the photo is from Kiwi Kai in Rotorua (they also serve a great rewena burger). You’ll also find this at various food markets in Auckland.

    26. Spaghetti on toast

    Photo & Video Sharing by SmugMug

    The Italians would probably cringe at the sight of this – New Zealand’s hilarious attempt at merging two of their flagship foods. It would be sad if it wasn’t so delicious.

    Wattie’s spaghetti in tomato sauce is exactly what it sounds like – a can of spaghetti in tomato sauce. Kiwis grow up on this stuff, and one of the favourite ways to eat it is to turn it into a wannabe pizza: more commonly known as spaghetti on toast.

    Take a piece of toast, cover it with spaghetti, sprinkle it with cheese and then zap it under the grill. Seriously, I bet even the All Blacks eat this stuff.

    Get it at: All ingredients found at any NZ supermarket. 

    27. Kiwifruit

    Photo & Video Sharing by SmugMug

    Due to the name people often associate this fruit with New Zealand, even though it’s native to China and produced mostly by Italy. However you will find a lot of Kiwifruit down here in New Zealand and it’s cheap, too. Try the yellow/golden version for a milder, sweeter flavour.

    Get it at: Any supermarket or fruit shop.

    28. Lamb

    Photo & Video Sharing by SmugMug

    Yes, it’s true – we have a lot of sheep, and we eat a lot of them too.

    While lamb is enjoyed all over the world, you won’t find them much cheaper or fresher than you will down in New Zealand. Every eatery will have their own offerings of lamb chops, lamb steaks, lamb racks and lamb burgers, and you owe it to yourself to try all of them while you’re on our shores.

    Get it at: You’ll find lamb chop meals on menus all over the country. McDonald’s had a lamb burger but it was a flop so it’s gone now – you’ll need to go to a cafe to find one of those. Most cafes and restaurants will have some part of the lamb on their menu 🙂

    29. Afghans

    Photo & Video Sharing by SmugMug

    While the name might suggest a Middle Eastern origin, make no mistake – this cookie is 100% a Kiwi food original. A classic recipe afghan consists of a chocolate cookie baked with cornflakes mixed in, coated with chocolate icing and then finished off with half a walnut on top. It has quite a unique texture as it’s both crunchy and smooth, and despite all the chocolate it’s not actually as sweet as you might expect. Looking at the picture it might seem like just a regular chocolate cookie, but most Kiwis will easily be able to tell an afghan from the very first bite.

    Get it at: Every bakery in the country should sell them. If you can’t find them there, Griffin’s makes quite a decent afghan and you can buy a pack of these at any NZ supermarket.

    30. Manuka Honey

    Photo & Video Sharing by SmugMug

    Manuka honey is a New Zealand (and Aussie) produced honey, made with pollen from the manuka tree that grows throughout New Zealand. Apparently it does all sorts of magic things for your health, none of which I can vouch for.

    It has a much richer, heavier flavour than regular honey (quite a distinct smell too) and I’ve noticed that people love receiving this as a gift, probably because it’s so expensive outside NZ. If you’re looking for an edible souvenir for mama, this could be the one.

    Learn about what to look for in a good manuka honey here.

    Get it at: Any NZ supermarket.

    31. Anzac biscuits

    Anzac biscuits new zealand food

    ANZAC stands for Australian and New Zealand Army Corps, representative of our troops who fought during World War 1. The story that I know goes like this: wives and mothers used to send biscuits to their sons and husbands during the war, careful to use ingredients such as oats and golden syrup that wouldn’t spoil during the journey. After the war the biscuits were aptly named Anzac biscuits, and have been known as such ever since.

    Over the years the recipe has changed quite a bit, from a hard flat biscuit to a softer, chewier one, and these are still extremely popular throughout the country today.

    Get them at: Can be found at supermarkets, some bakeries, and are also sold for fundraising on Anzac Day (April 25). If you’d like to try baking them yourself, give this recipe a go. It’s not hard!

    32. L&P

    L&P New Zealand

    L&P is a drink that originated in the small New Zealand town of Paeroa. I don’t have the full story; all I know is there was something special about the mineral water there which eventually led to it being bottled and sold. Later it was mixed with lemon, and the drink Lemon & Paeroa was born.

    L&P is hugely iconic in New Zealand, similar to what Inca Kola is to Peru, and if the country were ever to officially name a national drink I’ve no doubt this would be the one. Make sure you try it!

    Get it at: Anywhere with a drinks fridge.

    33. Pavlova

    new zealand pavlova

    Pavlova is a New Zealand dessert best described as a big meringue cake topped with fresh fruit and cream. The inside is soft, like a marshmallow, and together with the crispy outside provides quite a special collision of different flavours and textures. Very sweet, so if you’re a dessert lover this will definitely rate highly on your list. A Kiwi icon!

    Get it at: Quite hard to find actually. You can buy undecorated ones from supermarkets but they’re not the greatest. If you have an oven handy, have a go at baking one yourself – it’s actually quite simple. A thank you to my Mum who baked the one in the photo especially for this post!

    Well, there it is; my answer to what people eat in New Zealand.

    What do you think? Have you been to New Zealand? Which of these did you try? If you’re a Kiwi, what did I miss? Let me know in the comments below!


    Coming to NZ? Half of what we say won’t make sense to you. Brush up on your Kiwi slang before you land at the Kiwi Slang Dictionary

  • Book Review: The Alchemist by Paulo Coelho

    Book Review: The Alchemist by Paulo Coelho

    “My heart is afraid that it will have to suffer,” the boy told the alchemist one night as they looked up at the moonless sky.

    “Tell your heart that the fear of suffering is worse than the suffering itself. And that no heart has ever suffered when it goes in search of its dreams.” (more…)

  • Manila Food Frenzy: The Best 29 Filipino Dishes You Need To Try!

    Manila Food Frenzy: The Best 29 Filipino Dishes You Need To Try!

    One of the first things I repeatedly heard from tourists in Manila is how much they dislike the food in The Philippines. After spending some time in the country I couldn’t have disagreed more. The food here is awesome!

    If you’re ever in The Philippines and looking to sample some local eats here’s a Filipino food list to get you started: 29 of the best Filipino dishes that I was wise enough to take a photo of and totally recommend.

    The best place to find them is in Manila, which is where I spent most of my time. The Manila foods scene is excellent and especially around Makati and Taguig, you’ll find some really great Manila cuisine and restaurants. But I also travelled up and down the country and I’m sure you can find many of these great Filipino dishes everywhere.

    1. Fresh Lumpia

    Fresh Lumpia

    The fresh version of lumpia is a bit like a spring roll crossed with a burrito. It’s big and fat and filled with meat, lettuce, carrots, peanuts, I think there was even some coconut in there. On the side there’s a sweet sauce, or you can opt for vinegar. It’s pretty awesome. Don’t forget to try the deep fried version – even more awesome.

    Get it at: The Legazpi Sunday market (corner of Legazpi St and Rufino St)

    2. Chicken Sotanghon

    Chicken Sotanghon philippines

    It kind of feels like The Philippines version of Grandma’s chicken soup. It’s got your chicken, shitake mushrooms, carrots, green onions, vermicelli noodles, who knows what else. All I know is that it’s super tasty and you need to try it.

    Get it at: Recipes at Greenbelt 3 (most other Filipino restaurants also serve it).

    3. Beef Mechado

    beef mechado

    I can’t decide if I like this. It’s prepared by taking a decent cut of beef, stuffing it with pork fat and then slow cooking it in a tomato sauce. Some potatoes and carrots are chucked in too. Sounds awesome right? I think it was a little too tomatoey for my liking, but it’ll grow on me.

    Get it at: Fely J’s in Greenbelt 5

    4. Paksiyo Baboy Bisaya (Pork and Banana Claypot)

    paksiyo baboy bisaya

    Shanks of pork simmered in a soy based sauce with bananas. It tastes as wild as it sounds. I freakin’ love it!

    Get it at: Fely J’s in Greenbelt 5

    5. Leche Flan

    leche flan

    While eating this I was trying to figure out how it was any different to creme caramel, because to me it tasted exactly the same. After some Googling I learned that the custard in this is thicker because they use condensed milk and more egg yolks. I couldn’t really taste the difference, which I guess means I’m a few years away from being a judge on Top Chef. Anyway, I had to include this on the list; it’s one of the country’s favourite desserts!

    Get it at: Any Filipino restaurant

    6. Chicharon

    chicharon

    Chicharon are like the Doritos of The Philippines.

    One of the most classic Filipino snacks, it’s eaten like corn chips or popcorn – the kind of thing you’ll open a big bag of while sitting down for a movie.

    Basically it’s deep fried pork skin, and aside from eating it on its own they also garnish various dishes with it. What’s it taste like? Well, kinda like a bag of very porky tasting cheetos. It’s a basic snack but definitely one of the country’s trademarks. The locals absolutely love it.

    Get it at: You will find it in most supermarkets and markets. 

    7. Lechon

    lechon philippines

    So, I used to think the Chinese made the best pork.

    That is until I tasted lechon. Damn! Them Filipinos know how to cook a pig. This juicy, crispy masterpiece is something I won’t even try to describe. I had the privilege of attending a local baptism and they served up this freakin’ life changing roasted pig, I could’ve eaten the whole thing! Apparently the best lechon is from Cebu city, which is going to be my first stop on my next trip to The Phils. If I had to choose the best Filipino food on this list – this one would be pretty close to taking the spot.

    Get it at: Sabroso Lechon, one of my favourites (corner of E Rodriguez Ave and Tomas Morato)

    8. Bibingka

    bibingka philippines

    This is a type of cake made with coconut milk and baked in a banana leaf. I guess the idea is it’s supposed to end up tasting like coconut and banana, which it kinda does. You’re supposed to eat it hot, but not before lathering it with butter and coconut. The texture really reminded of a crumpet, especially with the melted butter seeping through it. I’m a fan.

    Get it at: A franchise called Bibingkinitan, or various street stalls around the city

    9. Kare Kare

    kare kare philippines

    This is a classic Filipino stew, consisting of oxtail, tripe, eggplant and Chinese veges. It has a strong peanut flavour and is served with shrimp paste on the side. It’s one of the flagship dishes here in The Philippines, but I can’t say I particularly enjoyed it. An acquired taste, perhaps.

    Get it at: Most Filipino restaurants

    10. Lomi

    lomi king philippines

    A classic dish from the Batangas area, this consists of flat egg noodles cooked in a very thick, eggy sauce. There’s also a whole bunch of other stuff in it depending on what variation you order (pork, seafood, chicken). It’s so thick that it’s almost like a cross between a noodle soup and a stew. On the side it’s complemented with a sauce of freshly diced onions, chili, calamansi and soy sauce. Put the two together and BAM! It’s seriously magic.

    Get it at: Lomi King in Lipa, Batangas

    11. Chami

    Chami Philippines

    After eating the Lomi I found out it had a little brother known as Chami. This is the dry version of the dish, and obviously I had to try it and see what it’s all about. It’s not really too different from a noodle stir fry, but it comes with a tasty dipping sauce/soup that I don’t remember the name of. Anyway, if we’re choosing between Lomi and Chami I’m taking Lomi any day of the week.

    Get it at: Lomi King in Lipa, Batangas

    12. Kilawin Na Tanigue

    kilawin filipino food

    Kilawin is a dish where raw fish is marinaded in vinegar and lemon/lime juice. The high level of acidity cooks the fish and it’s flavoured with a bunch of other stuff like chili, capsicum, spring onion and tomato. You’re probably thinking it sounds very similar to ceviche or the Fijian kokoda, but the taste is rather different. I found ceviche to be very fishy, kokoda to be very spicy and kinilaw to be very sour. All catered for local tastebuds I guess.

    Get it at: Most Filipino restaurants

    13. Pancit Bihon Guisado

    pancit bihon guisado filipino dish

    Bihon Guisado is a perfect example of great tasting, unpretentious Filipino food – some scallions, cabbage, celery, carrots, chicken and vermicelli tossed in soy sauce and topped with calamansi juice. Fast, cheap and awesome. Love it.

    Get it at: Most Filipino restaurants

    14. Crispy Pata

    crispy pata filipino dish

    One thing you’ll notice when eating around The Philippines is that they’re completely obsessed with their pork, which is probably why they cook it so well. Enter the crispy pata – a pork leg/knuckle deep fried to perfection and then sided with chili, calamansi and a variety of dipping sauces. I ate it a couple of times, one homemade one and one from a restaurant. Needless to say the homemade one was mouth watering but the restaurant cooked one wasn’t too bad either. If you’re a pork man it might just change your life.

    Get it at: Most Filipino restaurants. The crispy pata in the picture is from Kabila Museum Cafe at Ayala Museum, but I think it’s a little expensive for what you get. Manila food can be expensive in some areas – not that it isn’t worth it, but just make sure you’re aware!

    15. Sinigang

    sinigang filipino food

    If you’re a fan of sour soups like Thailand’s tom yum or Hong Kong’s hot and sour soup then sinigang is totally going to rock your world. I had one of these for breakfast almost every day during my month on Boracay. It’s a tamarind based soup with a whole bunch of other goodies in it, most commonly tomatoes, green beans, spinach, green mango and various other possibilities. I tried quite a few variations (pork and shrimp are the most popular), but I’d say the classic pork is probably my favourite. I can’t believe it’s taken me 27 years to try it.

    Get it at: Most Filipino kitchens. If you’re a fan go and try the Corned Beef Sinigang at Sentro in Greenbelt 3.

    16. Kaldereta

    kaldereta filipino food

    I’m always a sucker for hearty meaty stews so when I met my first Kaldereta we really got along. It’s a basic dish made by stewing cuts of meat in a tomato/liver sauce until tender, with a few carrots, potatoes and capsicums thrown in too. I’ve seen it with most meats but the lamb was easily my favourite.

    Get it at: Most Filipino kitchens. Try the lamb kaldereta at Sentro in Greenbelt 3.

    17. Adobo

    adobo filipino dish

    If you’re after Philippines traditional food, this dish might be them most traditional of them all.

    I saw this dish on pretty much every Filipino menu I set eyes on. It’s a basic meat dish which is simmered in a marinade of oil, soy sauce, vinegar and garlic, and sometimes later pan fried to give it a crispy surface.

    Like most dishes here they might often add a variation of other veges (onions, potatoes, capsicum). If you’re a budget traveler, this dish is always a tummy pleaser and usually very easy on the wallet.

    Get it at: Any Filipino kitchen or jolly jeep.

    18. Ginataang Papaya

    ginataang papaya filipino dish

    Tried this bad boy at a jolly jeep and was so pleasantly surprised. Green papaya shaved into thin slices and cooked in coconut milk and pork bits. Who knew it could taste so good?

    Get it at: You’ll have to look around the jolly jeeps and Filipino restaurants, I’m really not sure how popular it is!

    19. Bacolod Chicken

    bacolod chicken filipino dish

    Due to my fast increasing age and waistline I’ve been trying to eat grilled chicken wherever possible and turn a blind eye to KFC and Chicken McNuggets. My solidarity to this goal can waver rather easily but this wasn’t a problem in the Philippines thanks to the amazing bacolod chicken. I have no idea how they cook it, but from peeking into the kitchen I can tell you they employ a charcoal grill and probably brush some special sauce onto it, who knows. All I know is it tastes amazing. Don’t forget the soy sauce/calamansi/chili combo sauce on the side either.

    Get it at: My favourite is Bacolod Express, but there’s various chains around the city.

    20. Balut

    filipino dish balut

    After hearing about the infamous Balut over and over again I just had to try it. For those who have never heard of it, balut is a street food delicacy in the Philippines; a fertilised duck egg, boiled and eaten once the embryo is half developed. From Wikipedia:

    “In the Philippines, the ideal balut is 17 days old, at which point it is said to be ‘balut sa puti’ (“wrapped in white”). The chick inside is not old enough to show its beak, feathers or claws, and the bones are undeveloped.”

    If you’re looking for Filipino delicacies, this is the crowned jewel.

    When the guy handed it to me I nearly dropped it, it was scorching hot!

    After cracking the shell I saw a small amount of juice which you’re supposed to drink, so I did, which tasted very eggy. After that I just peeled it like a normal boiled egg and ate it. There were a few funny textures but nothing overly weird; in all honesty, it just tasted like a boiled egg. Talk about an anti climax. If you’re ever in The Philippines you should definitely try it, it doesn’t taste bad at all, and is apparently great for you.

    Get it at: At night you will hear the sellers riding around the streets on bikes screaming “Baluuuuuut!”

    21. Tablea Tsokolate

    tablea tsokolate filipino dish

    As the story goes, the Spanish colonists began this tradition of growing cocoa in The Philippines as the tropical weather was perfect for it. This tradition has continued until today with growers harvesting, drying, roasting and then grinding  fresh cocoa beans into tablea or ‘tablets’. This is used in various Filipino delicacies, including tablea tsokolate – a local style hot chocolate.

    The tablea is supposed to have a few minor differences to regular cocoa, which I did manage to find out but I’ve since forgotten. If you know, please share!

    Get it at: I got one roll at SM department store and another at the bus stop in Lipa.

    22. Bulalo

    bulalo filipino dish

    I fell in love with Bulalo the moment it touched my lips. To cook this they get a nice, fat beef shank, let it boil in a broth until all the bone marrow and fat has melted into the soup and then throw some veges in to top it all of (usually cabbage and corn). The soup is so beefy and flavoursome, probably because they leave it simmering in those massive pots all day (see pic). My mouth is actually watering furiously as I type this. It is seriously delicious.

    Get it at: Al Goto King Special Bulalo in Batangas City. It’s not as common in Manila but quite a few Filipino kitchens will have it.

    23. Buko Pie

    buko pie filipino dish

    If you travel anywhere by bus in The Philippines you will surely experience the street vendors jumping on board screaming “Buko pie Buko pie!!” After seeing a number of people buy these I came to the conclusion that this Buko pie thing must be a pretty big deal so I had to try one. This blog post on Our Awesome Planet laid out the best brands and eventually I got my hands on a Colette’s pie.

    It’s awesome, for real. I did not expect it to be that good. The texture reminded me of a really good apple pie, it had a nice firm pastry with a lovely crust, and it had that ‘freshly baked’ smell, the kind that weakens your knees as you walk past a bakery in the morning. Partner it with a scoop of vanilla ice cream and you’ll probably end up packing a suitcase of them to take home with you.

    So, what exactly is a buko pie? Just a well baked pie packed with young slivers of fresh coconut and condensed milk. How they make it taste so good, I have no idea.

    Get it at: I think it’s easiest to find the famous brands at their stores in Laguna, but you can find them at bus stops and markets too.

    24. Turon

    Photo & Video Sharing by SmugMug

    Take a few slices of banana, wrap it in a spring roll wrapper coated in brown sugar and then deep fry it. Sound delicious? That’s a turon! And yes, it tastes as good as it sounds.

    Get it at: I bought mine at a bus stop in Lipa. Also got served to me at a resort in Quezon.

    25. Ilocos Empanada

    ilocos empanada filipino dish

    Many countries have their own spin on empanadas, so it was no surprise their was a Filipino empanada too!

    This is a snack native to the Ilocos region, hence the name, but I seemed to keep running into it in the various Manila markets. The reason it kept catching my eye was the orange dough; it’s almost a neon orange before it’s cooked. However that’s not the only difference to standard empanadas.

    Inside it’s packed with sausage meat, green papaya and a whole egg, and you’ll notice from the photos that the shell is unusually thin. Once it’s deep fried and ready to eat you need to do what you do with everything else in The Philippines – splash it with vinegar!

    Get it at: Cucina Andare market outside Glorietta 3 (Fri, Sat, Sun), food market at Mall of Asia (Fri, Sat, Sun) or the Legazpi Sunday Market (cnr Rufino/Legzpi St).

    26. Longaniza

    longaniza filipino dish

    Longanisa is a type of sausage that they often eat for breakfast here. Every region of The Philippines has their own specialty, so depending on which one you choose you might get sweet, sour, garlicky, fish, chicken, beef etc. Although almost every time I ate it in Manila it was sweet and garlicky.

    Get it at: Any supermarket, food market or Filipino restaurant during breakfast.

    27. Banana Ketchup

    banana ketchup filipino dish

    Not your regular ketchup. It’s made from mashed bananas and you’ll definitely taste the subtle difference (less tang, more sweet). During WW2 there was a shortage of tomatoes and the ketchup makers decided bananas were the next best thing. Judging by it’s popularity today it seems the tomato never really made a comeback – banana ketchup is now a centrepiece of Philippines food culture.

    Get it at: Any supermarket. Restaurants will likely have it if you ask for it.

    28. Isaw

    isaw filipino dish

    Another popular street food in The Philippines, this is a grilled skewer of chicken or pig intestines. Splash some vinegar over it and away you go. I’m a fan of the flavour but the texture, not so much (it’s a bit powdery). It’s so popular here that you have to try it at least once.

    Get it at: Cucina Andare market outside Glorietta 3 (Fri, Sat, Sun), food market at Mall of Asia (Fri, Sat, Sun) or the Legazpi Sunday Market (cnr Rufino/Legzpi St).

    29. Bangus

    bangus filipino dish

    Bangus (milkfish) is the country’s national fish and I ate a lot of it!

    It’s a classic Filipino breakfast, usually paired with a side of garlic rice and egg. Before trying it I wasn’t sold on the idea of fried fish for breakfast (I’m more of a fresh fruits kinda guy), but after the first time it quickly became my breakfast of choice. With the trademark drizzle of vinegar it’s quite the kickstart to your day.

    Get it at: Any Filipino restaurant during breakfast.

    Heading to Manila and…

    Looking for tours and activities at an affordable price? I use GetYourGuide! Always great deals and local perks.

    For travel insurance, I always use World Nomads – get protected for just a few dollars a day!

    Somewhere to stay? Booking.com gives you the biggest selection and the best rates.

    Have fun and get fat! 😀

    B

    Eat like crazy in Manila! This city is an undercover hotspot for foodies, with a ton of trendy restaurants opening up all over town. Filipino food, if done right, is magnificent. Here are 29 dishes to keep on your list as you eat through the city.
  • 10 Reasons Why The Philippines Should Be Your First Stop In Asia

    10 Reasons Why The Philippines Should Be Your First Stop In Asia

    The Philippines was never very high on my travel bucket list. No one really talked about the place, and it seemed to have a reputation for being a rather dangerous place to travel through. Besides, all travellers knew that Thailand had all the best beaches, China had all the work opportunities and Vietnam had all the best food. Why bother going to the Philippines?

    Then finally in March this year I got the chance to visit. What I discovered was a country inhabited by the friendliest people on Earth, littered with unimaginable beaches and an infectious family like culture that made you never want to leave. Some of the most beautiful places I’ve seen in Asia were hidden in faraway corners of the country, still unheard of by much of the backpacker crowd. What I still can’t figure out is how so many travellers in Asia pass on this country full of beautiful people, fresh tropical fruit, picturesque islands and untouched natural beauty. Safe, cheap, beautiful; I ended up staying for 6 months! It’s easily become my new favourite spot in Asicoa.

    Need more proof? Here’s 10 reasons why you need to skip Thailand, Vietnam, Cambodia, Indonesia, Laos and head straight to the Philippines on your next trip to Asia.

    1. The amazing people

    friendly people philippines

    It’s amazing how friendly the people are here. How the place got a reputation for being dangerous, I have no idea. There was one time where I ran out of cash in El Nido, and since the place had no ATM’s I wasn’t able to get cash to pay for the tour I had been on that day. I was so embarrassed but when I finally told the guy, he just laughed and said “Ahhh no problem, you can pay anytime! I just hope you enjoyed the tour!” A perfect example of the generous, welcoming spirit of the Filipino people.

    They’re also so polite! I’ve never been called Sir so many times in my life. As soon as you walk into 7 Eleven – “Good afternoon Sir!”

    Then I ask her to help me work the drink machine, “Yes Sir, no problem Sir!”

    Then when I go to pay, “Thank you Sir, is there anything else you need Sir?”

    Then when I leave, “Thank you Sir, come again Sir!”

    Then as I walk through the door the security guard holds it open and says, “Thank you for coming Sir, have a good day Sir!”

    This isn’t a one off, it happens like this every single time! I thought the Japanese were polite but this was a whole new level. They don’t try to sell me anything, they don’t try and give me a taxi ride, they don’t try to ask for money; they’re just polite for the sake of being polite, and that’s something that you don’t see around the world too often these days. Filipino’s certainly know how to make you feel welcome.


    2. The incredible food

    Food in the Philippines

    What I love about Filipino food is that it’s so different.

    I love eating new things and that’s hard to do in many other parts of Asia. I’d eaten a whole lot of Chinese food before I went to China, I’d had quite a few gallons of Tom Yum soup before I went to Thailand, I’d eaten my fair share of curry and roti before I went to India and I knew all about udon noodles before I went to Japan. Yet before this year I had never seen or even heard of kalderetta, adobo, sinigang, bulalo, turon, lumpia, I could go on forever.

    Some of the food didn’t agree with me completely but there were some things, their soups especially, that were just so different and delicious. There really is a lot of stuff that will be like nothing you’ve ever tasted before. Damn, I’m craving a sinigang right now!


    3. You don’t get scammed or hustled

    Mall of Asia Philippines
    No one bothers you when walking down the street

    To me, one of the most unattractive things about Asia is the blatant scamming. If you’ve ever been to the markets in China or caught a tuk tuk in Thailand you’ll know what I’m talking about. Hustling is even worse – take a walk through Phuket one night and count how many times someone tries to sell you something.

    100 times only? Guess it was a quiet night.

    During my 6 months in the Philippines I got scammed once. Other than that, it was so refreshing not having to watch my back every second of the day. A couple of times I even tested the taxi drivers, telling them I had no idea how to get back to my apartment when I actually knew the way perfectly. Did they drive me around the block and run up the meter? Nope.

    Maybe the country’s strong religious roots has something to do with it, but whatever it is you’ll definitely appreciate it.


    4. It’s off the beaten track

    Tourism desk in the Philippines

    I still struggle to understand how so many attractions in the Philippines continue to fly under the radar.

    How is it that Bali gets 3 million visitors a year and Boracay barely manages to get a million?

    How is it that I literally had the entire resort on Cagbalete Island to myself?

    The Philippines only had 4 million tourists in 2012, compared to 20+ million in Thailand. Anyway, whatever the reason is let’s just hope it stays that way. Part of the magic in exploring the spotless white sand beaches of the Philippines is that you quite often have them all to yourself.


    5. Everyone speaks English!

    I was surprised to find out the language of instruction in schools here is actually English!

    Finding your way around a language barrier can be half the fun in travelling, but it’s also surprising how different your travel experience becomes when you can actually communicate with everyone.

    The level of English here is very high, definitely better than any other country I’ve visited in Asia (except for Singapore). It really makes travelling through the country a lot easier, and it’ll allow you to interact with the locals who will be able to recommend things and places you would have never otherwise heard of.


    6. The fantastic shopping

    SM Manila Philippines

    For me, shopping in Manila would be the best I’ve ever seen.

    Bangkok was pretty good, Shanghai was also good, even Hong Kong is not bad.

    Manila beats all of them.

    Out of the 20 biggest shopping malls in the world, 5 of them are in Manila. That’s more than any other city. On top of that all the shop assistants speak great English, stuff is not overpriced (cough, Shanghai), the local brands are surprisingly good quality and the free WIFI actually works! No stupid codes, no getting a password from the information desk; just connect and go.

    Their malls are not just big, boring boxes either. The maze of Greenbelt malls is modern, classy and full of character. Spend a whole day walking through here and you’ll probably only manage to see half of it.


    7. Unbelievable beaches

    Cagbalete Island Philippines

    These days its pretty hard to find a picture perfect beach that isn’t overcrowded, overdeveloped or overhyped. Unless of course you’re in the Philippines, where there are just too many to name.

    In a country made up of over 7,000 islands beautiful beaches are bound to be everywhere. And they are! Try Googling Amanpulo, Caramoan, White Beach Boracay, Coron, Camiguin, Anguib Beach, Cagbalete Island, Caramines Sur, Nacpan Beach, Bolobadiangan Island, Subic Beach, Buluan Island; there’s just too many to list.

    Most of these I haven’t even seen yet, but I’ll definitely be back to do it soon. What’s even crazier is that I’m guessing you’ve never even heard of these places, meaning no one else is going to be there except you.


    8. The pretty faces

    Megan Young, Miss World 2013 Philippines
    Miss World 2013. Photo credit: Paul Cortes Photography

    While I was living in Manila, the Traveler’s Digest released an article ranking Quezon City as one of the “Top 10 cities with the world’s best looking men”.

    The article caused a bit of a Facebook sharing frenzy amongst the locals, and the humble celebrations had barely ended when the Philippines won Miss World 2013 a few months later. In fact, it appears the Philippines has been cleaning up at beauty pageants for quite some time now.

    I’m just going to chime in and go on record saying that the Philippines really is a country of very pretty people 🙂


    9. It’s cheap!

    Glorietta market Philippines

    Budget travellers will definitely have no problem making their way through here. Taxi rides around town cost $3, a decent meal costs $1.50 and a bucket of beers will barely run you $5. Catching the latest movie at the cinema will cost you $6 and you can rent yourself a studio apartment for around $15 a day! Not to mention the country’s budget airlines (Cebu Pacific, PAL Express) offer some of the cheapest fares in Asia.


    10. It’s growing, fast

    Fort Bonifacio Philippines
    Fort Bonifacio in Manila

    I remember the first time I visited Fort Bonifacio and felt like I was walking through an upgraded version of Singapore. Skyscrapers were going up in all directions, it was incredibly clean, all the international eateries were around, there were Deutsche Bank and HP and IBM offices towering above me, the roads were wide and uncrowded, there were fancy public parks and boutique shopping streets; there I was thinking “I thought the Philippines was 3rd world?” The place looked like New Zealand 20 years into the future! I cannot wait to see what this place looks like in a few years time.

    I’ll say it one more time. Go to the Philippines NOW. Asia’s best kept secret may not stay a secret for too much longer.

    Looking for more Philippines content? Make sure you check out my trip to El Nido, my month living on Boracay, and my Manila Accommodation guide. It’s more fun in the Philippines!

    Heading to Asia. Be sure to add the Philippines to your "to-do" list. Amazing beaches, delicious food, off the beaten track, the friendliest people. What more could you want?