Category: Popular

  • Is This Finally The End Of Couchsurfing? (And What’s Next?)

    Is This Finally The End Of Couchsurfing? (And What’s Next?)

    If you’re a part of the Couchsurfing community, you’ve no doubt heard the news.

    And you’ve certainly seen the outrage.

    If you log in to your Couchsurfing account today, this is the screen you will see:

    What’s more, everyone has been locked out of their accounts until they pay the monthly fee. All our friends lists, messages, groups, photos, profiles and references are now locked behind this paywall.

    Many of us have seen this coming, but after nearly two decades of helping people travel the world for free, it’s official. Couchsurfing is no longer free.

    To be 1,000% clear – I am not against paying fees, and I’m not at all against paying a fee for Couchsurfing.

    I prefer it actually. I already pay monthly subscriptions for Spotify, Headspace, multiple blogging tools, multiple WordPress plugins, Audible, a couple of premium newsletters – quite a lot of stuff, actually. I prefer it this way, because when you pay for things like these, they’re usually way better than the free stuff.

    What I do care about is who I pay this money to, and how they use it.

    Over the last few years there have been many “incidents” between Couchsurfing HQ and the community, and “Couchsurfing is dead” was chanted by many longtime members. But most of us let it slide. We tolerated one more stunt, because we love this community that much.

    However, I think this one is finally going to nail the coffin shut.

    Again – it’s not about the $3.

    None of us care about the $3.

    In the words of The Count Of Monte Cristo: There’s a history here that you don’t understand!

    So let me rewind and recount this Couchsurfing story from the beginning, since it’s quite a long and dirty one.

    Couchsurfing and the many “Incidents”: From 1999 until today

    The idea was born in 1999 by an American programmer named Casey Fenton. When travelling to Iceland he found it too expensive to book a hotel, so he randomly emailed 1,500 University of Iceland students from a hacked email list and asked for a couch to crash on.

    He got about 100 offers, and this sparked the idea of creating a website.

    In 2003 he founded Couchsurfing as a non-profit, and officially launched the site in 2004.

    Couchsurfing took over the travelsphere and became one of the most popular travel sites in the world. But rather than blooming because it was such a beautiful site (it wasn’t) it bloomed because of what it stood for.

    Casey Fenton regularly said the goal of Couchsurfing was to create a better world, one couch at a time. As many of you have experienced, the backpacking culture is not guided by money, but by trust and generosity and openness, so the Couchsurfing mission resonated. Everyone loved Couchsurfing.

    There was no money in it, obviously, so from 2006 to 2011, the site was built, coded and moderated entirely by volunteers. The events and groups were also moderated entirely by volunteers. Volunteers from every continent donated tens of thousands of hours of work to keep the site operational and the community growing.

    Many consider this period the golden era of Couchsurfing. Nobody made any money from the site, it was funded purely by donations and 100% a labour of love by travellers around the world. “Hosting” and “surfing” quickly became dictionary terms in the backpacker community. And the community was rich. Any time you were in a new city you could just post in the groups, who’s around this afternoon? And instantly you’d have awesome people to hang out and explore with. I started travelling full time in 2011, and was neck deep in the backpacking community. Couchsurfing was central to the culture. It was everywhere.

    Even in my hometown I used it – after a surf one morning, I felt like hanging around to enjoy the beach. Logged onto Couchsurfing and what do you know? There’s a Couchsurfing event going on. I found them and spent all day lounging on the beach chatting. For those years, the site thrived.

    In May 2011 came the first “incident” that started to split the community. Couchsurfing abandoned its non-profit status and changed to a for-profit corporation. Many of the volunteers that had dedicated much of their lives to the site protested. Why did they need to be for-profit? Where was the profit going to come from?

    But this was just a precursor to the second “incident” that happened four months later. In August 2011 the founders accepted $8 million dollars in a Series A funding round. One year later they took an additional $15 million in a Series B. The beloved site that had operated solely on volunteer hours and donations for eight years raised $23 million of venture capital in 12 months.

    I guess from here, it’s not too hard to guess how the story goes. Probably because we’ve seen this story a thousand times before. When venture capitalists put $23 million into something, they expect to get much more than $23 million back out.

    (according to former CEO Jennifer Billock’s Linkedin, the company was sold again to a private equity firm in 2015, so technically we don’t even know who the owners are right now):
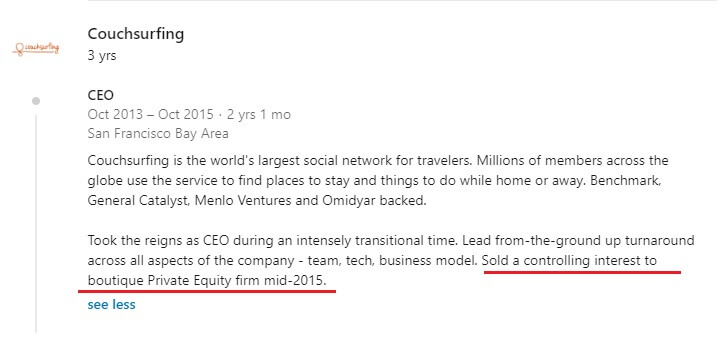
    Almost the entire community was against this (except maybe the founders, and the new owners) but Couchsurfing assured the community nothing would change.

    “We are confident that we will find a way to generate money that doesn’t hinder the amazing experiences that CouchSurfers have,” they wrote on their blog.

    Yet many things started to change.

    The third “incident” was a big one, but inevitable. Couchsurfing started hiring and staffed their own team to rebuild the site, moderate the forums and events and groups, and basically told the volunteers that had dedicated the last six years of their lives to the site they weren’t needed anymore.

    Not to mention, those volunteers that had worked endless hours on the site for years got none of that big payday money. Couchsurfing was now a for-profit company, and this company now owned all the code and the site, and all the profit being made from it went into the pockets of the new owners and staff. The people who actually built the site got nothing.

    This was doubly damaging because the new staff at Couchsurfing weren’t Couchsurfers, so they had no idea how the community actually worked. After they completely rebuilt the site they emailed everyone saying “Yay, look how great the new site looks!”

    And yes it probably looked nicer, but it also damaged the community in a way that wouldn’t become clear until years later. For years Couchsurfing volunteers had built and nurtured “city groups”, with regular meetups and many years of friendships. The site was redesigned and overnight those communities were gone. To give you a comparison, imagine if Facebook rehauled their site, and overnight every single Facebook Group disappeared. That’s exactly how it was with the new Couchsurfing. In their place they built generic city pages with events and forums.

    While trying to turn it into a fancy Silicon Valley website, they destroyed the communities people had spent years building that made Couchsurfing Couchsurfing.

    Those were the foundations of Couchsurfing and looking back now at the big picture, I think this was where the downward spiral really began. Even when they turned for-profit and ads started going up everywhere, the community still survived. But once they imploded the original communities that the site had been built on, it meant the membership started to disband and finally give up on site (or become much less active), and newer, less loyal members started to make up the core membership. As we’d start to see, the site is nothing without a critical mass of loyal members.

    The fourth “incident” was when Couchsurfing tried to start charging fees to surf. This was where they really crossed the line and one of the few times I saw massive pushback from the membership.

    This was a notification I got in 2016 when a host confirmed I could stay with them:

    Again – I have no issue with paying a small fee like this.

    Hosts invest a lot of time and money into hosting. Hosts often pick surfers up from train stations or bus stops, feed them, drive them around, do laundry, provide water and internet and power and linens. I’ve done my share of hosting. It cost money. Always.

    So the fee wasn’t the problem. The problem was hosts were going to put all this effort into hosting, and then the fee wasn’t even going to the host!

    Even then, most hosts would never want to receive a fee anyway. Couchsurfing resonated with us because there was no money involved. If people wanted to pay to stay somewhere, they could go to a hostel. Couchsurfing was supposed to be different.

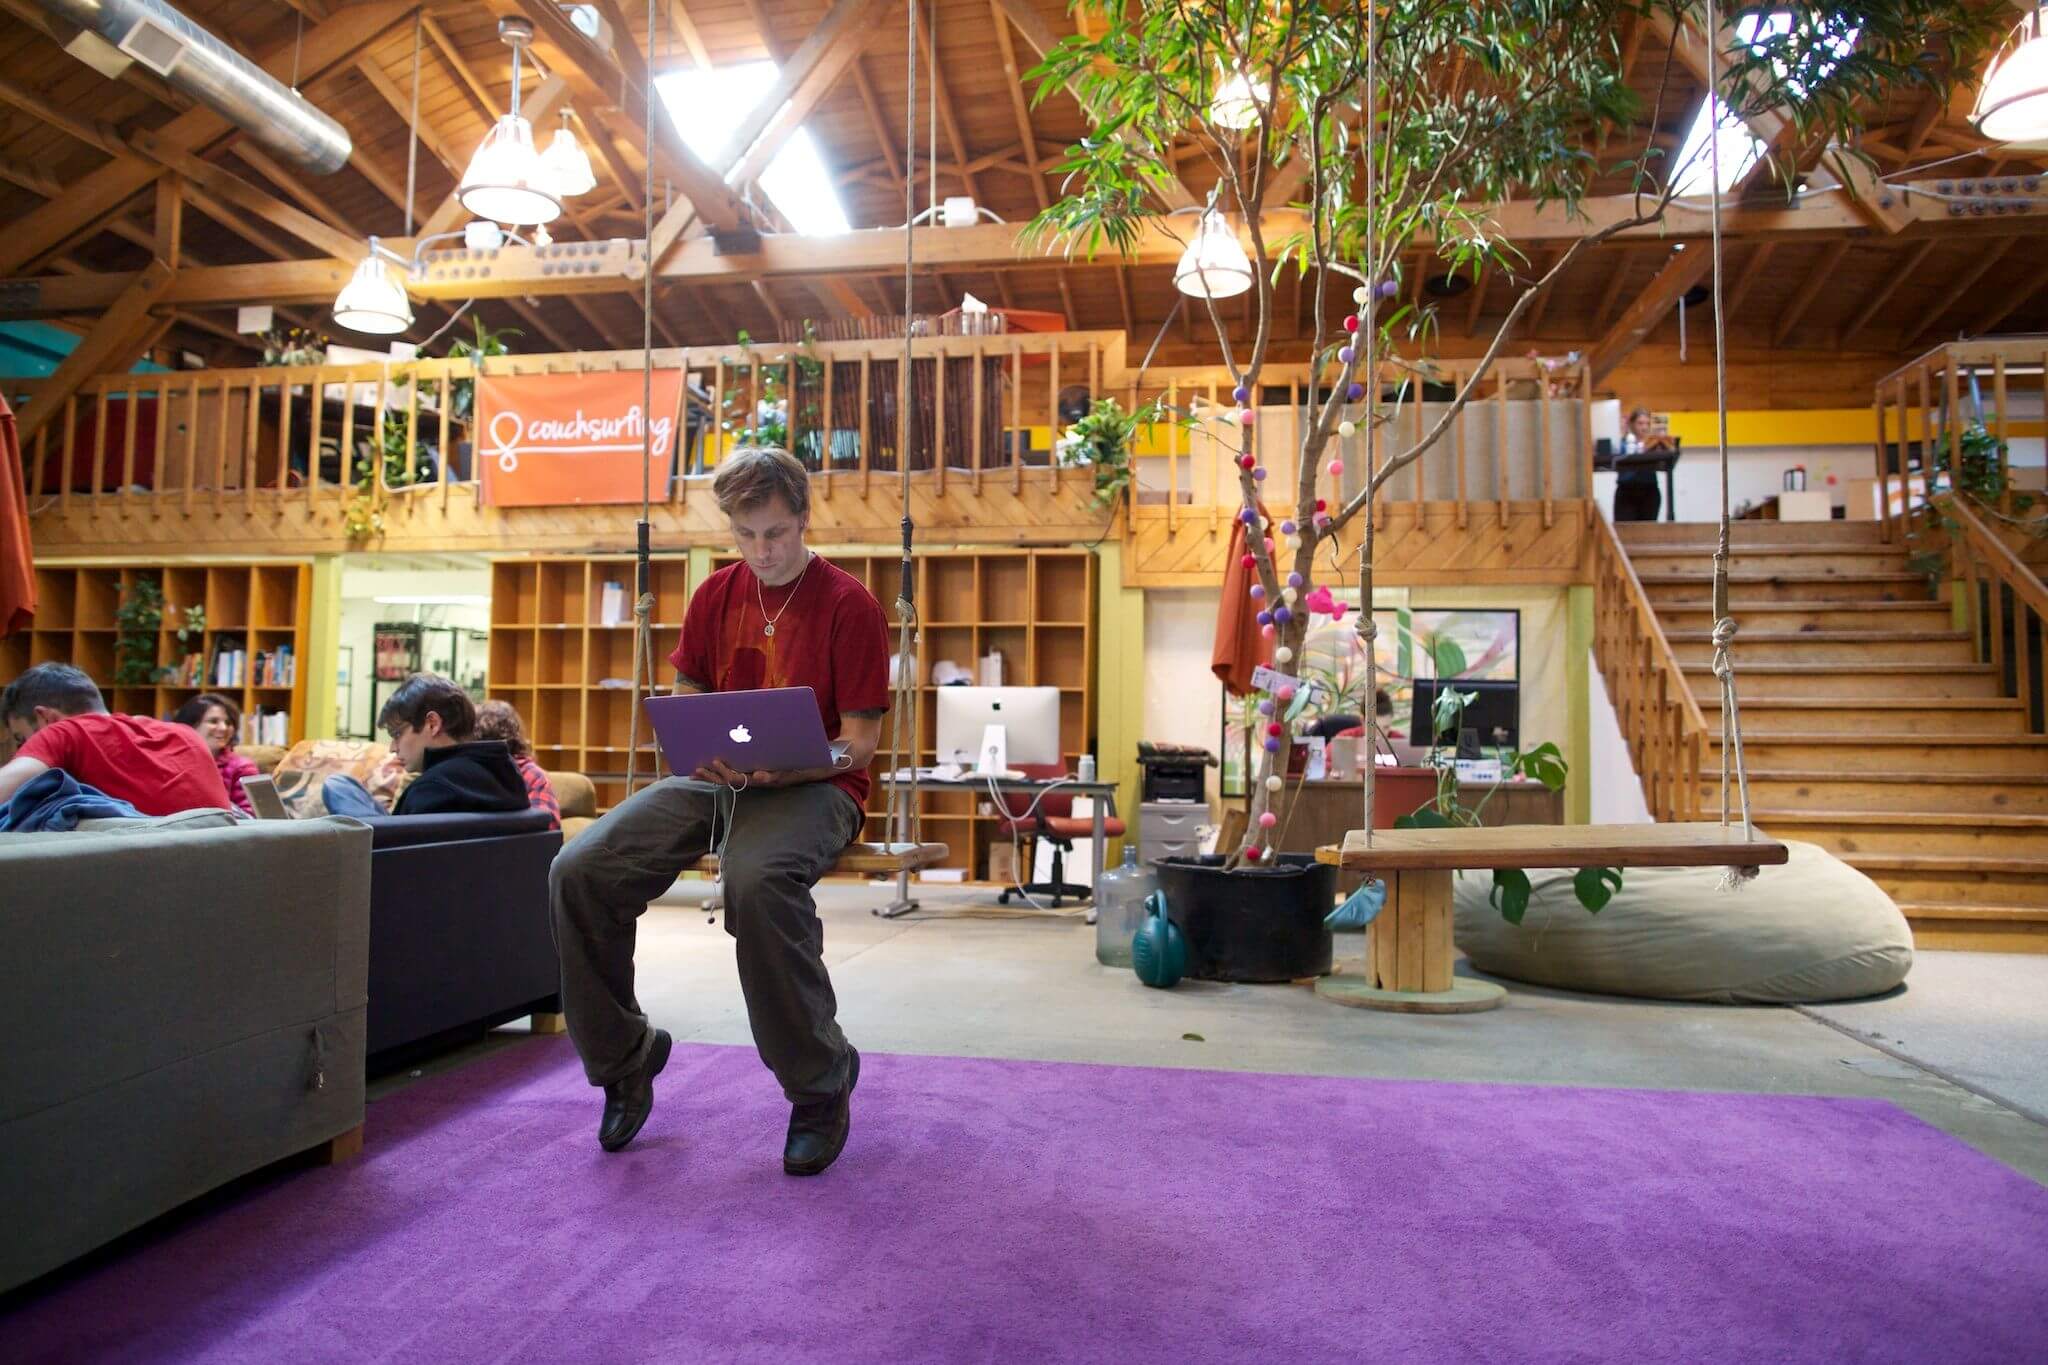
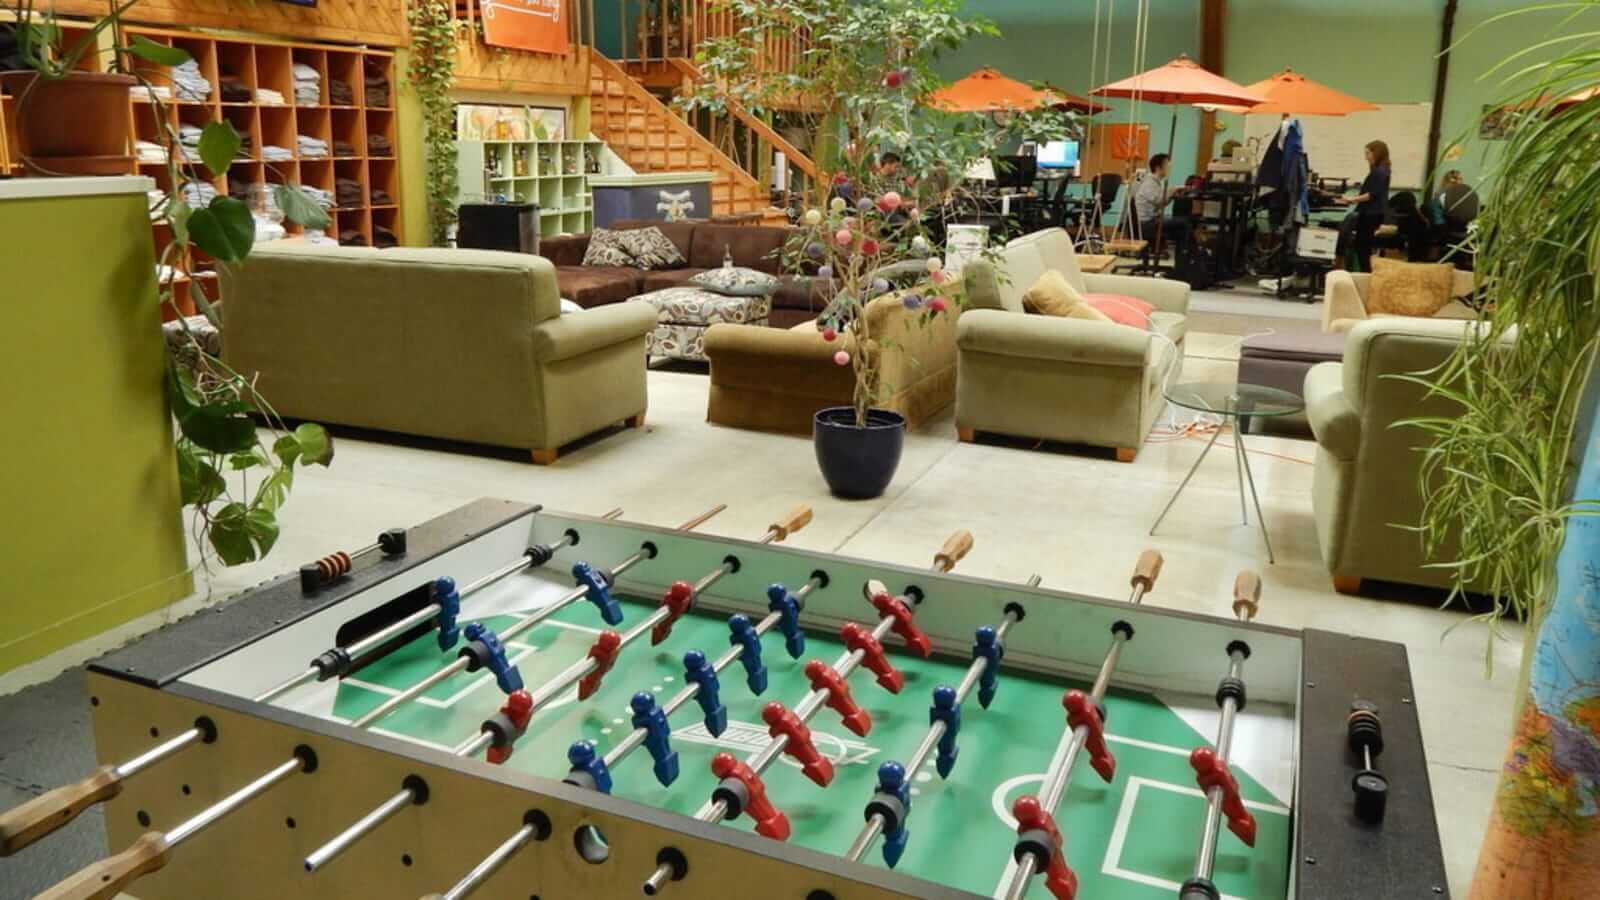
    To make this a double insult, we all knew exactly where those fees were going. This was 2016 and Couchsurfing were leasing some fancy new offices over in San Francisco:
    Couchsurfing offices

    We were all sleeping on floors and couches while these guys were playing nice in Silicon Valley. But that still wasn’t the worst part.

    What made the move triply bad was Couchsurfing had promised they would never do this. After taking their VC millions in 2011, they published a blog post that said (I quote):

    “CouchSurfing will never make you pay to host and surf. It’s against our vision to exclude anyone from having inspiring experiences for financial reasons, and that’s not going to change just because our methods of generating revenue do.”

    -Couchsurfing 2011

    As you can imagine, the move generated a big uproar (again) from the community, including from myself and other friends of mine on the site:

    They never replied to me or anyone I know, but to my surprise and to Couchsurfing’s credit, they pulled this idea after a month or so and surfing remained free.

    Until now.

    This fifth “incident” happened a few weeks ago where Couchsurfing suddenly locked everybody out of their accounts.

    It didn’t matter if you were one of the most active members of the community and had thousands of positive references and hosted hundreds of surfers per year, and even if you had paid for lifetime verification.

    As soon as we logged in, we were asked to pay a monthly $3 fee to access our profiles again:

    All our friends lists, photos, references, groups, were suddenly held hostage behind a paywall.

    After promising Couchsurfers would never be forced to pay to host or surf, we were now being forced to pay just to log in.

    When I saw this I was obviously disappointed (again), not because of three dollars, but because of how we got here. Because how did we get here? $23 million squandered over the years on CEO’s we never asked for and who never talked to us, fancy offices nobody needed, being bombarded with ads on every page of the site and app (which still doesn’t work properly), numerous other money grabs over the years which I won’t even go into right now, all the other “incidents” I haven’t even mentioned, and finally it had come to this. Locking us out of our beloved community for $3 per month.

    Which led to the biggest question of all…

    Where has all the money gone???

    Despite painting themselves right now as a company that has always been frugal, and all their staff are now valiantly working from home in the spirit of Couchsurfing and living on ramen, that’s not the case.

    In fact, I’m quite certain Couchsurfing has earned PLENTY of money over the years.

    Don’t forget, I’m not just a travel blogger, I’m also a Chartered Accountant. This kind of thing used to be my job (and now I also know a little about websites). So maybe I can find the money. Let’s have a look.

    How much does Couchsurfing make from verifications?

    They said on their socials last week that only 4% of active members pay to verify their profiles, which usually costs around $30 per year (it differs between countries). So let’s take a guess.

    Of its 12 million members, it’s estimated there are 400,000 active hosts, and you could guess an equal amount of active surfers, giving them ~800,000 active members.

    At 4% that’s 32,000 verified members, $30 per active member, that’s around $960,000 per year in verification fees (a guesstimate of course).

    I have also seen the 2008 financial statements, shown to me by the volunteer accountant from back when CS was a non-profit (us legacy CSers stay pretty tight 🙂 Even then they were bringing in a million per year in verification fees/donations, but with a tiny fraction of the members they have today.

    So I would say $960,000 per year is almost certainly an underestimate.

    How much does Couchsurfing make from ads?

    CS makes money from ads. Every Couchsurfer will tell you there are more ads on the site than Couchsurfers.

    In fact, I can just show you. Here’s what a Couchsurfing profile currently looks like:

    That’s pretty much as many ads as Google will allow you to put on a page (header, footer, left and right sidebars, and maybe one more in-content).

    In other words, they are maxxing their ad space allowance.

    How much is that in dollars?

    We would need to know their traffic. But we can make a rough guess using some tools.

    Here’s the current Couchsurfer Alexa score, which ranks a website’s traffic/engagement on the internet. It’s the 10,000th most popular site on the web currently:
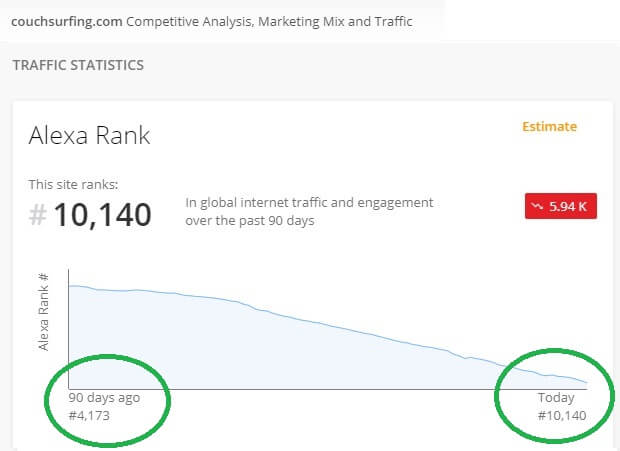
    But you can see that 90 days ago (before Covid 19) their rank was actually 4,000 (that is very high).

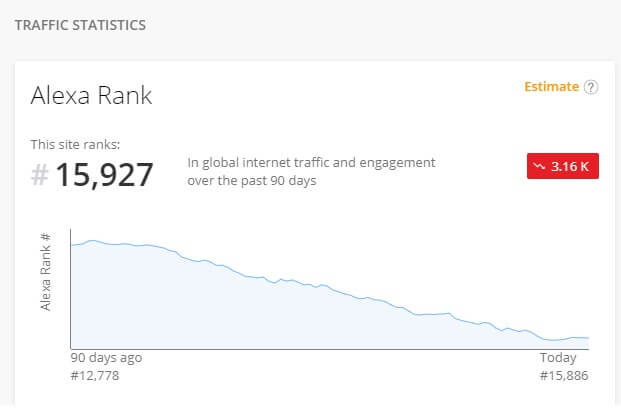
    I don’t pay for Alexa premium so it’s hard to find a perfect comparison, but to give you a yardstick, that puts it significantly higher than a mainstream travel site like The Travel Channel, which ranks around #16,000:
    And a few months before Covid hit, it was ranking almost on par with the NZ Herald – New Zealand’s largest newspaper:
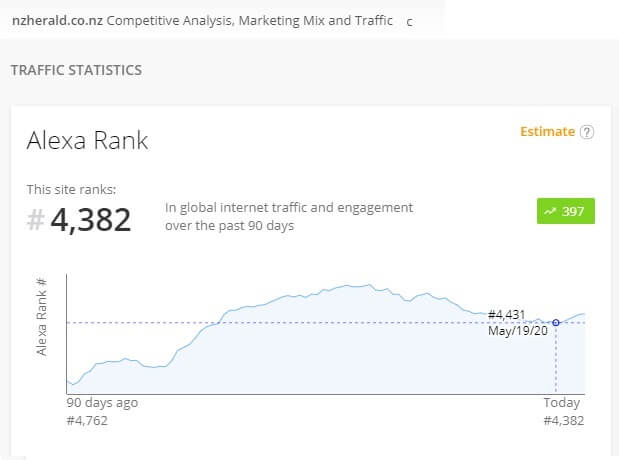
    That’s a lot of traffic. Millions of page views a week.

    We can cross check this with more tools (blogging tools are so much fun, hey?)

    Here’s their score in SimilarWeb, which ranks sites purely on traffic:

    Couchsurfing ranks 32,000 globally, and is the 42nd most popular travel site in the world.

    More importantly, it had 1.39 million visits in April. Look at the graph though! Before Covid when people were travelling, they were actually doing 4.5 million visits per month.

    You can also see they get ~5.5 page views per visit. Do some math, and that adds up to around 25 million page views per month.

    Just to cross check again and make sure we’re in the right ballpark, here’s the Travel Channel SimilarWeb results:

    Their traffic (very interestingly) hasn’t been affected by Covid. They’re doing around 22 million page views a month. Similar to Couchsurfing a few months ago.

    Couchsurfing said last week they will remove ads as part of their new revenue model, but up until last month, we can make a reasonable estimate that Couchsurfing was making as much (or possibly more) money in ads than The Travel Channel, one of the largest mainstream travel sites.

    (Note: Based on my own sites, SimilarWeb isn’t super accurate, but tends to underestimate rather than overestimate. So their traffic is possibly even higher).

    How much ad revenue is that, exactly?

    I know on a blog like mine, 100,000 page views brings in about $1,000 USD. And that’s not with ads in every corner of the page.

    If you really pump out the ads like CS is doing, you can get up to $2,000 per 100,000 page views pretty comfortably.

    Let’s just give a conservative $1,500 per 100,000 views.

    Over 25 million page views, that’s $375,000 per month, or $4.5 million per year.

    So where’s the money?

    $1 million a year in verification fees. $4.5 million per year in advertising. $23 million in venture capital. Nine years. Where is it?

    The only way we’ll know is if they release their financial statements. The community has asked for this numerous times (in fact, we’ve asked numerous times just to be talked to) and we’ve had nothing to date, so I don’t expect we’ll ever see them.

    But I can tell you where that money didn’t go:

    It didn’t go to hosts, who are the foundation of Couchsurfing.

    It didn’t go to volunteers who have spent thousands of hours organising events and keeping the community alive.

    It didn’t go to the volunteers who spent thousands of hours building the site for the first seven years of Couchsurfing’s life.

    It didn’t go to bloggers, influencers and unofficial ambassadors like myself, who for years recommended the site to friends, readers, fellow travellers, while also putting together beginner guides like this to grow the community.

    We can also guess it didn’t all go into the site, which is a pretty standard membership site and doesn’t (or shouldn’t) cost $5 million per year to maintain.

    So where else could it go? Our best guess is it went to the investors, staff and executives who, in all honesty, haven’t added millions worth of anything to the community since they took over in 2011.

    Of course my numbers are estimates and may be wrong; Maybe it’s only $4 million per year. Or even $2 million. Or maybe it’s way higher. Does that change anything? Not really.

    It breaks my heart to finally say it, but I have to.

    I’m breaking up with Couchsurfing

    I’ve resisted this day for a long time. For many of those years on the road, I considered Couchsurfing a part of who I was. It was like a badge we wore, we were so proud of it. The site really did give me so much, friendships, lessons, and changed me as a person. But I guess we all part ways eventually.

    Under different circumstances and different leadership, I’m sure many of us would have gladly paid $3 per month or even $5 or even $10 to support the community we have built over the years, but after this many years of second and third and tenth and eleventh chances and being let down year after year, we can’t do it anymore.

    It’s like having an ex that says they’ll change and stop treating you like ass so you keep getting back together and they’re still treating you like ass ten years later. Well, for many of us that ex is Couchsurfing.

    It’s heartbreaking because with the community we had, we really could have been something great and different, a free community that thrived and built something revolutionary like Wikipedia or Afrikaburn. In fact for a few years, that’s exactly what we were. But unfortunately it has ended up as ten years of so much hope and so many disappointments. It’s a fool me once fool me twice (or ten times) scenario now, and I don’t want to be the fool anymore.

    Let me give them some credit where it’s due. I used CS heavily up until around 2018, and met some of my closest friends on the site. I can attribute dozens of my best ever travel experiences directly to Couchsurfing.

    The site has changed my life.

    Of course we knew there were people earning huge salaries off our community, while we all slept on floors and tried to show people money wasn’t everything – that disconnect wasn’t lost on us.

    But we let it slide and stayed on board, because the site meant so much to us. To be fair, it still gave us what we needed. The site was used by us to meet people and find hosts and connect with other travellers, and in that sense it worked just fine. As long as they didn’t change things too much, we tolerated it.

    But I think now it really has changed too much.

    When Couchsurfing released the news of this latest move, I was sure it was just another money grab hiding behind the excuse of Covid 19, and this was also the word recently on reddit by a former CS employee:

    “Some time ago, I joined as an employee of CS because I was passionate about this project.

    Unfortunately, I was only able to make a small dent, as the profit incentives were quite misaligned.

    I was quite disappointed by the leadership. Don’t blame the employees. I know many of them were true couchsurfers and had real heart. (Read the glassdoor reviews, skip past the obviously fake ones). I doubt that most of the leadership has ever even couchsurfed in their life.

    The leadership sees a golden goose and doesn’t love it. That’s it. This latest thing is a cash grab.

    And bird for bird, this one needs to die so a new phoenix can rise from the ashes.

    The concept of couchsurfing has been released into the world, and like the best ideas, the idea itself will never die.

    XO. Stay Safe. Stay Curious. Stay Awesome.”

    I can’t confirm that post is actually from a CS employee, but it lines up with a lot of what we’ve heard through the grapevine. The employee reviews on Glassdoor are similar.

    Will Couchsurfing survive?

    I guess this isn’t a surprise; this is what happens when you take big investor money. Investors aren’t interested in hearing how many nice travel stories they’re creating. They’re interested in profit.

    And of course that’s not always evil – you can do it and can do it the right way.

    Couchsurfing is really just a social network after all – people connecting people. And it’s not impossible to do that for free; Facebook, Instagram, Twitter, Snapchat, Google, all do it, all are much more complicated than Couchsurfing and have never charged me a cent. For some reason, Couchsurfing just never figured it out.

    So my guess is this ends in two ways. Either CS is lying and they have plenty of money, and a few people are going to get even more rich off all the new fees. Or they’re not lying, they really are going broke, and soon they’ll disappear. Maybe a combination of the two.

    Either way, I can be certain Couchsurfing will no longer be the Couchsurfing we knew and that spirit will move elsewhere. If the site continues, it will be a different type of travel community. The entire premise of Couchsurfing was that money was irrelevant, and anybody with a free spirit could be one of us. Obviously that is no longer true, so it may become more like an upper middle class, millenial, glamping, Airbnb hybrid kind of high society place with a membership fee.

    Maybe that type of thing will thrive, I really don’t know. If it does, all my best wishes to them.

    However I am also going on record today to say:

    I will not be paying the Couchsurfing monthly fee (at least not under the current management), meaning I will no longer be using Couchsurfing and Couchsurfing is no longer a service I am recommending.

    I know I have been a champion of the Couchsurfing brand for almost a decade, have promoted them endlessly on my blog, to many thousands of people, but as always things change and it’s time to explore something new.

    The site is still active and anyone is still welcome to sign up and pay the fee and use it, but my recommendations will now move elsewhere.

    What’s comes after Couchsurfing?

    It’s important to remember Couchsurfing isn’t just a website; it’s an idea, and a set of values, and a community.

    Ironically Couchsurfing said this quite well in their lockout message:

    All of us who are members of Couchsurfing believe in something greater than money, possessions, and status.

    This is true and while Couchsurfing itself no longer embodies this ethos, the members still do and communities can be rebuilt anywhere, from the ground up, just like we did before.

    There are three active communities up and running already.

    The first is BeWelcome. This is a site very similar to Couchsurfing (pretty much the same) and is run by volunteers on a donation target of $1,500 per year. It was founded in 2007 and has around 130,000 members.

    The second is TrustRoots. Most people I’ve met talk quite highly of TrustRoots, which has about 36,000 members and is also very similar to Couchsurfing. I am unsure of their budget but they are a registered UK non profit.

    What do I think of them? They’re both great. They’re also both very anti-profit, possibly to the point it is hampering their potential. I don’t think profit is dirty, I just think obsession with it is. I think they could also use someone at the helm who can really push the site full time – something that Couchsurfing had for its early years. Regardless I think with a little push in the right direction, both have the potential to do quite well. Maybe neither of them want to be the next Couchsurfing anyway, and are happy where they are.

    A third site being developed right now is Couchers.org. They’re open about their goal of replacing Couchsurfing as the go-to site for surfing and hosting. What the team has put together so far looks great. If you’re a CSer, I’d highly recommend signing up for the beta. Watch this space – it looks promising.

    There is also a fourth option, which is Facebook Groups. I’m already a member of several Couchsurfing Facebook Groups, and a lot of activity happens in there, including finding hosts and surfers. I think this will grow as people migrate off the platform and into these groups to stay in touch. If you search for a Couchsurfing Facebook Group in your city, you’re likely to find one.

    The fifth option is your own travel network. When we Couchsurf, what are we actually trying to find? People. Usually people to stay with, or people to hang out with. And we don’t need millions of people, usually we just need one.

    In fact, in many countries I visit these days, I always have an old travel friend who is happy to let me crash, or will say “I know someone that lives there, let me hook you guys up!” And their friends become my friends, and the circle grows. This is really Couchsurfing in its purest form, travellers helping travellers connected by other travellers, and you don’t need a website with millions of members (or dollars) to do it.

    The sixth option is the space itself evolves, and it kind of already is. This is likely where I’m heading. If people actually want to pay to join a travel site, I would recommend something that gives you more than just a basic social network. The best example I know of is NomadList.

    It’s a community of people who actually live and work on the road full time, and not only do you get access to tons of useful info, you’ll be mixing with other web entrepreneurs like bloggers, Youtubers, programmers, freelancers etc too.

    Since this lifestyle is growing rapidly I think NomadList will actually become huge. You can also find people to crash with, and I’m sure a lot of the members were Couchsurfers too back in the day (CS is mostly centred around younger backpacker student types). I also love that its founder levels.io is super transparent about running it, building it, how much it earns etc. I’ve pretty much watched him build it from the ground up on Twitter over the last few years. Been very cool to see. The site is free to use, but also has a premium membership.

    Going forward I will probably use all of these resources in some way, and continue to report to you on my experiences and which ones have worked best.

    Lastly, I’ve also donated 2x the yearly subscription Couchsurfing was asking for to BeWelcome and Couchers (will do the same for TrustRoots once they’re accepting donations) and I’ve also paid for a lifetime membership at NomadList.

    Just to show that it was never about the money 🙂

    Sending love always!

    B

    Disclaimer: The figures in this article are all guesstimates. I do not have access to Couchsurfing’s financial statements and everything is a best estimate based on the information and tools mentioned.

    Photo credit: Bob Dass @ Flickr

  • The Ultimate Guide To New Zealand Slang

    The Ultimate Guide To New Zealand Slang

    It happens to me everywhere I go. I’ll be having a conversation with some mates at the hostel and, forgetting I’m not in New Zealand, I’ll say something like…

    “Yeah nah bro, I reckon that’s all good, cheap as for a mean as feed like that!”

    And they’ll all stare at me in silence, as if I’m an alien speaking to them in Na’vi. And then one of them will go, “Sorry, what?”

    Meanwhile the Aussie guys next to me are pissing themselves laughing.

    I’ve since learned to go easy on the New Zealand slang while travelling, especially when I’m around non Kiwi folk, but this isn’t as easy as it sounds. It’s actually quite a struggle, and I still remember bunking with an Aussie in Colombia and both of us laughing at how nice it was to finally be able to speak normally with someone.

    So, next time a Kiwi is in your dorm, prep yourself with this guide. In fact, bust out some of the New Zealand slang below and they’ll think you’re the coolest person alive. More importantly, if you plan on coming to New Zealand you’d do well to learn as many of these NZ slang words and phrases as possible.

    Learning Kiwi slang isn’t easy, so we’ll start with 20 common words. Once you’ve learned them all, move on to the next section where I’ll teach you the good stuff. You guys are going to be speaking fluent Kiwi in no time!

    Lesson 1: Some popular New Zealand slang words to start:

    Kiwi – Can refer to either a New Zealander, or the country’s national bird. For the fruit, we say kiwifruit.

    Jandals – Flip flops. e.g. Havaianas

    Dairy – A convenience store, corner store, or mini supermarket.

    Chilly bin – A cooler bin, used for keeping drinks cold.

    The wops – Really far away, the middle of nowhere. e.g. she lives far away, out in the wops.

    Macca’s – McDonald’s

    Togs – Swimsuit

    Bonnet & boot – Hood & trunk (of a car)

    Scull – To drink a usually alcoholic drink in one go without stopping.

    Buggered – Very tired

    Fizzy drink – Soda

    Mince – Ground beef

    Hot chips – French fries

    Kai – Maori word for food

    Chocka Block – Crowded/busy

    Pissed – Drunk

    Cuppa – A hot drink, usually short for “cup of coffee” or “cup of tea”

    Jumper – A jersey or sweatshirt

    Angus – Someone with an anger problem

    Hungus – Someone who eats too much

    Easy enough? Cool. Now try wrap your head around these ones:

    Lesson 2: Advanced Kiwi Slang Words & Phrases (for those who wanna get serious!)

    Bro

    When I’m with my friends I use this in almost every sentence. We use it in place of ‘man’ or ‘mate’ or ‘dude’. It’s not reserved for good friends, you can say it to anyone, like the mailman or a taxi driver. They’ll probably say it back to you.

    Example:
    Jack: Hey bro how’s it going?
    John: I’m all good bro! Did you see Shortland Street last night bro? It was crazy bro!


    All good

    This basically means ‘everything’s fine’ or ‘no problem’, and we also use it in place of ‘you’re welcome’ when someone says thank you.

    Example:
    Jack: I thought my car was going to break down but it was all good, thanks for waiting.
    John: All good bro.


    Sweet as

    Means ‘no problem’, or sometimes can just mean a simple “OK”. Used similarly to ‘all good’.

    Example:
    Jack: Yo, we’re all going to Jen’s house to watch Gossip Girl and eat Toffee Pops. Gotta go gym first but I’ll pick you up at 7?
    John: Sweet as (translation: OK).


    Faaaa

    This could be considered a shortened version of “far out” (or the F word, I’m actually not sure) which can be used to express both excitement and disappointment. The amount of excitement or disappointment you wish to express will depend on how long you hold the ‘faa’.

    Example:
    If you scratch a lotto ticket and win $2 you might go “Faaa, only $2”, but if you scratched it and won $20,000 you’d probably go “Faaaaaaaaaaaaaaaaaaaaaaaaaaaaaaaaaaaa $20,000!”


    As

    We commonly use the word “as” as an amplifier to the preceding adjective. For example, “cheap as” would translate to “really cheap”.

    Example:
    John: Bro, check out my new polka dot undies. Got them in Howick for 20 bucks.
    Jack: Bro, that’s expensive as! (translation: that’s really f*cking expensive).


    Hardout

    This is one of those Kiwi slang words with many meanings:

    1. To amplify an adjective.

    Example:
    It’s hardout cold today! (translation: It is extremely cold today)

    2. To express agreement to something very enthusiastically.

    Example:
    Jack: Bro, this restaurant is awesome as, we should come here every week.
    John: Hardout! (translation: yes, we should!)

    3. To describe something as awesome or amazing.

    Example:
    John: How was the movie?
    Jack: It was hardout, bro! (translation: It was awesome, bro).

    4. To describe someone as extremely talented/hardworking/successful.

    Example:
    John: Did you know Ben got 100% in every exam?
    Jack: Man, that guy is a hardout! (translation: that guy works really hard).


    Not even

    Loosely translates to “No way” or “That’s not true”, but can be used in various different contexts.

    Example:
    Jack: Bro, I forgot my wallet. You’ll lend me 20 bucks though eh?
    John: Not even! (translation: No, I wont.)


    Ow

    This can be combined with “Not even” and is used somewhat like an exclamation mark. It’s used quite sparingly, but if you manage to pull off the “Not even” + “Ow” combo as a foreigner, you will probably be made an honorary Kiwi.

    Example:
    Jack: Bro, how did you pass that exam, you must have cheated hardout!
    John: Not even ow! (translation: Get the f**k outa here)


    Shot

    This has multiple meanings, so many that it would be pointless to explain them all here. In fact I’m not even sure I could explain them, as there is an acquired comfort in using this word and understanding all it’s uses. Nonetheless, I encourage foreigners to try as often as possible. Three of the most common meanings are:

    1. To express thanks.

    Example:
    Hey bro, can you pass me that jug of water please? Shot. (translation: Thanks)

    2. To express joy, similar to how you might use “Yuss!!”

    Example:
    John: Bro, Jen got us free VIP tickets for Miley Cyrus tonight!
    Jack: Oh shot! (translation: That’s awesome!)

    3. To express encouragement, or to say ‘good job’ or ‘well done’.

    Example:
    John: Hey bro, I finally passed my bikini waxing certification last night. Starting my new job tomorrow!
    Jack: Shot bro! (translation: Well done!)


    A feed

    A meal.

    Example:
    Jack: I’m hungry bro.
    John: Alright, let’s go for a feed. Macca’s?


    Reckon

    In many ways it is a synonym for the word “think”, for example instead of saying “I think so” you could say “I reckon”. However it has other meanings:

    1. Used to express one’s opinion. For example, instead of saying “Do you think?” you would say “Do you reckon?”

    Example:
    John: Do you reckon if I buy Jen a box of Pineapple Lumps and then ask her on a date she will say yes?
    Jack: Yeah, I reckon! (translation: yes, I think she will).

    2. Used to agree enthusiastically to something.

    Example:
    John: I can’t believe Tom cheated on Jill for the 279th time!
    Jack: I reckon! What a dick. (translation: I know! What a dick).


    Mean

    An adjective to describe something as really amazing or awesome.

    Example:
    Jack: Did you see that girl in the purple dress last night?
    John: Yeah bro that girl was the meanest! (translation: that girl was extremely hot/amazing).

    Example:
    Jack: Did you like that Olsen twins movie we saw last week?
    John: Yeah, it was pretty mean (translation: Yeah, it was quite good).


    Heaps

    Means ‘a lot’ or ‘very’.

    Example:
    Jack: Man, I always see that girl there.
    John: Yeah, I’ve seen her heaps too. She goes there heaps bro. (translation: Yeah, I’ve seen her a lot too. She goes there all the time).


    Piece of piss

    To describe something that’s very easy, similar to “piece of cake”.

    Example:
    Jack: Hey, I’m about to take my driving test. Is it hard?
    John: Nah, piece of piss bro (translation: No, it’s very easy).


    Taking the piss

    An expression which means ‘to make fun of’ or to ‘mock’, or to not be taking something seriously. Not to be confused with “taking a piss”, which means to urinate.

    Example:
    Jack: I was gonna go out drinking with you guys tonight, but Jen got mad at me so I’m staying home.
    John: What the f**k? Are you taking the piss? (translation: Are you being serious?)


    On the piss

    Getting drunk.

    Example:
    Jack: Man have you seen Melissa’s Instagram lately?
    John: Bro she’s always on the piss eh????
    (translation: she’s always out drinking, right?)


    Yeah nah bro

    Yeah nah is a tricky one to translate accurately. It basically means “No”, but it’s like a more polite version of no.

    Example:
    Jack: Hey man you wanna stay for dinner?
    John: Yeaaaah nah bro, I gotta get home and study
    (translation: I’d like to [not really], but I can’t, gotta get home and study).

    However, it can also be translated as simply “Ummm”, or perhaps as “Ummm yeah, but no”. Such as when you’re talking about a sensitive topic, or just need time to think.

    Example:
    Jack: Hey bro, I saw you and Jess go home together last night!
    John: Yeah nah bro……how did your night go? (translation: Well, no, we didn’t, how did your night go?)

    There’s no exact translation, so try to observe the different ways Kiwis use it before you start trying to use it yourself!


    To the days

    This is pinned to the end of a word or phrase, and means ‘extremely’ or ‘very’.

    Example:
    Jack: Did you see Tim got drunk again last night?
    John: Bro, that guy’s an alcoholic to the days! (translation: That guy’s seriously an alcoholic).


    Honest to who?

    Loosely translates to “Really?” Often the response will be “Honest to G”, which I presume means Honest to God.

    Example:
    Jack: Bro, I won like $5,000 at the pokies last night.
    John: Honest to who?
    Jack: Honest to G O D!


    Gizza

    Short for “Give us a”, which actually means “Give me a”.

    Example:
    Jack: Faaa, check this out, Jen posted a photo of herself on Instagram in a bikini.
    John: Honest to who? Gizza look! (translation: Really? Give me a look!)


    Shout

    This is the Kiwi form of the verb ‘to treat’, such as treating someone to a meal or a drink.

    Example:
    Jack: Bro, I can’t come out tonight, I spent all my money on a pedicure.
    John: It’s all good bro, Tim is shouting drinks tonight.
    Jack: Shot!


    What a sad guy

    This is said when someone does something super uncool.

    Example:
    Jack: Bro, when Tim was drunk as last night I put $500 of booze on his credit card.
    John: What a sad guy!
    (translation: what a crappy thing to do)


    Aye/Eh

    Probably impossible to explain, but I will try. It has many different uses so you will need to listen carefully to the pitch, tone and context in which it’s used to decipher the meaning in each particular situation. Also note that the word is pronounced like the letter “A”, not the letter I.

    1. Used on the end of a statement to solicit agreement from the other party. Similar meaning to “don’t you think?” or “isn’t it?”

    Example:
    Jack: It’s pretty hot today eh? (translation: It’s pretty hot today, isn’t it?)
    John: Yeah bro, hardout. (translation: Yes, very).

    2. Used to express disbelief and/or surprise. You would use a similar pitch and tone to when you say “Really??”.

    Example:
    Jack: Tim broke his leg at rugby last night and now he’s in the hospital.
    John: Eh? (translation: Really!?)

    3. Used to express confusion when you’re unsure of why something is happening or when things are not appearing as they should. When used in this context the “Aye” will typically be longer and more drawn out, usually in a slightly higher pitched voice.

    Example:
    Jack: Bro Mr Tupai said you have to go to his office after school because your exam was so crap.
    John: Eeeeeeh? (translation: What the hell!?)

    4. Used as a filler word, with no real meaning at all.

    Example:
    Jack: How was Jen’s cupcake party?
    John: It was cool eh, I really enjoyed it.


    Cuz

    While technically short for “cousin” this is mostly used as a term of friendship, but can also be used as just a casual way to address someone. Sometimes the longer form “cuzzy” is used.

    Example:
    Staff: “Sir, here’s your Big Mac combo, no pickle extra fries.”

    Jack: “Oh, cheers cuz.” (translation: Thanks man)


    Chur

    Generally used in place of “cheers” or “thank you”, but in certain situations can also mean “OK/cool” or “No problem”. I’ve also heard people use it simply as a way to greet each other.

    Example:
    Jack: Saw you were running low bro so got you another beer.
    John: Chur bro! (translation: Thanks man).


    Can’t be bothered

    Used when someone is too lazy or just simply doesn’t feel like doing something. Another variation of this is “can’t be stuffed”, which has the same meaning and is used in the same way.

    Example:
    Jack: Bro, your arms are looking kinda small you should come to the gym with us.

    John: Nah, I can’t be bothered bro. (translation: No, I’m too lazy).


    Choice

    Simply means “good” or “cool” and is used similarly to “sweet as”.

    Example:
    John: Bro, Jen went to buy our movie tickets and the guy gave all of us free popcorn.
    Jack: Oh choice! (translation: Oh that’s awesome).


    Suss

    This word can have two different meanings depending on the context:

    1. To take care of a task that needs to be done or to sort something out.

    Example:
    John: You were supposed to get our rugby tickets sorted, suss it out bro! (translation: take care of it)
    Jack: Sussed it out this morning bro! (translation: I sorted it out this morning)

    2. To describe something as suspicious/suspect.

    Example:
    John: Bro, it’s all good, this guy said he’ll give us a ride into town.
    Jack: Are you sure you wanna go with him? He looks kinda suss bro. (translation: he looks a bit suspicious/not right).


    Mint

    Loosely translates to “cool”, or “awesome”. Has quite a broad meaning and can be used to describe most things that you think are cool.

    Example:
    John: “Bro, check out my new iPhone cover, it’s got Kim Kardashian on the back.”
    Jack: “Gizza look. Oh bro, that is mint.” (translation: Give me a look. Oh man, that is awesome.)


    Gap it

    Can simply mean “to leave” or can also mean to “run away”.

    Example:
    John: Bro I saw this guy trying to break into my car.

    Jack: Did you catch him?
    John: Nah, he gapped it. (translation: no, he ran away)


    Stink!

    Stink can be used on its own to express unhappiness with something, or can also be used as an adjective to describe something/someone as really lame.

    Really good word to pair with “Faaa”.

    Example:
    Jack: Did you see the Easter Show got cancelled?
    John: Faaa stink as!
    (Translation: Oh no that sucks!)

    Example:
    Jack: I was supposed to go for get milkshakes with Tim, but he cancelled on me last minute.
    John: What a stink dude!
    (translation: What a bad person).


    Skux

    Really cool/attractive/stylish/awesome.

    Example:
    Jack: Bro I heard you got like 3 girlfriends now wassup?
    John: Nah, not even, I’m not a skux dude like you eh!
    (translation: no way, I’m not as cool as you!)


    Chocka

    Chocka means something is very full or busy. If something is extremely busy, you can use the full term “Chocka Block”.

    Example:
    Jack: Yo, I heard the supermarket was pretty chocka today? (translation: I heard the supermarket was quite busy today?)
    John: Bro, chocka block! (Man, it was super busy!)


    Kia Kaha

    Kia kaha translates to “Be strong” in Maori. It is a phrase Kiwis say to each other during hard times, periods of grieving, or when sharing support to each other. For example during natural disasters, tragic events, or the All Blacks losing in a World Cup final. You will see Kiwis saying to each other, kia kaha.

    Example:
    We are all grieving today during this difficult time. Kia kaha, New Zealand (stay strong, New Zealand).


    Straight up

    This can be used as both a question and a response. As a question, it loosely means “Are you serious?” As a response it means, “Yes, I’m serious.”

    It can also be used as a way to answer something with an enthusastic yes.

    Example:
    Jack: Dude I can bench 200kg now!
    John: Straight up? (translation: Really?)
    Jack: Straight up. (Yes, really).

    Example:
    Jack: If you were given the chance, would you date Barbara Streisand?
    John: Straight up! (translation: Definitely!)


    C*nt

    The reason I’ve included this word is because while it might be vulgar in some countries, it is not in contemporary New Zealand. In fact, it is often used a term of endearment between friends, and probably on the same level as “douchebag” or maybe “dickhead” when using it as an insult.

    If you hear this in the streets in New Zealand, do not be alarmed! It is quite normal and nothing to worry about 🙂

    Example:
    Jack: Hey man do you know Sara’s new boyfriend Joey?
    John: Yeah, he’s a good cunt actually (translation: yeah, he’s actually a nice guy).


    Wanna hiding?

    Generally if you hear this phrase between friends it’s okay, but if it’s said to you by a stranger, you’ve done something wrong. You might hear this at the bar once or twice on a heavy weekend. It’s what Kiwis say when they want to punch you in the face.

    Example:
    Jack: *pours water down John’s shirt*
    John: What the f***! You wanna hiding?! (translation: You want me to smash your face in!!?)


    Palangi

    This is actually a Samoan word which means foreigner, but you’ll hear it in New Zealand quite often. It’s normally used as a friendly term to describe white people/caucasians.

    Example:
    Jack: Hey, what do you think of that new guy Shane on our rugby team?
    John: I’ll be honest, he runs pretty fast for a palangi!


    Bring a plate

    This is one of those New Zealand sayings that’s often misunderstood. When Kiwis invite you to dinner and ask you to bring a plate, it’s not because they don’t have enough kitchenware. It means they want you to bring a dish, like a lasagne or a cheesecake. It’s basically our way of saying it’s a pot luck dinner.

    I had to include this one, because it would break my heart if you were one of those foreigners who hilariously turned up to a dinner party with just an empty plate! (happens often).

    Example:
    John: Hey, dinner party at my house on Friday, you free?
    Anita: Yes! I’m coming.
    John: Alright, don’t forget to bring a plate!
    Anita: Oh, you don’t have enough plates?
    John: No I mean BRING SOME FOOD omg! 😀


    Nek Minnit

    This phrase was born from a viral Youtube video, which literally means “next minute” or “suddenly”.

    Example:
    John: What happened to that girl at the bar last night? I thought you guys were getting along?
    Jack: Bro, everything was good, then we took a shot, nek minnit she was drunk as! (translation: suddenly she was extremely drunk).


    Gummon!

    This phrase was born from a clip on a TV police show that quickly went viral. It’s used as a slang way to say “C’mon!” when someone gives an excuse or says something soft.

    Make sure you emphasise the G at the start!

    Example:
    John: Bro what happened to you last night? You said you were coming to town with us!
    Jack: Sorry bro I stubbed my toe and it was too sore to walk.

    John: Aww gummon!!


    WANT TO ADD YOUR OWN? The official Kiwi Slang Dictionary has been launched, with all the above words, and more! Add your own definitions, submit words not in the list, vote for your favourites! Check it out here.

    Well, that pretty much covers it! Hopefully now if we ever cross paths on the road you’ll find it a little easier for us to understand each other.

    Oh, and a special thanks to all the Canadians, Americans and Europeans I’ve met who didn’t understand a word I was saying. You were the inspiration for this post.

    Been to New Zealand? What other New Zealand slang phrases did you hear that you didn’t understand? If you’re a Kiwi, what did I miss? Let me know in the comments below!

    Heading to New Zealand? Follow these tips:

    • For affordable accommodation in New Zealand, I highly recommend using Airbnb. This will allow you to get both private rooms and fully furnished apartments at rates far less than hotels and some hostels, especially in the bigger cities. You can get $25 of free Airbnb credit using this link.
    • I highly recommend purchasing travel insurance, particularly if you plan on partaking in the outdoors or road tripping up and down the country. For a beginner’s guide to travel insurance, why you need it, and how to get it, check out my post Travel Insurance 101: Everything You Need To Know.
    • If it’s your first time visiting New Zealand, my buddy Will at The Broke Backpacker has an epic New Zealand travel guide on his blog. Check it out, it should have all the information you’re going to need to see our fine country on a healthy budget!

    Just the funniest writeup on New Zealand slang you'll ever see. Check it out, bro.
  • Surviving AfrikaBurn: A First Timer’s Guide To Tankwa Town

    Surviving AfrikaBurn: A First Timer’s Guide To Tankwa Town

    Think you’re ready for your first AfrikaBurn?

    I had my first AfrikaBurn this year, and can tell you it is magical, inspiring, life-changing, enlightening, and I’m certain you’re going to have a significant experience there (you can read my full diary here).

    However, there is a lot to think about before you go.

    AfrikaBurn might be many great things, but it is also exhausting, dangerous, challenging, dirty, and both physically and emotionally overwhelming. There is a lot you need to prepare for – food, water, gifts, camping, transport, sun, rain, wind, costumes, tickets, lights, safety, budget. Living in the Karoo for a week is no joke! So many people go unprepared, and this ends up dampening their experience significantly. So my first piece of advice is, be prepared.

    That’s what this guide is for, and is my gift to all first timers heading to Tankwa Town. I want to make sure your first Burn is as great, even better, than mine, and this guide will have all the information you need to make that happen.

    Contents

    1. What is AfrikaBurn?
    2. Buying Tickets for AfrikaBurn
    3. Your Camping Options
    4. Transport to AfrikaBurn
    5. What do you do at AfrikaBurn?
    6. Understanding the Burns
    7. Safety and Security
    8. Volunteering
    9. Gifts
    10. MOOP
    11. Packing List
    12. Budgeting For AfrikaBurn

    What is AfrikaBurn?

    To attend AfrikaBurn, you must understand AfrikaBurn.

    AfrikaBurn is not a music festival, a rave, a carnival, a concert, or any other kind of arts event or festival.

    The truth is, there isn’t really a word to describe it. We simply call it, a Burn.

    Each year, 12,000 people venture into South Africa’s Karoo Desert and volunteer their time and resources to build a city. The city is known as Tankwa Town.

    Tankwa Town is a city of Radical Inclusion. Everyone is invited to live in Tankwa Town, however they are asked to live by a few guiding principles.

    First, Tankwa Town is completely Decommodified. Money is useless in Tankwa Town. It’s not allowed there, and doesn’t belong there. There’s nothing to buy, nothing is allowed to be sold, there are no businesses, no branding, no sponsors, no advertisements, no markets, no stores.

    In fact, there’s nothing at all in Tankwa Town, except what you take with you. The entire city is built from the ground up, by you. Whatever you take there, is what you will find there. If you want a restaurant in Tankwa Town, you build it. If you want a concert, build a stadium and create it. Tankwa Town is created entirely by the Community, and limited only by your imagination. If you don’t build it, it won’t be there.

    Because there is nothing in Tankwa Town, you also need to take everything you need to survive for a week; water, food, shelter, clothing, electricity. This is called Radical Self Reliance. Some say, your ability to survive in the desert for a week serves as your Tankwa passport. Those who can’t do it, simply can’t come.

    How does a town survive without money? Tankwa Town survives on an economy of Gifting. Residents are free to provide anything they want, but they can only gift, and expect nothing in return. Those who don’t know what to gift can volunteer as city staff – Rangers, Cleaners, Cooks, Lost & Found, Gate Staff. Everybody is expected to give something to the town. Otherwise, it can’t exist.

    Radical Self Expression is a key component of life in Tankwa Town. There is no dress code, you express yourself freely in whatever way you choose. You can wear outrageous outfits, or wear nothing at all. Often the world tells you there are certain things you can and cannot wear or do. But not in Tankwa Town. In Tankwa Town, you are free.

    In the centre of Tankwa Town is the playa, a large open circle of desert filled with artwork. Throughout the week, the artworks are burned by the artists; the oldest standing tradition of the Burn. The burns teach us Immediacy, and that the city is transient, life is transient. It reminds us that we built this city together, and will destroy it together, that it was only here for a moment, and nobody saw it but us.

    Finally, we live by the principle of Leave No Trace. At the end of the week, everything that hasn’t been burned is dismantled or destroyed and removed from the desert. We leave the desert spotless, as if we were never even there. The city remains only in our memories.

    The 11 Guiding Principles of AfrikaBurn

    These are the unwritten “laws” of Tankwa Town. They are not enforced as laws, but they are encouraged and expected to be respected by all who attend. I’ve mentioned most of them above, but here is the full list:

    1. Radical Self Expression – Express yourself truly and honestly.
    2. Radical Inclusion – All are invited and respected.
    3. Radical Self Reliance – Your survival is solely your responsibility.
    4. Decommodification – No buying, no selling, no advertising, no money.
    5. Communal Effort – We work together.
    6. Civic Responsibility – We value a civil and responsible society.
    7. Participation – We achieve change by personal action and being involved.
    8. Immediacy – We are here right now, all we have is this moment.
    9. Gifting – Give to the community without expecting anything in return.
    10. Leave No Trace – Respect the environment, leave it as if we were never here.
    11. Each One Teach One – A self reliant community depends on freely passing knowledge to one another.

    Buying Tickets For AfrikaBurn

    To enter Tankwa Town, you need a ticket.

    Tickets in 2019 cost 1900 ZAR ($132 USD).

    There is only one place you should buy your ticket, and that is directly from the AfrikaBurn website. You will need to set up a Burner profile, and you can purchase it with any regular debit or credit card.

    Make sure you use your full legal name on your ticket purchase and that it matches your passport/drivers license. You will need to show your ID when you enter the gate and it will need to match.

    I would also highly recommend printing your tickets out, don’t rely on your phone. You never know what can happen out there.

    (If you’re wondering why you need to buy a ticket to a decommodified event: AfrikaBurn is a non-profit, and funds go towards things like admin, legal, materials for DPW volunteers to set up the town infrastructure (toilets, roads etc), not to mention renting a big ass desert for a week, among other things). Full financials are on their website.


    What are the camping options at AfrikaBurn?

    One thing that wasn’t clear in any of the official guides is, how does the camping actually work? Are you allowed to just camp on your own or do you need to join one of the Theme Camps?

    The answer is, you can absolutely camp on your own without joining a camp, and in fact that’s how Burners traditionally attended Burns. Theme Camps were things that popped up later as the events became bigger.

    What’s a Theme Camp?

    Theme Camps are camps that plan to offer some kind of service to the burn, such as an area to serve food or a bar or something similar. Generally these camps need a lot of members to cook, clean, set up the camp and basically keep things running smoothly, so they invite volunteers to stay with them and help out. Lots of people join a Theme Camp for their first Burn, but you definitely don’t need to if you don’t want to.

    If you’re planning on joining a Theme Camp, make sure you get in touch with the camps early. There should be a full listing of Theme Camps on the AfrikaBurn website and their contact details.

    Find the ones that resonate with you and ask if they’re looking for people to join. The advantage of Theme Camps is they’re generally located closer to the centre of town, so it’s a lot less walking for you every day. The other advantage of Theme Camps is they generally provide things like water and food and a big stretch canopy shelter for you to camp under, which can appeal to first time Burners.

    If you’re camping solo, you’ll be located a little bit further away, but if you get to the Burn early (first or second day) you should be able to get a spot not too far away. As a solo camper, you’re going to have a lot of other things to plan for too. We’ll talk about all that in the packing section below.

    Of course, you can also arrange to camp with a group of friends and that is common too.

    Plug and Play Camps

    These are camps that, for a price, offer to set up your camping, transport all your supplies into the desert, and basically offer you a hotel-like service for your week in Tankwa. These camps are strictly prohibited at AfrikaBurn. If you’re offered a plug-and-play experience, do not accept it and report it via the website. Not only does it go directly against the principles of AfrikaBurn, it may be shut down by Burn HQ if/when they find out about it.

    Cost sharing with other campers is fine (you bring the tent, I’ll bring the food, let’s all chip in for gas etc), but AfrikaBurn HQ can request financials if your camp is large to ensure no profit is being made.


    Transport To Tankwa Town

    Getting to Tankwa Town is a mission, it’s about 8 hours by bus, 4-5 hours by car. What makes it even more difficult is the road. It’s a shitty unpaved road and punctures are super common. I caught the bus to Tankwa, and our luggage vehicle had a blow out about halfway through. Check it out:

    As you can see, this road is no joke.

    Here are your options for getting to Tankwa:

    Drive yourself

    Most people drive themselves to Tankwa. It’s about a 4-5 hour drive assuming you don’t have any real problems. I worked as a greeter on the gate and a lot of people were arriving with flat tyres, even in good weather, so be prepared for that. Have a couple of spares and a puncture kit, and make sure you know how to change a flat.

    The directions from all major cities can be found on the AfrikaBurn website.

    If you are planning to drive, and you’re planning to camp solo, I would highly recommend a camper if you can afford it. It will just remove so many of the weather considerations you need to make when camping in a tent. Especially if you’re staying the whole week, the extra comfort will be worth it.

    AfrikaBurn Bus

    The bus is an ideal option for those coming in from overseas and don’t have car. It totally removes the need to worry about driving, changing tyres, keeping spares and tools, vehicle passes and so on.

    In 2019 the Burn Bus was 1095 ZAR return (about $75 USD). It leaves at midnight on the Sunday before opening and returns at 1pm on the Sunday of closing. The bus is pretty comfortable, and can fit all your stuff. My main concern was whether I’d be able to fit all my camping gear and water on the bus, but the ticket says “anything you can fit in the taxi on the way to the bus stop, you can fit on the bus”

    The one major downside of taking the bus is it’s a super long bus ride, around 8 hours each way.

    Tickets are sold on Quicket.

    Carpooling

    There are lots of people heading to the Burn and many of them will have free seats. The best way to find a ride is to post on the Facebook group Tankwa Ride and Share. This is a group specifically for finding and offering rides to Tankwa.

    Again, the main issue is space, because even if people have spare seats, they may not have room for all your stuff. Don’t try and arrange your rides one or two days before the event – arrange them early as open seats become much rarer as the event gets closer!


    What do you actually do at Afrikaburn?

    I got this question a lot. If there are no concerts or performances or famous people to see, what do you actually do at AfrikaBurn?

    It’s a city. You live in it.

    And like any city, there is always stuff going on. When you arrive, you will receive a map and a WTF? Guide, so you know What The F*ck is going on. It will detail all the Theme Camps, Artworks, Mutant Vehicles, Classes, Talks, Events and so on:

    Also, like all cities, it is totally different during the day and night.

    I don’t want to say too much as so much of AfrikaBurn is figuring the city out for yourself and creating your own unique adventure. But here’s a general idea of what goes down:

    AfrikaBurn during the day

    The day is when most of the events are happening. The centre of town is along the Binnekring and Buitekring (translates to “inner ring” and “outer ring”). For reference, you can check out the town map.

    Walking along the Binnekring during the day will present you endless Theme Camps offering food, drinks, playing music and hosting events. Just from memory, 2019 had things like desserts, wine, ribs, burgers, yoga, sauna, movies, massages, pancakes, fresh juice, and lots of dancing. There are also lots of classes, talks and discussions about many subjects – spirituality, sex, life.

    People also enjoy exploring the artworks during the day, so you’ll see many people out on the playa. There will also be Mutant Vehicles out on the playa with DJ’s playing sets for anyone after an afternoon dance.

    What’s a Mutant Vehicle?

    Tankwa Town is a pedestrian and bicycle only zone. All vehicles that come into Tankwa are required to drive straight to their camping spot and park for the duration of the week. The exception is Mutant Vehicles. Mutant Vehicles are pieces of mobile art, usually modified cars or trucks. All need to be inspected and approved as Mutants by the DMV (Department of Mutant Vehicles).

    If you wander around the Buitekring and the camping zones in the day, you’ll find more Theme Camps, generally smaller and lesser known ones. For example, everybody knows Pancake People because it’s on the Binnekring, but nobody knew about Maple Camp because it was a few blocks away on Butterfly Road. So during the day, make sure you take the time to really explore the map, you’ll find a lot of gems out there.

    Personally, I love the day much more than the night. It’s when the real conversations are had and friendships are built. My advice is definitely don’t sleep in! Get out of your camp, start interacting. There’s lots to do and people to meet!

    AfrikaBurn At Night

    After sundown, Tankwa Town turns into one enormous party like you’ve never seen. The bars and clubs all let their speakers blare at full volume, people are dressed in fairy lights and glow sticks, crazy fur coats and costumes, and drugs and alcohol are everywhere. The playa is also filled with Mutant Vehicles pumping tunes and creating mini dancefloors all across the desert. The party goes right until sunrise and even then it doesn’t stop.

    Not everything at night is about partying though. In 2019 we had State Of Bliss which opened a jazz lounge and served tea, there was Sweet Love Cinema which screened movies until the a.m., plus lots of people just chill in their camps and relax.

    Remember, the nights are freezing cold, so make sure you have something warm to go out in at night. Also, some places serve drinks at night, but not many. If you plan on hitting the nightlife hard, make sure you bring your own alcohol.

    In your daypack

    When you venture around the town, you need a backpack to carry all your things with you. The most important things to remember are days are sunny, nights are cold, it’s dusty and you need to hydrate. Sanitiser, lip balm, buff, dust goggles, sunglasses, WATER, plate, cup and cutlery, map, headlamp. Here’s what a typical daypack (and nightpack) might look like:


    The Burns

    Every night there are burns scheduled, usually between 6-8pm. To understand why the artworks are burned, you need to understand the origins of the event.

    In 1986, two friends built a wooden statue of a man and burned it on a beach in San Francisco. It was a ritual attended by about 30 friends. This ritual continued each year, and eventually became known as Burning Man. More artworks started to be built, more people started attending, and it grew so big it got moved into the Black Rock Desert. Today, 80,000 attendees head to Black Rock each year and construct an entire metropolis for Burning Man. This is known as Black Rock City.

    Tankwa Town is South Africa’s version of Black Rock City, and both cities live by the same core principles. The burns are a central tradition of Burning Man, and AfrikaBurn.

    The burns are symbolic because they represent the impermanence of the city, and life in general.

    I would highly recommend attending as many burns as possible. They are the essence of the event and what it stands for, and they mean different things to everybody. The Burn Schedule is up every day at OCC (check the map).


    Safety and Security

    While incidents do happen in Tankwa Town, they are rather rare, especially considering the environment.

    One provider of security are the Tankwa Town Rangers. Rangers are not police officers, they are Burners just like everyone else but volunteer to patrol the city and keep the peace. For example, they give directions to people who are lost, if someone has parked their car blocking the road, a Ranger might ask them to move it, if a parent has lost their child, a Ranger will help them radio it in to HQ. A big part of a Ranger’s job is to ensure people are safe, so if anyone is seen passed out or incapacitated, Rangers will escort them to the Sanctuary tent – a first aid tent where they can get medical treatment or rest.

    There are also police, medics and ambulances present in Tankwa Town, however they are only called in as last resorts, for serious medical emergencies, or if laws have been broken. Often Rangers will radio incidents into Ranger HQ, and HQ will decide if they need to escalate it. Medical evac is also available.

    For the burnings, there are fire marshalls present at every burn, who secure a safety perimeter and then monitor the burn until it’s complete. There have been incidents of people running into burns, so marshalls are large in number and security around burns is taken very seriously. Many burns are cancelled or postponed because of wind concerns.

    There are also Event Guardians, local staff which act as general security for the event. They generally are stationed on the main streets and just observe for any problems, but I didn’t see them often.

    The Self Reliance principle is pushed a lot in this respect. People are generally encouraged to look after themselves and solve problems themselves wherever possible. For example, at Ranger training we were told not to get involved in fights or arguments between people. Radio it in if it gets out of hand, otherwise, let them settle it on their own.


    Volunteering

    Volunteering is encouraged for all burners, and you will see the sign “One burner one shift” posted on the Binnekring by the volunteer booth. Particularly for those not involved in a Theme Camp, volunteering is the ideal way for you to contribute to Tankwa Town and embrace the principle of Communal Effort. I volunteered every day Mon-Fri as a Ranger, Greeter, Fluffer and Ice Slinger and each shift added so much to my experience.

    If you’re a first time Burner, I would highly recommend volunteering as a Ranger. This is the absolute best way to learn how the town works. As a Ranger, you’re forced to learn the map because people will see your orange vest and ask you directions, so you will very quickly learn your way around town. This will add so much to your enjoyment of Tankwa Town; by the end of the week, I met people who still didn’t even know various parts of the town existed. As a Ranger, I’d been forced to walk the town end-to-end over my shifts, I didn’t even need the map by the end of the week.

    To be a Ranger, you will need to attend Ranger training, either before the Burn in Cape Town or during the first two days of the Burn at Ranger HQ.

    To sign up as a volunteer, you can either do so beforehand on the website, or in Tankwa Town at the volunteer booth.


    Gifts

    Gifts are something a lot of people don’t prepare for and end up regretting. You are going to have so many incredible moments and connections with people and having a small gift to exchange can really add a lot to the experience.

    Some people gift things like candy, chocolates, one girl gifted me a mini waffle while I was on Ice Slinger duty and it was the most perfect and delicious thing to receive at that moment. Little gestures like this make up part of Tankwa’s magic so I’d suggest thinking about what kind of gifts you might want to bless the city with.

    I took about 60 of these bracelets and they were all the rage, people loved them! Anytime I saw someone doing something nice I would put one on their wrist, like the guy performing jazz at the State of Bliss lounge or the guys cooking the ribs each day, or even just someone who gave me a compliment or a hug. Often people I’d given them to would stop me a few days later on the street and be like “Hey man thank you so much for this bracelet I love it!” My only regret is I didn’t take more, I should’ve taken 200!

    Tankwa Town is the perfect place to rediscover the joy in giving, so make sure you’re prepared with meaningful gifts you can spread each day 😉


    MOOP

    Before we get to the packing lists let’s talk about MOOP.

    MOOP stands for Matter Out Of Place and refers to anything that doesn’t belong in the desert. Everything from cigarette butts to beer cans are MOOP. In fact, every single thing you bring to Tankwa with you is MOOP. One of our Burn Principles is Leave No Trace, so everything you bring with you, you must take back with you, including your trash. Even biodegradables like orange peels and apple cores are MOOP. Things like that take a long time to biodegrade in the desert, you need to bag it and take it all home. If you’re going to the Burn, do not MOOP!

    If people see you mooping they will call you out for it. You should do the same.


    AfrikaBurn Packing List

    This is the largest and most important section. Remember, there is nothing in Tankwa Town provided for you, except toilets.

    That means you need to take everything needed to survive for a week in the desert – a week of food and water, good shelter, warm clothes, bedding, transportation, medicines, any electricity you need and so on.

    Below is my recommended packing list. There may be other things you need to consider, but this is everything I took and I didn’t run into any major problems out there.

    Camping

    • Tent – My advice for tenting is to spend a little extra and get a larger tent that is wind and waterproof. A tent like this will probably cost you around 1,000 – 1,500 ZAR. A 3-4 person tent is about right for solo camping, as you’re going to have a lot of stuff. You’re also going to be very tired at the end of each day and you want your home to be comfortable. This is the exact tent I used (Oztrail Genesis 4V Dome) and I ordered it straight off Takealot, they delivered within 48 hours and it was perfect. My friend nicknamed it the mansion because it was so nice and spacey compared to tents of most other solo campers 😀
    • Rebar – When the wind decides to show up in Tankwa it is vicious. Normal tent pegs are about as useful as toothpicks. You need rebar. Rebar is that steel reinforcement bar they use on construction sites. We had a dust storm on Day 2 and without rebar my tent would have stood no chance. Afterwards the town was littered with tents lying in bits. If you don’t have rebar during a strong wind storm, kiss your tent goodbye. Don’t believe me, check out the video. I bought my rebar from Outdoor Junkies in Capetown, they sell ready-made rebar pegs for Burners at around 25 ZAR a pop. Worth every penny.
    • Hammer – To get your rebar into the ground, you’re going to need a hammer or mallet. Even with a good mallet, it still wasn’t easy getting my pegs in, the ground in the Karoo is like concrete. To be honest you shouldn’t have any trouble borrowing a mallet of someone in the campgrounds, but just be aware that you need one.
    • Mattress – Again, the Karoo ground is rock hard, it’s not like sleeping on grass. You’ll need a mattress or sleeping mat. Something like this is perfect.
    • Sleeping bag – It is freezing cold at night in the Karoo, sometimes sub-zero. Make sure you bring a warm, thick sleeping bag, something like this.
    • Pillow – I didn’t actually take a pillow, would’ve been nice though!

    Food

    You need a week of food. It’s up to you whether you want to cook or not. I personally decided against cooking, as it meant there would be so many more things to bring, and would use more water too. Instead I survived on wholesome ready-to-eat foods:

    • Rusks – Bring a variety, they don’t take up much space and are nutritious.
    • Dark chocolate
    • Protein bars – Bring a variety (chocolate, peanut, dried fruit, seeds etc)
    • Biltong – Ostrich, beef, kudu – great source of protein.
    • Nuts – Bring a variety.
    • Health snacks – I had a lot of those healthy snack balls and bars, usually made of dates and nuts and seeds.
    • Other snacks and treats – Cookies, sweets, dried fruits etc.

    If you do plan on cooking, you should know they do sell ice in Tankwa Town. It is the only thing allowed to be sold there (as a food safety issue), and is sold by the AfrikaBurn team. Therefore you will be able to keep meat fresh (and drinks cold) as long as you buy ice each day.

    One tip: Don’t get too worried about food. Lots of theme camps serve food and most people take way too much. By Day 4 or 5 people will be happily giving away their food so they don’t need to take it back. I only took about 4-5 days worth and I still had this full box to bring home:

    Of course that doesn’t mean you can go unprepared! Take the minimum amount you think you’ll need for a week, and that will definitely be enough. If you have any left over, you can gift it.

    Water

    The recommended amount is 5 litres per person per day. This includes drinking, washing, brushing your teeth etc.

    I took 30 litres (six 5L bottles) and ended up giving 3 of them away on the last day. However this is because I was working as a Ranger so I was able to fill up my water bottle at Ranger HQ each day, and also there was a Theme Camp offering showers so I did most of my bathing there.

    I still recommend taking 4-5L per day, even though you may not use that much. It’s always better to be overprepared, and you can always gift it if you have any left over.

    Clothing

    • Costumes – Radical Self Expression means you’re encouraged to wear whatever you want! You will see lots of people wearing extravagant things, and also lots of people wearing nothing at all. Dressing up is awesome fun and a big part of the Burn. A good place to get stuff in Cape Town is at the Grand Parade on Wednesday and Saturday mornings, and the vintage stores in Observatory (Bang Bang, Voom Voom, just walk down that street, there are several). Coats For Africa is another great shop.
    • Warm jacket – The nights are very cold in the desert so you need something warm. Big fur coats are popular because they’re warm and they look awesome.
    • Buff – I used my buff every day and it was a life saver (you can get them here). You can wear a buff so many different ways so it serves you in all weathers – wind, sun and rain. This is me wearing it as a full head mask during one of the very windy days:
    • Full brim hat – The sun can be brutal in the day.
    • Walking shoes/boots – Unless you’re taking a bicycle, you will be walking a lot! And I also recommend walking over biking, because it will be so much more natural for you to stop and talk to people, make new connections, and wander down little streets and into little camps. Make sure you have shoes you can walk several kilometres in each day (and be sure to tape up your feet if you’re prone to blisters).
    • Sunglasses – Obviously.
    • Dust goggles – When the dust storms hit, they hit hard and you can barely open your eyes for five seconds without dust getting in. You may be lucky and have no dust storms, which is great, but if they do come you absolutely need goggles. Ski goggles like these ones are super affordable and will do the job perfectly, even swimming goggles, or you can buy some cool steampunk ones from a vintage shop or on Amazon:
    • Thermals – Again, the night is cold. You may not get much sleep if you’re not warm. Handy for wearing under your clothes while walking around the playa at night too. Something like this is perfect.
    • Warm socks – For sleeping!
    • Flip flops – Really handy for doing things around camp and quick trips to the toilet. Also, the ground is reasonably flat and not too hazardous out there, on hot days, lots of people walk around in flip flops. Gives your feet a break from your boots too.
    • Gloves – Hands freeze at night.
    • Everyday clothes – You don’t need to dress up in costume every day, sometimes it’s nice to just walk around in a tank top and shorts. Light long sleeve shirts and pants are ideal to keep the sun off you. Bring a versatile wardrobe, you get all kinds of weather out there.
    • Final day clothes – This was one of the best tips I received. Fold up a full set of clothes and wrap it up tightly in a plastic bag. These will be your clothes for the trip home at the end of the week. Trust me, the last thing you want to do is spend 5 hours in a car sitting in dirty dust covered clothes. Having a fresh set of clothes for that final trip is heaven.

    Toiletries

    • Toothbrush/toothpaste
    • Toilet paper/paper towels – The toilets always have toilet paper, but having your own is handy, also just for cleaning around camp.
    • Lip balm – Essential! The desert destroys lips.
    • Baby wipes/wet wipes – Absolute life savers. You can use them tissues, wiping down cutlery and cups, sanitary wipes, and many other things. “Wet wipe showers” are also common and effective. I took about 12 packs and used almost all of them.
    • Moisturizer – Skin gets battered out there.
    • Nasal spray – For the dust!
    • Hand sanitiser – Essential, used it daily.
    • Sunscreen

    Tools and supplies

    • Power bank – For charging phone and camera (there’s no reception in Tankwa, but phones are still good for taking photos and notes).
    • Headlamp – Essential! Get a good strong headlamp like this one , you will use it alot to get around town after dark.
    • Torch – Not essential if you have a headlamp, but still handy.
    • Spare batteries – Obviously.
    • Duct tape – For fixing shit.
    • Pad and pen – Good for writing down phone numbers, contacts, notes.
    • First aid kit – You don’t need a treasure chest, but at least take some essentials. I had band aids, Dettol, tea tree oil, tape.
    • Locks – Stuff does get stolen at burn, lock your tent. Use a code lock, keys get lost.
    • Cup – Essential! Drinks are gifted everywhere but you need your own cup. Use a carabina to latch it to your waist for easy access, or even string it around your neck.
    • Plate – When gifted food, you can often just use your cup but a plate or small lunchbox helps.
    • Spork/cutlery
    • Fanny pack – I used my fanny pack every day, it was very handy for the small things like lip balm, sanitiser, wipes, notepad etc.
    • Backpack – You’ll need a small daypack to carry things with you during the day – water, sunscreen, scarf or warm clothes, cup, plate, maybe even a camera.
    • Umbrella/raincoat – We only had a tiny bit of rain and I just stayed in my tent. But if rains are heavier, you might really want these.
    • Trash bags – There are no bins in Tankwa. You need to take all your trash home with you!!
    • Lights – You need to light yourself up at night. There are cars and bikes all over the place and if nobody can see you it’s a problem. Many people like to use Christmas lights, but I think glow sticks are ideal -cheaper and you can also gift them. I took a tube of 100 and gave most away, you only need 4 or 5 per night to be fully lit up. Just make sure you take them all home with you! Glow sticks are full of chemicals and are the worst kind of MOOP. You can usually get a tube of 100 for less than $10.

    Other optional supplies

    • Buckets – Buckets come in handy around camp – as a basin to bathe, as a rubbish bin for the corner of your tent. Also note that you cannot just dump grey water (water with soap in it that you’ve used to bathe, brush teeth, wash dishes etc) in the sand. If 12,000 people dumped grey water around the campground it would be a huge muddy swimming pool! You need to collect it and let it evaporate – buckets are perfect for this.
    • Broom/dustpan – Cleaning your tent is nice every few days, as the dust gets everywhere quickly. You can just use a makeshift broom out of some paper, but having a proper dustpan is very handy.
    • Bicycle – Many people bring bicycles – they aren’t necessary but you will be doing a lot of walking without one. You can also rent a bicycle for the week from Pedals For Peace.
    • Camera – You don’t see many cameras in Tankwa Town since the dust ravages them, but if you know what you’re doing and have a dustproof lens, you can get some amazing shots.
    • Table and chairs – If you plan on lounging around your tent, bring foldable chairs and a table. Not so necessary as a solo traveller, but if you’re coming as a group you’ll probably want this to be able to eat and just chill out together.
    • Umbrella/shade – Something that can change your entire camp is having a shaded area outside where you can just sit and relax. I spent most of my time at other people’s camps, but if you plan on spending a lot of time in camp relaxing, you’ll want to arrange something like this. Either some big picnic umbrellas or a tent with a shade attached.
    • Generator – Not necessary in my opinion, but a lot of camps bring them.
    • Gas cooker/stove – If you plan on cooking. Make sure to adjust your water supply accordingly for washing dishes/cooking needs.
    • Fire extinguisher – If you’re cooking, you’re advised to bring one.
    • Musical instruments – Always a winner!
    • Extra set of car keys – If you’re driving, definitely bring two sets of keys. Things get lost easily in the Karoo. Last thing you need is to be stranded out there.

    Budgeting For AfrikaBurn

    How much does AfrikaBurn cost?

    I came to Cape Town around two weeks early to make sure I was properly prepared for AfrikaBurn. As you can see from the packing list, there are a lot of things you need to buy.

    Here’s a very rough breakdown of all the things I bought for Burn:

    • AfrikaBurn ticket: 1,895 ZAR / $132 USD
    • Bus ticket: 1,090 ZAR / $76 USD
    • Tent: 1,299 ZAR / $90 USD
    • Rebar: 141 ZAR / $10 USD
    • Backpack 190 ZAR / $13 USD
    • Fannypack 100 ZAR / $7 USD
    • Satchel 120 ZAR / $8 USD
    • Sunglasses 20 ZAR / $1.50 USD
    • Storage boxes 102 ZAR / $7 USD
    • Headlamp and batteries 239 ZAR / $16 USD
    • Jacket 150 ZAR / $10 USD
    • Scarf 40 ZAR / $3 USD
    • Scarf 50 ZAR $3 USD
    • Boots 560 ZAR / $39 USD
    • Hat 60 ZAR / $4 USD
    • Hoodie 150 ZAR $10 USD
    • Thermals 120 ZAR / $8 USD
    • Socks 130 ZAR / $9 USD
    • Gift bracelets 680 ZAR / $47 USD
    • Costume stuff (vests, hats etc): 990 ZAR / $69 USD
    • Food: 1,600 ZAR / $111 USD
    • Water: 110 ZAR / $8 USD
    • Miscellaneous (sunscreen, first aid, wet wipes etc): ~500 ZAR / $35 USD
    • Things I was able to borrow: Sleeping bag, mattress, cooler bin.

    TOTAL 10,700 ZAR / $716.5 USD

    Obviously there were various things I already owned so didn’t need to buy, like a power bank, buff and so on. Also, since I’m on the road I can’t really carry much with me, so I literally had to buy almost everything. If I were travelling to South Africa solely for the Burn, I would’ve brought a lot of stuff from home.

    Luckily South Africa is relatively inexpensive, so preparing for Burn isn’t as expensive as other European festivals or Burning Man. And if budget is really a problem, you can sell most of your costume stuff at vintage shops when you get back. I gave most of mine away, but I did sell my tent pretty easily when I got back to Cape Town.

    Also, once you get to Tankwa Town you won’t be spending anything, so you only need to budget for preparations beforehand. And, since it was my first Burn I was slightly overprepared; you should be able to do it for much less if you just stick to the essentials.


    Final Tips For AfrikaBurn

    • I know it’s hard after reading a huge guide like this, but go without expectations. Don’t look forward to anything, just let the experience happen.
    • Don’t sleep in. So much great stuff happens in Tankwa Town during the mornings and afternoons.
    • Take people’s contact details. It’s very unique connections you make there.
    • Goggles, wet wipes, cup, gifts, rebar, buff. These small things will make such a big difference! Make sure you have them.
    • Take some photos, but not too many. Try and live in the moments.
    • Get involved in everything. Go to all the events, volunteer as everything, attend the events that are way out of your comfort zone. That’s the secret to self discovery in Tankwa Town.
    • Go on the first day! In my opinion the first 3 days are the best. You experience the town building and coming to life. The final days are quite different, in fact some people come to Tankwa just for the party at the end of the week. So the crowd changes a bit. Definitely experience the early days if you can.
    • Try to appreciate the whole experience of Burn. I met people who literally just slept in the day and partied at the Cobra all night. I talked to them about different places around town and they hadn’t even heard of them. There is so much more to see than just the raves.
    • Express yourself radically, give lots of hugs and gifts, and have HEAPS OF FUN 🙂

    That’s everything I have to say. Writing this guide has been my Each One Teach One, and providing it here to you is my Gift.

    SEE YOU IN THE DUST.

  • Eating Abidjan: 16 Foods To Try On Your Visit To Cote d’Ivoire

    Eating Abidjan: 16 Foods To Try On Your Visit To Cote d’Ivoire

    Food in the Ivory Coast was not what I expected.

    I recently spent several weeks eating my way through the economic capital of Abidjan, doing my best to sample as much of the local cuisine as possible. I was expecting some similarities to east African cuisines, which generally have soft and mild flavours, but Ivory Coast food is not like that at all – it’s sharp and spicy, with extra chilis on top!

    As your intro to Ivorian food, I’ve collated a list of 16 things I think you should look out for on your next visit. 

    Enjoy!

    Attiéké

    attieke ivory coast food

    Photo credit: Modjou

    Attiéké is one of the main staples in Ivory Coast cuisine and you will see it everywhere. 

    It’s made from fermented cassava, which is granulated so it becomes like couscous in texture. You usually eat it with your hands – just smush it into a ball and pop it in your mouth, similar to how the Indians eat rice and curry.

    It can be served with almost anything; you will see it served as a side with most dishes, or sold streetside on its own in small plastic bags. 

    What’s it taste like? Mild, it’s a little bit sour. Really filling too, so you should never be hungry here. Out of the staples listed below it was probably my favourite, I found myself choosing it for most of my meals!

    Alloco


    Alloco is basically a heart attack on a plate.

    It’s made from plantains (green bananas), which are cut up into bits or slices, then deep fried until they’re super brown and crispy. The serving is usually large and they’re soaked in oil, so you know eating them will make your arteries cry (but of course you do it anyway because they’re so yummmm). 

    They have a touch of sweetness which makes them a nice change from french fries, plus they’re softer and chewier too. You see this eaten a lot more at nights, usually with the all the chickens being grilled around town. The locals love it.

    Foutou

    foutou ivorian food

    Foutou is an interesting dish, I actually watched one of my friends make it from scratch and it took forever.

    First, the cassava and the bananas are boiled.

    After that they are left to cool a little, and then they get pounded in this big bowl. They need to be pounded one by one so it doesn’t come out lumpy, so it takes a long time.

    Once it’s all pounded into a mush they mold it into these big balls and let them sit.

    In the end they have this big lump of sticky yellow goodness, which is typically eaten with a sauce dish.

    It tastes how you’d imagine (like banana) but it’s sticky and quite difficult to eat. I learned this the hard way but you need to wet your fingers first (in the sauce) before you start grabbing at it. Otherwise you’re going to be gnawing at foutou glued to your hands like a tourist dummy.

    This is quite hard to find at night, so go searching for it at lunchtime if it’s what you’re looking for. Definitely something you need to try for the full west African experience 😉

    Placali

    placali ivorian food

    Placali is another staple, this one made from fermented cassava dough.

    It’s cooked slowly with water and then set aside to cool. When served it’s going to look like a huge dumpling which you pick at with your hands, similar to the foutou.

    It also tastes sour, like a sourdough bread, and is normally served with sauce dishes. I remember getting served this and thinking it would definitely not be enough, but even a small portion is so filling that I was struggling to finish it. 

    This is also something you can only find during lunchtime – search out some local food spots around midday and it will be easy to find.

    Sauce Kopè

    sauce kope ivorian food

    “Sauces” are really popular in Cote d’Ivoire food and there are a lot of them.

    Sauce kopè translates to “sauce okra”, which is a very gooey and spicy sauce. It’s usually eaten with placali like you see in the photo.

    Common ingredients in the sauce are crab, escargot (snails) and fish or beef.

    Eating this dish is labour intensive and messy; the placali is already a sticky challenge and the sauce is also a little difficult to handle. By the end of your first time eating it you should get the hang of it, but if you’re like me you might feel a bit goofy in the process, especially while dripping sauce everywhere with placali plastered all over your hands. Don’t worry, it’s all part of the fun.

    How does it taste? Okra has a semi-neutral flavour to begin with, so it depends on what it gets cooked with. Seafood is popular, so if it’s crab or fish it will probably have a seafood chowder like taste, and it’s usually spicy too.

    Mine had snails in it which you’ll come across a lot in Cote d’Ivoire cooking – they taste mostly like shellfish but a little firmer, nothing to be afraid of!

    Overall sauce kopè wasn’t my favourite sauce but it wasn’t bad – definitely worth trying if you see it on the menu.

    Sauce Arachide

    sauce arachide ivorian food

    Sauce arachide is a spicy peanut based sauce, this one more often eaten with rice.

    I think the usual main ingredient is chicken, but the one I had (in the photo) was made with fish which was also good. If you can imagine half a fish cooked in a big bowl of spicy satay sauce, that’s pretty close to what you’ll get. Pretty good!

    When it comes to sauce dishes in the Ivory Coast, the menu changes daily so it just depends on what they’re cooking that day. The two above are the ones I tried but there are lots of others too. They’re not really available in the evenings, so check out the local eateries around lunchtime, that’s when you’ll find them!

    Poisson Braisé

    poisson braise

    Fish is common in Ivorian cuisine, and anything braisé in the Ivory Coast is a treat.

    Put those together and you have Poisson braisé, which translates to “braised fish”, although I don’t think it’s actually “braised” as we understand the word in English.

    First the fish is marinaded in some basic flavours (garlic, lemon, parsley, pepper etc) and then cooked slowly on a hot grill. Afterwards it’s topped with sauteed onions and tomatoes and served with a side of attiéké or alloco. You always get the whole fish too so it’s usually a huge meal.

    Because Ivory Coast is on the coast (duh) the fish is almost always fresh. I don’t think I ever had a bad fish during my trip!

    Poulet Braisé

    poulet braise

    Poulet braisé translates to braised chicken and is cooked in much the same way as the poisson braisé – marinaded in spices and then thrown on the grill for a slow cook. 

    This is a really popular dish at night and you’ll smell the chickens grilling as you walk around Abidjan after dark. 

    One thing that stands out about the poulet braisé (and many other dishes in Cote d’Ivoire) is the chili sauce they add on the side. It’s literally the spiciest sauce I’ve ever tasted and I couldn’t even touch it. Those Ivorians seem to just eat it by the spoonful. Madness.

    If you’re not a spicy food guy, be careful not to mistake it for an innocent tomato sauce – it definitely is not!

    Other than that this tastes like your standard grilled chicken – I ended up eating it a lot as it was easy to find and cheap, usually around 2,500 CFA ($4 USD) for half a chicken.

    Choukouya

    choukouya ivory coast

    Choukouya is the west African version of flame grilled meat. It’s the classic nighttime meal and you’ll find it getting cooked all over the city in the evenings.

    As far as I understand it choukouya can refer to many different kinds of meat, so you can have chicken choukouya, beef choukouya, goat choukouya and so on. 

    Once it comes off the grill it’s chopped up, topped with onions and served with the usual spicy-as-hell sauce on the side. Most people eat it with fries or alloco (and lots of beers).

    Poisson en papillote

    poisson en papillote ivorian food

    Poisson en papillote translates to “fish in foil”, which is exactly what it is.

    When I ate this I’d just done a long day of surfing and I asked the barman what I should eat. He recommended the poisson en papillote avec riz (fish in foil and rice). I didn’t even know what that meant but it turned out to be awesome. I think I had it again the next day.

    I’m not certain how they cook it, but I know they wrap the fish in foil with some kind of lemon marinade and maybe some tomatoes, then cook it until it’s saucy and delicious. Luuuurved it.

    Garba

    garba abidjan ivorian food

    This is a very local dish, which consists of attiéké, topped with diced onions and tomatoes and several pieces of fried tuna. You can eat it with your hands – simply grab a piece of everything and pop it into your mouth. The tuna is very salty so you need to get a good chunk of attiéké and tomatoes to mellow it out. It’s a perfect combination if you get the mix right!

    This is one of those classic “poor man meals”, so you’ll find it being sold streetside in many places, mostly in the mornings.

    Why mornings? Because this a super popular Ivory Coast breakfast! Or at least how it was explained to me; you eat it for breakfast on a Sunday or a day you don’t need to do anything. It’s a very heavy meal so the idea is you can just overeat and then enjoy your food coma for the rest of the day.

    Poulet piquet

    poulet piquet ivorian food

    Poulet piquet is chicken on a stake cooked over a wooded fire. You’ll notice it very quickly by the big sand/dirt pits they use for cooking outside the restaurants.

    The funny thing about eating out at night in Abidjan is everywhere is so dimly lit, so often you can’t really see what you’re eating. Sometimes you see people holding their phones in one hand and eating with the other because it’s that dark! So, when I tried poulet piquet I didn’t really get a good look – I do know there were a couple of sauces on the plate, that were yum, but no idea what they were…or what they looked like.

    It was noticeably less greasy than a regular grilled chicken though. That means you can have it with some greasy alloco (fried bananas) and not feel too bad! 🙂

    This is pretty to easy to find, you’ll find it being served during the night in lots of food spots around town.

    Kedjenou

    kedjenou ivorian food

    Kedjenou is a traditional Ivorian chicken stew.

    It’s cooked in a sealed dish, sometimes some vegetables are added, then it’s left to slow cook in the meat’s own juices. At the end you’re left with a very flavoursome and saucy stewed chicken, best eaten with attiéké or rice. If you’ve been to Morocco, it might remind you of the tagine. Of course they add a few chilis too, so be ready for some heat. 

     This one is another popular lunch dish, but I saw it served at a few places at night too. 

    Banane braisé

    banane braise ivory coast

    Banane braisé are plantains slow cooked over hot coals.

    The end result is a hot banana which is browned on the outside but still very soft on the inside. This is a classic Ivorian snack and you’ll see it being sold roadside all throughout Abidjan. 

    There was a lady selling these just across the road from my apartment, 100 CFA (20 cents) for the small ones and 200 CFA (40 cents) for the big ones. Can’t find many cheaper and healthier snacks than that!

    Pain Brochette

    pain brochette ivory coast

    I was on the lookout for this for many weeks and didn’t find it until my last night in town. I was having ice cream with some friends very late (around midnight) when we saw a guy making pain brochettes across the street. Of course I had to go try one!

    How it works is the guy will have a few beef (I think) skewers on the grill. He’ll slice a baguette in half and when the skewers are ready to chow he’ll clamp them inside the bread and pull the sticks out. Then he adds a whole bunch of stuff – mayonnaise, egg, some sauces and seasonings (I really have no idea what it was) and then it’s time to eat!

    How’s it taste? It’s really just like a regular beef sandwich. Super cheap though. And tasty 🙂

    However it was one of the “rougher” street foods I saw, so if you’ve got one of those sensitive stomachs try to choose your pain brochette place carefully. I’ve also got a guide that you might find useful!

    Dégué

    degue ivory coast

    I had a friend bring me a bottle of this one morning, insisting that I try it. I just thought it was yogurt but a few weeks later I found out it’s actually a traditional Ivorian drink.

    It’s made by mixing yogurt with millet flour, and they must add a lot of sugar and/or honey because it’s very sweet. Tastes like an oat smoothie or maybe even one of those Asian sago desserts and goes down super easy. It’s sold everywhere in restaurants and supermarkets so you won’t have trouble finding it. Try it – it’s different!


    And there’s your introduction to Ivorian food. Shout out to my friends Orphelie from Culturiche and Yasmine from Afrofoodie for taking me out to some of their favourite eats in Abidjan, if you want ideas on things to do in town be sure to check out their blogs 🙂

    Heading to Ivory Coast and…

    Looking for tours and activities at an affordable price? I use GetYourGuide! Always great deals and local perks.

    For travel insurance, I always use World Nomads – get protected for just a few dollars a day!

    Somewhere to stay? Booking.com gives you the biggest selection and the best rates.

    I also have a beginner’s guide to Abidjan, so be sure to check that out!

    Have you been to Cote d’Ivoire? What was your favourite food? Let me know in the comments 🙂

  • A Beginner’s Guide To Abidjan, Ivory Coast

    A Beginner’s Guide To Abidjan, Ivory Coast

    West Africa is a place that’s been on my list for so many years. I’ve set foot on the north, the east and the south of the continent, but the west has always escaped me until now.

    When my schedule and a cheap flight lined up this year, I had to go. I booked a flight from the European winter and headed down to Abidjan, where I spent nearly two months enjoying the bustling capital. 

    I can’t say it’s my favourite city, but it’s definitely unique and a place any traveller should experience. The francophone side of Africa is a planet of its own.

    An Abidjan overview  

    First thing – Abidjan is not a city for Africa beginners. 

    If you’re on a tour or an arranged trip you’ll be fine (although those aren’t common here) but as an indie traveller it’s challenging, particularly if you don’t speak French.

    The people are not hyper-friendly, things are not very cheap and barely anyone speaks English. The language barrier makes it quite difficult to navigate the city and it would be doubly so for someone new to the continent. This is a sprawling metropolis, not a little town, things move fast here and people are rather Frenchy. Even I felt timid walking around the first few days, and not many places make me feel that way.

    It’s also not a city for beginner budget travellers. You will need to be rather travel savvy to stay on a tight budget here; that means staying in neighbourhoods that are quite far out of the city centre, seeking out (very local) markets and roadside stalls to get your food, and negotiating in French for every single taxi ride. Public transport is almost non-existent.

    If it’s your first time in Africa, be ready to go straight in the deep end.

    However that doesn’t mean you can’t do it! You will likely spend a lot of money but the city is safe by most standards and first world amenities are easily available (for a price), so it just depends on what kind of trip you’re looking for.  

    Two sides to a city

    Abidjan is very business oriented and things move reasonably fast. It has all the modern amenities you want, such as large supermarkets, electronics stores, designer brands, Burger King and KFC, luxury hotels, fancy restaurants, European cars etc etc.

    There is a lot of business here which obviously leads to a lot of money floating around. People spending big in nightclubs, driving an Audi, living in luxury apartments and so on.

    Typical Abidjan supermarket

    You’ll quickly see the modern side of Abidjan is extremely expensive – on par with France – the kind of places where you might pay $5 or $6 for a coffee. However, that’s only one side of the city, the side that all the expats and foreign companies come for.

    The other side of the city – people living in high density housing, selling snacks on the street for 50 cents, hustling every day to get by – obviously exists too. This is the side of the city most people live on.

    The gap between rich and poor here is probably the biggest I’ve seen in any major city, so you essentially have two halves of a city living completely different lives. As a human it might be disheartening, but as a traveller it sets a very interesting scene.

    There is also an extremely fast growing middle class in Abidjan from all the money that’s been pouring in; this is the second fastest growing economy in the world. If there was any doubt about the changing fortunes of Africa, that will all be dusted once you set foot in this city. 

    Getting your Ivory Coast Visa

    Unless you’re from one of the ECOWAS nations, you’re going to need a visa to enter the Ivory Coast, regardless of your reason.

    There are no visas on arrival, or if there are, they are very time-consuming to get. Abidjan tourism is still not at the point where things are easy for visitors.

    Instead, you need to get an e-visa prior to arriving. It’s straightforward and is done completely online. It takes around 48 hours and costs around $100.

    I have a complete guide on how I got my Ivory Coast e-visa here.

    You also need a yellow fever certificate – there is even a health centre right there in arrivals where (I assume) people who don’t have a certificate will need to get a yellow fever vaccination before entering. If the thought of getting vaccinated in an Ivory Coast airport doesn’t excite you, I suggest you get vaccinated at home.

    Arriving at Abidjan Airport

    I arrived in Abidjan in the middle of the night, around 1 a.m. 

    In Europe or even much of Asia, arriving in the middle of the night isn’t a problem and public transport will still get you anywhere you need to go.

    Not west Africa. In fact five years ago I would’ve paid extra just to avoid this flight and the midnight airport antics. Cab drivers in African airports are some of the worst when it comes to hustling tourists.

    I had a very friendly man approach me as soon as I exited the gates, as I was expecting. I went straight to the ATM and he followed me, acting like he was being my security guard and making lots of small talk.

    Then I walked over to the info desk and asked the guy which taxis were safe. He chatted quickly in French with the guy following me, and then told me it would be fine to go with him.

    My contact in Cote d’Ivoire had told me the correct price is 6,000 francs during the day, but during the night it could be 8,000 or slightly more. Just as I was about to start talking price he said “So you give me 20,000 okay?” and started walking off with my bag. I stopped him and laughed and told him I’ll find someone else. He offered 15,000 and I just tried to ignore him. Then he got annoyed.

    “You think you know the price? You don’t know the price!” and he stormed off.

    The guy at the information desk was really helpful and even called my Airbnb to double check the address, then called a taxi driver for me and gave him all the instructions. In the end I paid 10,000 to 7eme tranche, which is around $17. 

    You could bargain the price down more if you have the energy, otherwise just live with the few dollars extra, known in this part of the world as the “white tax” 😀

    Where to stay in Abidjan

    The map above shows the main areas of Abidjan, which is split into two parts – the north and the south.

    As you can see it’s connected by three bridges, so in peak hour traffic getting across town is extremely slow. From Marcory to Angré might take 15 minutes late at night, but over an hour at 6pm.

    A few quick one-liners about these neighbourhoods:

    Marcory – Very active area with lots of malls, restaurants and bars.

    Cocody – Upper class area with many expats.

    Angré – Northern suburban area

    Riviera – Middle upper class area with many bars, restaurants.

    Plateau – Central business district with many office buildings.

    Treichville – Rougher and more local side of Marcory.

    Yopougon – Very large, local area.

    It’s hard to choose a best neighbourhood in Abidjan, but probably the easiest way to describe it is if Abidjan was New York then Plateau would be Wall Street, Marcory would be Times Square, Treichville would be Harlem, Yopougon would definitely be Queens, Riviera and Cocody would be Brooklyn and Angré might be the Bronx. Something like that!

    Staying in Marcory

    Typical Marcory shopping mall

    Marcory is the most central part of town where you can do everything – eat street food but also eat in nice air conditioned malls, stay in nice hotels but also cheap guesthouses etc. You will also see quite a lot of expats and foreigners around here running their businesses, shopping, and just doing daily errands. Many of them are out here eating/drinking during the nights as well.

    As a tourist, you probably want to stay in and around Marcory if you’re on a short trip. It’s the central hub that connects all the different corners of the city, and many of the popular places to visit in Abidjan are around here.

    Traffic in Abidjan is not a joke and you don’t want to be spending your trip commuting down to Marcory every other day.

    If you’re after a place to stay, Villa Ayaba is centrally located in Marcory and a good launching point for a tourist visit.

    Staying in Cocody/Angré

    Typical Angré street in 8eme tranche

    If you’re staying in the city longer (more than two weeks) you might want to stay up in the northern neighbourhoods around Cocody and Angré.

    Angré is where you will find most of these places, especially around 7eme tranche and 8eme tranche which is where I stayed. You won’t see many foreigners around these parts, in fact I rarely saw any at all, except for a few Lebanese that owned restaurants and shops.

    Also, I got a good number of stares each day so you know they don’t see tourists too often around here!

    However the area is safe and security guards are everywhere, even walking around after dark was safe and normal judging by locals’ behaviour.

    A good place to stay up in that area is Villa Jaddis. It’s around the 7eme tranche and one of the top accommodations in the city, suitable for someone visiting for the first time.

    For something cheaper, you could try Residence Helios. It’s lower down in Cocody around Riviera 4, but still a decent area.

    Staying in other areas

    The Riviera zones are also nice but it’s quieter and more spread out and harder to find tourist accommodation around there.

    Plateau is also possible but it’s mostly very pricey hotels – but if that’s what you’re looking for you’ll have many quality places to choose from.

    For example, I visited the Sofitel Ivoire one afternoon and it literally has the largest pool I’ve seen in my life.

    This is one half of their swimming pool:

    Staying in a place like that will cost you around $250-$300 USD per night. Not a bad place if it’s in your budget 😉

    Airbnb is quite rare in this part of town, so again Booking.com is your best bet for getting a good rate.

    As for Yopougon and Treichville, you probably don’t want to stay around there as a tourist unless you want to go full local, but those places are probably better for day visits.

    Money in Abidjan

    The currency in Ivory Coast is the franc, or the CFA (Communauté Financière Africaine). It’s a common currency used in all the former French colonies in west Africa. The other countries using the franc are Benin, Burkina Faso, Guinea-Bissau, Mali, Niger, Senegal and Togo.

    The exchange rate is currently around 570 CFA to $1 USD.

    One piece of advice here – the thing that plagued my trip was the issue of having the right change. For some reason, nobody ever has change in Abidjan.

    I went to buy bread one morning which was 300 francs, and I only had a 5,000 note. They wouldn’t accept it, so I spent around two hours walking around trying to buy stuff like fruit or eggs to try and get change, but nobody had any change so they wouldn’t sell me anything.

    I even asked my Airbnb security guard if he could help, so he went walking around with me to some shops and still no dice.

    I never thought I’d see the day where I literally struggled to give money to people, in Africa!

    Another time I bought some laundry powder from the shop down the road, it was 300 and I paid with a 1,000. The guy gave me 500 in change and told me to come back tomorrow for the other 200 (which I did). 

    This was practically a daily occurrence throughout my stay in Abidjan.

    The point, always keep your small change! When you get money from the ATM you’re going to get a stack of crisp 10,000 franc notes, which nobody is going to want. Break them every opportunity you get and refrain from spending your small notes and coins until you really need to. It will make your days so much easier.

    Getting Around In Abidjan

    Most people, even locals, get around by taxi or private car.

    Taxis are the red/orange cars you see in the photo above. They’re often poorly maintained (you’ll see them broken down all the time) but they are everywhere so never hard to find.

    They will usually cost you around 1,000 CFA ($1.75) for a short trip, such as if you’re just going to the next neighbourhood or somewhere nearby (say 10 minutes or so). Usually you don’t even need to negotiate for these trips, just give the driver 1,000 when you get out.

    Longer trips you’ll have to negotiate. If you’re going from Angré down to Marcory it will be 2,500-3,500 CFA ($4.30-$6), depending on your negotiating skills, the time of day, and how nice the driver is. If he’s cool he’ll just agree to 2,500 off the bat, if he’s a dickhead he’ll try and push you for 4,000 and make you haggle down to 3,500. But if he insists on ripping you off just wave down another taxi, there’s a new one driving past you every minute.

    You can imagine this is quite draining (even local friends complained about this) but try and embrace it as part of your Abidjan experience. If anything it certainly improves your French!

    There are also yellow taxis which are shared taxis and are cheaper, but they are quite complicated to use.

    Again remember to keep small change for taxis, or at least ask them before the ride if they have change for a 5,000 or a 10,000. This will avoid a debacle when it finally comes time to pay.

    Safety in Abidjan

    Abidjan is a safe city. 

    There are police around quite often, but they never looked twice at me or gave me any troubles.

    You can also feel from the general vibe that most areas aren’t considered dangerous. All the indicators of safety (women walking alone at night, street stalls open after dark, kids playing outside etc) could be seen in most parts of the city. Also when I walked around alone at night nobody gave me the “what are you doing!” look so overall things felt very safe. Most local contacts told me the same.

    After the civil war, the military presence in the city increased significantly and is still there. My cab was even stopped and I was body searched at one in the middle of the night. The cab driver just rolled his eyes like it was standard procedure so I wasn’t too worried about it. He looked curiously at my camera tripod, but that was it. Didn’t ask for a bribe or anything.

    Of course there are definitely parts of the city you shouldn’t be wandering around alone in, but I can’t imagine you have any reason to go there. Common sense should be enough to keep you out of trouble.

    As for personal experiences, I didn’t experience any danger during my stay. However, my phone did get stolen and apparently this is quite common so be wary of this.

    It was while I was sitting in a traffic jam at night, and I had the window down. I was scrolling through something on my phone and then suddenly – whoop! A hand reached in and snatched it. I looked out the window and saw a street kid, probably around 18 years old, running up the hill into the bushes. 

    The funny thing is I was actually warned about this about a week earlier – I was in a cab using my phone with the window down during the day, and the driver told me to be careful because people can reach in and steal it. One week later, someone reaches in and steals it. What a surprise…

    However petty theft like this is common in almost all of the developing world and it doesn’t concern me much. I’m only concerned about violent crime, and that seems pretty rare in Abidjan (at least in the places you’re likely to visit).

    Thankfully, travel insurance covered it and reimbursed me for the new phone I bought after I got home. Thanks World Nomads!

    People in Abidjan

    This was probably the most interesting part of my visit as I never really came to a concrete conclusion.

    My first observation was Abidjanians (if that’s a word) seem to have inherited some of the French preciousness. The average person on the street can seem stand-offish or even unwelcoming. Even when you make eye contact, they won’t return or even acknowledge a smile, or at times may even ignore your bonjour or bonsoir. Sometimes they stare at you like “Why are you talking to me?”

    Many middle and upper-class Ivorians have lived in Paris and other parts of France, so that’s likely part of it.

    However, a good percentage of people will also greet your eye contact with warm smiles and greetings and make you suddenly feel like you’re in the heart of Africa again.

    It’s two polar opposites.

    Sometimes it’s hard to judge. Security guards often seem like they’re giving you the death stare as you walk past, but as soon as you smile and wave they transform into a Sesame Street character and wave back with a huge grin.

    Even when you go to buy stuff at fruit stands etc, people don’t tend to welcome you with big smiles or anything. The one fruit stand around the corner from my apartment was very cold and impersonal on my first day, but on the subsequent days she greeted me with a big smile and a bonjour chinois! like she was my best friend. So it seems that you need to develop some kind of familiarity with people first before their warmth comes out. Again it feels a bit like France in that sense. 

    This might be partly a big-city mentality rather than specifically an Ivorian thing, but it’s what you’ll find in Abidjan.

    They’ve inherited the good side of the Frenchness too, however! For example, whenever I was invited out for meals or to meet people, they always insisted on paying the bill and were super hospitable and treat you like a special guest, always asking if you need another drink and so on. Compare this to a place like maybe Tanzania, where every single time I’ve been out with a local (which is many) people have seen me as the wealthy foreigner and always expect me to pay. So seeing all the sides of the culture is very interesting.

    Also, it helps to remember Abidjan is one of the major cosmopolitan cities of West Africa so there are a lot of Malians, Nigerians, Ghanaians, Guineans and so on living here, so you don’t even know who is from where. Many of the people you walk past probably aren’t even Ivorian!

    Overall people are very decent here, but if you’re expecting the African mega-friendliness from strangers like you do in Uganda or Tanzania you’ll be disappointed.

    English in Abidjan

    This is my buddy and fellow blogger Yasmine, one of the few people I met in Abidjan who spoke fluent English (after studying in the UK). But that’s definitely not the norm here.

    Overall, English is poorly spoken in Abidjan.

    Almost every taxi driver will speak no English, or very little, and even staff in shopping malls will probably only speak French.

    Even very well-educated people won’t speak great English – it’s just not a priority here. The language is French and absolutely everything is done in French.

    That means French is essential if you plan on staying here for more than a week or two. Even if you don’t want to put much effort into learning, you should definitely learn your numbers so you can understand prices, and learn basic phrases for food and asking directions. 

    You might want to use my guide for learning a language in seven days.

    Food in Abidjan

    What to do in Abidjan once you’ve seen everything? EAT!

    Attieke – A bit like a cassava couscous, which is a staple here and you’ll see it sold all over the city.

    Alloko – Deep fried chopped plantains, just think french fries, but as bananas.

    Foutou – A pounded cassava and banana mash, almost like mashed potatoes.

    Placali – Like foutou but without the banana.

    Fufu – Like foutou but without the casava.

    You can try the above with all different kinds of sauces, usually the menu changes every day, and revolves around fish, chicken, snails, crab, beef. The sauces are generally spicy.

    In the night it’s all about the braises. Most popular are the chicken (poulet braise) and the fish (poisson braise), both go great with attieke or alloko! 

    It’s hard for me to recommend places to eat as I just walk around and pop into wherever looks good, but I will suggest checking out Yasmine’s blog afrofoodie.com and her Instagram – she’s one of the biggest food bloggers in Abidjan and knows pretty much every joint in town, you’ll find endless ideas on her feed!

    Another thing you should definitely try is the fruit! The papayas, the pineapples and the cacaos are amazing in Cote d’Ivoire, some of the best I’ve ever had and they’re super cheap. A papaya or a pineapple might cost you 200 CFA (35 cents) on the street.

    And lastly, make sure you get your fair share of bread and baguettes in.

    Obviously, the French were here for a long time and the baguettes are as good as if not better than in France itself, 100-150 CFA (25 cents) each. Eat them while they’re hot!

    Water

    Always drink bottled water. It is inexpensive and safe.

    Some people sell plastic sachets of water on the street, but be warned that this is simply filtered water and if you have a very sensitive stomach it may not sit well with you.

    I also recommend you read my article on preventing traveller’s diarrhea

    Getting a sim card in Abidjan

    The biggest network in Cote d’Ivoire is Orange and I’d recommend getting your sim with them. You can get a sim card with around 12GB/month (changes all the time) for 10,000 CFA ($17 USD). The internet is 4G/LTE and the coverage is good.

    Just find an Orange store and take your passport and they’ll set it up for you. However be warned that nobody spoke English at any of the Orange stores I went to, so be prepared!

    The other networks are MTN and Moov, but everyone recommended going with Orange.

    Getting out of Abidjan

    While there are plenty of interesting things to do in Abidjan, getting outside the city is incredible too. The two obvious trips are to Grand Bassam, the UNESCO beach town to the east, and Assinie, the beach resort area even further to the east.

    To get to Grand Bassam, the cheapest way is to get the bus. You can catch a bus from the bus stop at Adjame, or you can also catch a minibus from the bus stop at Treichville. The price will be around 500 – 1,000 CFA ($1.75).

    To get to Assinie, definitely go to Treichville as it has a van that goes direct. The price will be 1,500 CFA.

    You can also get asked to pay extra if you have a large bag that needs loading, around 1,000 CFA.

    To get to these bus stops just ask a taxi to take you, they all know where it is. You can also negotiate with the taxi to drive you to these places himself, you might pay anywhere from 12,000-20,000 CFA for a round-trip, but you’ll need to negotiate hard. 

    The other way to get to these places is to make some local friends. It’s really popular to head to Bassam for the beach during the weekend, if you make the right connects you can just hitch a ride!

    How Much To Budget in Abidjan

    Abidjan is not cheap.

    I stayed in Abidjan for around six weeks (43 days), here’s how much I spent:

    Transport: 84,000 CFA
    Food and water: 148,000 CFA
    Accommodation: 623,000 CFA
    Misc: 59,000 CFA

    Total: 914,000 CFA ($1,600 USD or around $37 per day).

    Here’s how this breaks down:

    Food was mostly cooked myself with stuff bought from the market and stalls like this:

    Usually 2,000 CFA ($3.50) should get you enough fruit and veg for 2-3 days.

    I did eat out every few days at local eateries and roadside places which are usually cheap-ish. For example this meal with a bottle of water was 2,700 CFA ($4.70):

    Accommodation was all Airbnb, staying in studios around Angré 7eme and 8eme tranche. Usually around 15,000-20,000 CFA ($25-$43) per night for a place like this:

    Transport was all local taxis, sometimes I went into Marcory to meet friends or just wander around, but I didn’t do that every day. Often I just stayed around Angré.

    Miscellaneous includes things like cellphone, laundry, tips, and other random everyday things.

    So what’s the right budget?

    If you want to go hyper-budget travel and really live locally, you can get by on $10-20 USD per day. However that is going to be uncomfortable for even the super experienced backpacker.

    I would say a more reasonable budget is around $40-$50 USD per day – this will include staying in an Airbnb and eating local food at local places. 

    If you think you will be spending more time in expat-oriented places, such as eating at shopping malls and restaurants, you’ll be at around $80-$100 USD per day, and closer to $150 per day if you’re staying in a nice hotel.

    As a guide, there are many decent hotels on Booking.com for around 20,000-30,000 CFA ($35-$50 USD) and much nicer ones in the $100+ USD range.

    Resources

    To get your visa, make sure you apply online at this page. If you need guidance, follow my guide.

    Travel insurance is highly recommended when visiting Abidjan. I used World Nomads. If you’re new to travel insurance, check out my guide.

    Best prices for Abidjan hotels will be found on Booking.com. Click here for the best rates.

    Airbnb has many good options, especially in outer neighbourhoods. If you’ve never used Airbnb before, you can get $25 off your first booking with this link.

    Any questions, leave them below.

    Enjoy Abidjan!!

    Featured image: Citizen59@Flickr

    Disclaimer: World Nomads provides travel insurance for travelers in over 100 countries. As an affiliate, we receive a fee when you get a quote from World Nomads using this link. We do not represent World Nomads. This is information only and not a recommendation to buy travel insurance.
  • The Hunt For The Best Waffles In Bruges

    The Hunt For The Best Waffles In Bruges

    Many mornings on the road begin with you lying in bed wondering what to do that day.

    On this particular morning, I was in Bruges.

    The thing about Bruges is it’s kind of uneventful, to be honest. Other than looking at cathedrals, most tourists tend to spend the day doing one of three things – eating Belgian fries, drinking Belgian beer, or eating Belgian waffles – usually all three.

    I figured while I was here, maybe I should at least try one of them. But which?

    Well fries and beer – that didn’t really excite me. But waffles…that sounded like it might be fun. Even the word itself is fun – waffles. Sounds a bit like happiness.

    Deciding that I was indeed going to eat waffles took around an hour. The next two hours was about deciding which waffle to eat. I lay in my bunk bed, procrastinating about brushing my teeth, abusing Google reviews and making a shortlist of the waffle spots that were worthy of my hard earned euros.

    This turned out to be a poor idea. Google, like feelings, just complicated things. By the time both my arms were numb I had a list of not one, but seven different waffle places that required attention.

    Now I had to do was something I try to avoid as often as possible: Make a decision.

    Or did I?

    That’s when I came up with an idea – one so genius I even surprised myself. Instead of forcing myself to commit to one waffle, why don’t I just try all seven?

    Thus began my day of waffle promiscuity in the wonderful city of Bruges.

    It was almost 1 p.m. when I finally managed to put pants on and get out the door. I was staying deep in a corner of town, so it was a decently long walk to my first waffle. A walk through Bruges can feel somewhat odd at first glance, a bit like a theme park. I don’t even think any Belgian people live here – just hoards of tourists who came to see what Colin Farrell and Brendan Gleeson were raving on about.

    So what’s the verdict? Well, there are big cathedrals and churches, and many old, medieval-looking buildings to either side of you; very pretty indeed. I’m not sure what kind of architecture it is – maybe French? Dutch? To be honest unless it’s a Japanese pagoda, I can never really tell the difference. I’m sure they’d have told me on the free walking tour – aka the tour where I tip a guy so I can follow him around and beg for it to end – but I never found the time to go.

    It takes me around twenty minutes to arrive at my first waffle spot – Chez Albert (Breidelstraat 16) – which came highly recommended on the highly reliable internet.

    This place looked a bit like a waffle hot dog stand – nice colourful menu and a long queue. I waited patiently while taxing my brain, trying to decide which waffle would have the honour of kicking this tour off.

    In the end, my mind asked for berries but my heart asked for chocolate and fresh cream. I’m not sure what my heart was thinking, because that was the absolute last type of waffle I needed to start the day.

    best waffle in bruges chez albert
    best waffle in bruges chez albert

    While delicious, eating this on an empty stomach was a terrible idea. The sudden sugar hit smacked me like a brick. And I still had a lot of waffling ahead of me.

    This waffle is reasonably thick and decently fluffy inside. Not a super crunchy crust, but firm, like a well crisped French toast. You get a choice of milk or dark chocolate. Lots of cream. €4.50. Verdict? Okay.

    To be honest, that was more than enough waffle to keep me satisfied for the day (maybe even the week). This is where I should tell you I don’t have a sweet tooth at all, I can barely finish a full sized Magnum. But unfortunately, in my mind I had committed to bedding seven waffles (it seemed a lot easier in my imagination). Stubbornness being one of my less savoury character traits, it was onto the next.

    The next target on the hitlist was a place called Fred’s (Markt 20) which was a short five minute walk away.

    That was good, because it meant I had the chance to burn eleven of the 300 calories I’d just consumed.

    best waffle in bruges freds

    Fred’s is also a little takeaway booth, more like an ice cream shop with a waffle section. Or I suppose it could also be a waffle shop with a good selection of ice cream. Whichever way the prose excites you.

    Not too sure what my logic was, but I figured after all that cream and chocolate, maybe a scoop of vanilla ice cream would help balance things out.

    best waffle in bruges freds

    Of course I was wrong, it just made my stomach curdle like a washing machine. I still enjoyed the first bite, but the next eight had me regretting ever Googling waffles in the first place.

    Chewier than the previous one with a bit more glaze. Although the flavour itself was more or less the same. Ice cream was super mild vanilla. €3.50. Verdict? Also just okay.

    Now I was realising the obvious problem with trying to find the best waffle in Bruges; you need to eat a lot of waffles. And when you eat a lot of waffles, you kind of get sick of waffles.

    By now I was really hurting for something healthy. The frontrunner to serve this purpose was The Gingerbread Tea Room (Sint-Amandsstraat 29), a short walk across the Old Town. How exciting. Maybe I could get a waffle with some fresh berries – an antioxidant waffle, if you like – and a hot cup of overpriced detox tea.

    From the outside, Gingerbread Tea Room looked like exactly my kind of place – quiet, relaxed, not too full, lots of small tables for solo travellers trying to find themselves. The waiter, who also seemed to be the owner, was very pleasant and welcoming.

    best waffle in bruges gingerbread tea room

    Only one thing on the menu jumped out at me – the fresh seasonal fruit waffle. I could already feel my fruity 5-a-day vitamins going to battle with all the cream in my colon.

    “Does this come with cream or chocolate or anything?” I asked him.

    “Yes, it does.”

    “Can I have it with just fruit? Like no cream or anything else.”

    “Yes, of course.”

    Boom. I was only two waffles in and struggling, but I knew this one would restore the balance. I’ll get some vitamins to the brain, we’ll be three waffles down – after the next one we’ll be past halfway! Surely the guts will be hurting, but if you want to achieve big dreams, you gotta hurt a little. Nothing good in life comes easy, including diabetes.

    But then the hurt really began. Words cannot express the sword I felt through the heart when my waffle arrived. It was like when you meet that Tinder date and her teeth aren’t quite as straight as she had let on. I’m not sure if there’s a secret agenda in Bruges to give everyone heart disease, but my delicious assortment of antioxidant filled fruit was violated with…icing sugar.

    best waffle in bruges fruit waffle

    It took me a while to re-motivate myself, but after three deep inhalations, I counted my blessings and regained my composure. After all, they’re still kind of straight, right? Maybe there’s a great personality under that icing sugar. Give it a chance.

    Luckily I had my 4 euro cup of spiced tea, like that motivating best friend, every few minutes just egging you along. In the end, we got through it, my tea and I. Despite the fact I was already on waffle overload, it actually wasn’t bad at all.

    best waffle in bruges fruit waffle

    The waffle here was much lighter and crisper than the previous two. It is also quite flavoursome, tastes like a waffle smells (does that make sense?) and is quite a bit bigger too. Lots of fruit. Menu overall is great and good service as well. €9.50. Verdict? Pretty good.

    Now that my tongue was feeling like an abused piece of sugar cane, I needed something savoury to inspire me into the second half of this mission.

    Luckily, I was prepared for this moment. 

    Like a battlefield general, I had strategically placed the only savoury waffle in Bruges right in the middle of my siege. It was a moment of brilliance, a little planning tactic I learned from Sun Tzu’s Art Of War. Now it was time to reap the rewards of my foresight. It was off to House of Waffles for some savoury waffle magic.

    Yet as I arrived at the door, I was stabbed through the heart for the second time in thirty minutes.

    The door was closed. All the lights were off. It just so happened that on the most random day of the week (Wednesday), House of Waffles had its day off. My visions of guacamole and tomatoes melted into tears that ran down the edge of my cheeks (not really) while I contemplated this turn of events and how to best regroup.

    The truth is, we all face obstacles in pursuit of our dreams. In this case, an incompetent waffle store manager who decides to only open six days a week and chooses Wednesday, of all days, to close his store in the middle of a tourist mecca. I mean, at least make it on a Sunday so you can lie and tell everyone you’re at church. That’s Deliquency 101. But let me impart an Instagram quote on you that I’m sure you’ve never heard before. Life is not about how many times you succeed. It’s about how many times you fall and pick yourself back up again.

    Let me tell you how I picked myself back up again.

    All I needed to do was trick my brain into telling myself I’d succeeded when I’d obviously failed. Since I had my first waffle at 2 pm, all that was required was to eat this waffle before 2 pm the next day. Technically I would still have eaten 7 waffles in one day, and could deem this mission a paper success. That would work, right? I mean Achilles probably didn’t even whoop Hector that bad at Troy, just got a lucky stab or something. Maybe even did some illegal eye gouging in the first round. But in the history books, Achilles always gives Hector an A-grade ass whooping. When I tell my kids this waffle story, I’ll be sure the technicalities get lost in the history books too. 

    Next on this now rubber victory mission was Oyya (Noordzandstraat 1).

    I’m not quite sure why I kept Oyya on the list, because it looked just like another Chez Albert or Fred’s. In fact, I wouldn’t be surprised if they all have the same owner and just use a different wallpaper for each place.

    best waffle in bruges oyya
    best waffle in bruges oyya

    By now I was in dire straits with my waffling ability so I ordered the bare minimum – a plain waffle with absolutely nothing. I didn’t even want the napkins or the paper bag, because they smelled like waffles and even that was giving me a migraine.

    But as I took the waffle from the kind man, I tried to see the positive in this self-inflicted dilemma. I reminded myself that I’m working. I’m working. Technically, eating waffles is my job. How can you complain about that? I mean life could be so much worse.

    Then again, life could also be so much better. I let out a groan and ate the damn waffle.

    best waffles in bruges close up

    Interestingly, the first bite of every waffle still tastes awesome. It’s the bites that follow that start causing hypertension. But with a little pep talk I get through this one too.

    best waffles in bruges oyya

    This waffle seemed much softer and much more doughy than the others on the inside, but still has a decent glaze on it. Slightly sweeter too. €2.50. Verdict? Also just okay.

    Next on the list was a joint called I Love Waffles (Katelijnestraat 26). Ironic, since all I could think about was how much I hated waffles. Nonetheless, my intestines and I soldiered on.

    Once inside, it was refreshing to see it was a bit different from the other places.

    best waffles in bruges i love waffles
    i love waffles bruges

    This is more like one of those frozen yogurt places where you order your waffle and then ruin it with too many sprinkles and toppings from the goodies section. The photo of the strawberry waffle looked appetising somehow, so I ordered that. I sprinkled it with some shaved almonds and went to work.

    strawberry waffle bruges

    While I was eating, one of the staff on a smoke break said hi and then told me I look like Manny Pacquiao. He asked if I’m travelling alone and told me about his recent solo trip. I’d already figured he was some kind of globetrotter when he randomly started talking to me. We talked boxing while I finished the waffle, which actually went down rather easily with the refreshing dose of fresh strawberries.

    This one has bit of a crunch to it, but quite chewy inside too. They also give you a crapload of strawberries on the strawberry waffle. The free toppings are a nice touch, although it’s mostly chocolate sprinkles and stuff like that. Cool little place. €4.50. Verdict: Decent. 

    That was five waffles down.

    The final one for the afternoon was a place called Lizzie’s (Sint-Jakobsstraat). This place had rave reviews and when I walked past earlier had been packed to the brim. This was the grand finale.

    lizzies bruges

    As expected, it was full when I got there. I had to awkwardly squeeze onto a table next to a mother and daughter. Luckily they were very sweet and didn’t mind at all.

    As for the waffles, well, the menu looks a bit fancy for a waffle place, probably to justify the, uhh, ‘ambitious’ prices. Basically it’s 7 euros for a plain waffle, and then 3-4 euros for every topping you want.

    I decided to be extravagant and went for the warm cherries and fresh cream. After clogging three arteries in a day, why not go for four and become legendary?

    Speaking of legendary, the Lizzie’s waffles are big, nearly the size of a pizza. It was a generous two cups of cream and cherries too.

    lizzies waffle bruges
    lizzies bruges

    I knew this one was going to be a challenge.

    So before starting I said grace. And then I prepared for battle, drawing my knife and fork like a sword and shield. Last round, kill or be killed. Then with kung fu determination, I wolfed the thing down with low kicks and straight rights, it didn’t stand a chance. Then I closed my eyes and drowned in self pity and a future of increased life insurance premiums.

    lizzies waffles bruges

    While the waffle is certainly large and oh so Instagram friendly, it falls short on the taste side. It was a little bland/dry, and tastes similar to those no-frills ice cream cones from the supermarket. This is masked with the generous sprinkle of sugar, and the generous helping of cream and extras. €13.50. It’s not terrible but for that price I was expecting to be able to take the plate home with me. Staff were lovely though. Verdict: Overpriced. 

    The following morning I woke up ready for the final battle. To be honest the waffles of the day before had done minimal lasting damage and I was actually looking forward to my savoury waffle breakfast (technically lunch).

    I got to House Of Waffles (Wollestraat 31) and the place was packed – there was actually a queue inside. On any other day I would have just moved on but of course, circumstances and ego prevented me from doing so.

    After a twenty minute wait I finally got my table. Here’s the famous savoury waffle menu:

    house of waffles menu

    The Mexican sounded tantalising but in the end I couldn’t pass on the BLT.

    Service is quick and it was on my table within 10-15 minutes.

    house of waffles breakfast waffle

    This thing was delicious. It’s actually like a waffle sandwich – two waffles with a mountain of bacon, lettuce, tomatoes, mayonnaise and an egg sandwiched between it. Very satisfying.

    As a side note, I also saw a guy next to me eating the cheese waffle which looked particularly good.

    house of waffles breakfast waffle

    Because I have now run out of adjectives to describe waffles, I will simply say these particular waffles were standard tasting Belgian waffles. They are generous with the bacon, lettuce and tomato. Overall this plate was very enjoyable, but there is a waffle novelty factor to it; it would probably be better with just some nicely toasted bread. Still something fun to try if your budget affords it. Friendly service too. €14. Verdict? Satisfying.

    Afterward, I sit there and bask in the joy of conquering my seven waffle challenge. At first I feel proud, an achievement I will surely share on many first dates to come. But after some signs of indigestion and a moment of self reflection, I realise I’ve just spent 52 euros on waffles in 24 hours and need to rethink my life choices. Yay Bruges.

    Heading to Bruges and…

    Looking for tours and activities at an affordable price? I use GetYourGuide! Always great deals and local perks.

    For travel insurance, I always use World Nomads – get protected for just a few dollars a day!

    Somewhere to stay? Booking.com gives you the biggest selection and the best rates.

    Also be sure to check out my guide to Bruges, with the best places to stay and things to do!

    Powered by GetYourGuide

  • A Day Thrift Shopping In Amsterdam

    A Day Thrift Shopping In Amsterdam

    So I needed a jacket.

    It was so cold in Amsterdam, and for some reason, I was without a jacket.

    Here’s the problem. In case you haven’t heard, I don’t buy clothes. Especially jackets.

    It’s because I have so many jackets at home in New Zealand, I’m quite sure I should never need to buy another jacket, ever. In this life and the next. And probably the one after that too.

    It’s this old minimalism thing, got me on a buying boycott.

    I did strongly resist this idea of a new purchase, for several days, honestly. I went out one night in three layers. Cold. Next day I had four layers. Still cold. So there was nothing to argue about after that, really. I needed a jacket.

    Now Amsterdam is not a cheap city, so the obvious choice was: Thrift shop.

    I actually love thrift shops. The last thing I bought second-hand shopping was a jacket in Copenhagen (very similar situation) and it was five euros…or it might have been ten, I can’t remember. But it was so good I decided to keep it, after initially planning to give it away to someone at the end of my trip. I even took it with me on my trip to the UK this year. It’s basically a part of the family.

    But it was no good to me now, 10,000 miles away. I was either buying a jacket today or getting pneumonia.

    Easy choice. I choose pneumonia.

    Problem: That would be irresponsible, wouldn’t it? Sharing a dorm with so many other travellers and all, potentially infecting a hostel full of globetrotting young’uns for the sake of thriftiness. Some of them might even be travelling to remote destinations soon, where healthcare is sparse. Buying myself a jacket could literally save their lives. If you think about it, I’m almost obligated to do it. Just in the spirit of selflessness.

    Plus, it gave me something to do in Amsterdam for the day that didn’t involve smoking plants. Exactly what I needed.

    The cool thing about the thrift shops in Amsterdam is they’re everywhere, and often all clustered together in one neighbourhood. Second-hand shopping is also quite prevalent in the culture here.

    I decide to carry out this mission in Waterlooplein, which has quite a few options and is near the centre of the city.

    The first place on my list is the Kilo Store. It’s barely a minute’s walk from Waterlooplein station.

    This place is supposedly one of those “weighing” places, where you fill up a basket of clothes and they charge you by weight. I’ve seen a similar second-hand store in Bulgaria, where I bought a scarf, and it literally cost twenty cents or something. But in this store some stuff has price tags too. So I’ve no idea how it all works.

    The thing about thrift stores is, you really need to look. Every single item is different.

    I wander the entire store, trying to find a jacket that I’m gonna vibe with. You know, something that fits my aura, something a brooding writer would wear, one who never actually writes. Something that says, “I don’t care what I wear, but I secretly kinda do”. Something that says “I’m on a trip around the world trying to find myself”, crossed with “I actually already did that and now I’m lost again”, crossed with “I’m not a hipster but I do drink turmeric lattes sometimes.”

    I don’t really know what that looks like, but I’m sure I’ll know it when I see it.

    I walk around Kilo Store three times.

    I don’t see it.

    The next place I go to is called Episode, a short walk away.

    Episode is a little smaller, and a little more colourful. It actually has stores in a lot of places in Europe.

    This particular store has a large selection of second hand sneakers, which I never see much of in shops like these, but it’s a little thin on the jackets.

    I do see a bomber jacket that I could wear and not feel like a weirdo, but deep down I know it’s not the one. It’s something you wear when you’re just starting your backpacking career, not something you wear after being ranked #33 in The Expeditioner’s Top 50 Travel Blogs of October 2014.

    After a short browse of the weird and wonderful in here, I move on.

    The next place is about ten minutes walk away. It’s a place called BIS Army and Navy. Despite the obvious clue in the name, I didn’t actually realise it only sold army and navy clothes until I walked in the door.

    Of course to be polite, I walk around, pretending to look at stuff, and then I see a very cool jacket.

    Now this jacket, which I of course forget to take a photo of, really starts to smile at me. First thing I do after the obligatory glance-over is inspect the price.

    59 euros!

    But it’s brand new. Do I deserve a brand new jacket?

    I try it on.

    Fresh.

    It’s super thick, like a blanket, puffed, army green, lots of cool zips. It’s so warm, you could hike to the Arctic in this jacket. You could climb Everest in this jacket. You could sled with dogs in Siberia in this jacket, probably with just a tee shirt underneath. In fact, maybe (just maybe), you could go north of The Wall in this jacket.

    Only one problem. It’s big. Big like Adele. The old Adele, not the new Adele with the six pack.

    Why is this a problem? It’s not usually, I’ll date any version of Adele, especially the original one. She could sing while cooking breakfast, winters would be warm, it would be heaven. But this jacket can’t fit in my backpack. That’s how fat it is. That’s also probably why it looks cool. Fat jacket swag and all.

    I ponder this decision for a long time. To buy or not to buy.

    This wasn’t the mission. The mission was to buy a throwaway jacket, one that was the price of a kebab. And an exception could be made if the jacket was cool enough, but this jacket…it’s not that cool. And it’s fat. It simply will not fit inside the backpack. I would need to abandon it before my next flight, and this jacket is not in the abandon-able price range.

    Begrudgingly, I put it back on the rack. I walk out of the store. As I do, I get a confirmation email in my gut, telling me it was the right decision. I smile. We’ll set fire to the rain another day.

    The next stop is a place called Time Machine Vintage.

    Just from the outside, I can tell my chances of meeting my perfect jacket here are slim. It’s like when you go to that bar with a friend, and you know it’s going to be terrible, but you go inside and buy a drink anyway.

    I walk inside. I look around for four seconds. I walk out.

    I may be a little wonky, but I don’t think I’m Time Machine Vintage wonky.

    Just across the street from Time Machine Vintage is a place called Mood Indigo: Vintage Denim.

    I head over and immediately things look promising.

    Lots of cool jackets. Levi’s denim, Levi’s khaki, athletic jackets, tracksuits, leather.

    All second hand.

    This is the place.

    On the second rack I touch, I see something. It’s a Levi’s sherpa jacket.

    This is dangerous territory. I’ve always wanted a Levi’s sherpa jacket, the one with the wool inside, especially since the Friday Night Lights era (the show, not the mixtape). I spent my whole year studying in China trying to find a cool, affordable Levi’s sherpa jacket, and it never happened, they were always $300, $400. Ever since then, this jacket has been like my Eleanor (you know, that car that Nicholas Cage…never mind).

    I take it off the rack slowly, rubbing it between my fingers.

    First step in thrift shopping, check the condition. Otherwise you might get attached too early, and end up convincing yourself to buy a poop stained antique.

    I survey it closely for rips, stains, holes.

    Clear.

    Next, smell it. I give it a hearty sniff.

    Minty fresh.

    Actually it was more like a faded musk, but whatever.

    Finally, the fit.

    If you try something on at a thrift shop and it fits you perfectly, it’s usually a sign. The thrift shop gods put it there for you. If you put it back on the rack after that, you disrespect the shop, the moment, the previous owner whose old hopes and dreams live inside that garment. The experienced thrift shopper knows this.

    I put my right arm in. Then my left. I give my arms and shoulders the manly “jacket flick”. It falls on me perfectly. Sleeves perfect. Collar perfect.

    I look in the mirror.

    I don’t see a cold guy in Amsterdam anymore. I see a vagabond. A cowboy. A guy on a trip around the world would definitely wear this jacket. A brooding writer would devour this jacket. A guy who drinks turmeric lattes would be a legend in this jacket. You couldn’t just go north of the wall in this jacket, you could do it wearing flip flops and eat a white walker for breakfast in this jacket. You would climb Everest as a warm up in this jacket. Ryan Atwood would wear this jacket. Maybe even Tim Riggins would wear this jacket. On a good day, even Hank Moody would wear this jacket.

    Then I look at the price.

    69 euros.

    Brendan. My man. Think about this. That’s 69 bowls of roast duck dry noodles in Bangkok. 69 piles of mangoes from that fruit stall in Tanzania. It could even be 69 slices of margherita somewhere in New York. Maybe back in the day you were willing to pay hundreds of dollars for the perfect sherpa that you never found. But you’re older and wiser now. You’ve evolved, emotionally, spiritually. I mean, you’ve even learned to appreciate Adele’s grey-green eyes and artistic integrity and vulnerable sense of humour. You didn’t come all this way in life just to spend 69 euros on some jacket. Did you?

    I go to the Levi’s page on my phone, praying to see a ridiculous price.

    €130 brand new. This ain’t even half price.

    Suddenly feeling the pressure of this decision, I panic. I hastily return the jacket to the rack and step outside. I ask for a sign.

    A hipster cafe appears next door. I sigh with relief. Exactly what I need. As I panic about buying unnecessary material possessions, I decide to remedy the situation by buying unnecessarily overpriced food. I walk inside. The chicken and edamame bowl is €11.70. Sounds like a deal.

    A pleasant surprise: Chicken, edamame and pineapple is actually amazing together. Highly recommended.

    As I pick up every last grain of rice with my chopsticks, my mind turns back to the jacket.

    It’s final decision time.

    I go back to Mood Indigo.

    I walk to the rack.

    It’s still there.

    I put it on again. I walk around the shop three times. I look at myself in the mirror.

    This is it. You want to be a pneumonia-free sherpa-wearing trail blazer or not?

    I pull out the Mastercard, rub it between my fingers. I walk to the counter.

    Committing budget traveller sin right in broad daylight.

    “I’ll take this one.”

    The guy gets up off his stool.

    “Cool man.”

    He rings it up, I hold my N26 card against the machine.

    Blip blip.

    Accepted.

    As he starts to bag it, I hold up a palm and smile.

    “Don’t worry, I’m ‘a wear it right now.”

    As I walk out the door, I feed an arm through the sleeve, swing it around, let the jacket wrap me like a Levi cloud. As it falls upon my shoulders, luxury clothing pheremones emanate from my fingertips. I pull the cuff once, tug on the lapels twice. Fresh. Walking down the street, I stare at myself in the shop windows.

    That’s a Levi’s sherpa jacket, motherfu*ker.

    That’s right. It is. A second hand one. Maybe even third hand. Someone probably vomited on it once. Maybe it has pee on it. And tabasco sauce. Might have even been stolen from a homeless guy.

    But now it’s mine.

    B

    I know, I know, it’s amazing.

    Heading to Amsterdam?

    Check out some of these great day tours by my friends at GetYourGuide:

    Also be sure to check out my Amsterdam accommodation guide!

  • What Happens In The Amsterdam Red Light District? (and how to get there)

    What Happens In The Amsterdam Red Light District? (and how to get there)

    It’s still early, and I’ve been wandering these Amsterdam streets for a couple of hours now. Before I head home, there’s one more thing left to do. Something that everyone does here in Amsterdam.

    The Amsterdam red light district is probably the most famous in the world, rivalled only by Thailand’s Soi Cowboy or Patpong. We’ve all seen photos of it, we’ve all heard about it, but of course nothing is going to compare with seeing it with your own eyes.

    Funnily enough, I can’t even find this notorious place on Google maps. Searching “Amsterdam red light district” sends me to all kinds of strange parts of the city. It’s only after getting on the McDonald’s wifi and asking Google that I realise it’s known by it’s Dutch name – De Wallen.

    It’s a long, cold walk. I feel anxious.

    Finally, after maybe half an hour, I think I see it – some pink/red lights in the distance. As I get closer I can tell it’s what I’ve been looking for – the infamous Amsterdam windows. Interestingly, these few windows are right next to a huge old church in the centre of the city, known as the Oude Kerk, or the Old Church.

    Not knowing what to expect (or I suppose, knowing exactly what to expect but still not expecting it), it’s a minor shock when I walk past the first one. A skimpy girl in lingerie stares back at me. She winks and gives me a “come hither” motion with her index finger.

    I continue walking, quickly shifting my glance to the next window. Another young lady is in there. She’s wearing something similar, and does something similar.

    This continues, as I walk past maybe seven or eight windows, and am propositioned in sign language by seven or eight half naked women. When I reach the end, I take a moment to shake it off.

    It was odd, exciting, sad, peculiar, enjoyable, all at once.

    In the distance, I see even more pink lights, leading into a bunch of small alleyways and side streets. I walk briskly. I can’t wait to see what’s inside.

    In this next maze of streets, there must be at least 100 windows. It’s filled with women in bikinis, lingerie, skimpy dresses. Many of them look slavic, maybe Russian or Ukrainian, Polish, at a guess. Many of them are very pretty, like supermodels. Some are simply gorgeous.

    amsterdam red light district windows

    These few windows were empty, but you’ll normally find sex workers posing behind them. 

    But perhaps even more interesting than the women, is the crowd. There are no Dutch people here. It’s all tourists. This is a tourist attraction. Groups of friends and couples walk around, pointing at the girls, staring, laughing, I can overhear drunk teenagers egging each other to “go for it”. Old men stroll the streets like they’re in a shopping mall. Just like me. Strolling these streets like I’m in a shopping mall.

    After walking down four or five streets, my mind is overloaded. I’ve never seen so many pretty women in their underwear in the flesh in such a short time – literally a buffet of female bodies. One of them is so aesthetically perfect she looks like she’s been photoshopped. As you walk by, most of them look at you with inviting eyes, trying to seduce your euros. Some just stand there like mannequins. Others just sit in their underwear, scrolling through their phones.

    Still, I’m not exactly sure how this thing works. Is there a room in the back? Surely there can’t be rooms behind every one of these windows? Maybe you’re supposed to take these girls to your hotel? Behind the girls all you can see is a table, a chair, maybe a coat hanging on the wall.

    But then a few windows along I see an actual bed in the window. It’s small. And then I think, guys are actually supposed to walk right in there and walk right out? In front of all these people? 

    Surely nobody is going to do that.

    But, right on cue, somebody does it. A young guy, maybe in his twenties, walks into a door. The girl closes the curtains behind him, but not before he gets a split second glance outside to see myself and maybe thirty other people staring at him.

    Does he think we’re judging him?

    I’m not judging you, player. Have fun.

    Eventually I come to what seems like the main street of De Wallen. There are strip/sex clubs everywhere and bright lights lining both sides of a canal. The first thing I walk past is the notorious peep show. It’s a circle of booths that surround a small room, and you pay 2 euros for a 2 minute peep of what’s happening inside.

    Probably one of the weirdest things I’ve seen people actually pay for.

    Of course, I go ahead and pay for it.

    amsterdam red light district peep show

    The booth is tiny, the size of an airline toilet. Not an Emirates one, a Ryanair one. I drop my two euros in the slot, like a video game. The shutter opens and inside there’s a small stage with a circular bed, like in Austin Powers.

    On it, there’s a guy performing oral sex on a woman. Neither of them are supermodels, and neither of them look like they’re particularly enjoying it. Around the bed you can actually see the other “peepers” in the windows of the other booths, all staring at this couple, like we’re in a zoo. Everyone looks like how I suppose I look – kind of amused, kind of confused. Except for one old Japanese looking guy whose eyes are really popping out of his head.

    Then the shutter drops. Time’s up.

    As I exit the booth, a crowd of tourists lingers outside, intrigued as I was, reading the signs and trying to figure out how it works. This place is really going to get two euros out of every one of us.

    I continue my walk around the street. The live sex show sounds interesting, and is infamous in Amsterdam, but it’s 35 euros. I tell myself I’ll think about it (I did actually go back later ready to pay, but it was about to close).

    amsterdam red light district peep show

    And of course in between all these weird places, more windows. More attractive half-naked women. More tourists staring at them, husbands and wives, likely thinking very different things. I walk past one who looks just like Jessica Alba. She sees me looking at her, and turns around and shows me her bum.

    She’s got the type of body that makes men weep.

    Why isn’t this girl a bikini model somewhere?

    How did she end up behind that window?

    After circling more windows through the maze of streets, like a kid in a candy store, I find myself back at the canal. Beside me is the Red Light Secrets Museum. Posted up by the door, they’ve got the TripAdvisor reviews from seemingly satisfied customers. It actually sounds interesting.

    11 euros to get inside. Cheaper than a sex show.

    The museum turns out to be better than I thought. They show you mock ups of the rooms behind the windows, tell you about the landlords who rent them, the prostitution laws, the lives of the girls. Many of them actually make a good living, and work for around 3-5 years before taking that money and doing something else.

    amsterdam red light district

    There’s also lots of interesting facts and tidbits; the standard rate the girls charge is 50 euros for 15 minutes, the average booking takes 6 minutes, and the most requested service is non-sexual.

    They also tell you about the history of the district, the problems they’ve had with trafficking, and other less glamorous parts of the business.

    amsterdam red light district

    Finally, they also let you stand inside a window, so you can see what it feels like from the inside.

    Right at the exit, there’s a confessions wall where visitors can anonymously write their darkest secrets and drop them in a box, and the museum posts the good ones for everyone to see. Most of them are like “I’m cheating on my husband with Bob” but there are some wild ones up there too.

    It’s almost midnight when I get out. As I walk through the maze of streets one last time, the girls seemed to have gotten more aggressive in their selling. Many of them tap the windows as I and other guys walk past. After I make eye contact with a petite young blonde, she actually opens the door and loud whispers at me.

    “Just to talk, quickly,” she nods, with innocent eyes.

    I walk up to her window and say hello. The first thing I notice is the makeup caked heavily on her face.

    “Do you speak English?”

    “Yes.”

    “Do you want to come inside?”

    Of course part of my brain is saying yes, but the answer that comes out is no.

    “No thank you.”

    “Why not!?”

    “Maybe another day.”

    Her smile turns into a frown very quickly and she closes the door in my face.

    How rude, I think to myself.

    amsterdam red light district

    It’s late now. As I start heading back towards the bus stop to go home, I walk over one of the canal bridges and overhear a bunch of American teenagers hyping up one of their friends. I linger a little to see what the deal is.

    Eventually he pats the air and says “okay okay okay”. He takes a deep breath, then walks right up to the window of a very pleasant looking lady.

    From a distance I hear her ask “How old are you?”, he answers “Nineteen”.

    She lets him in and pulls the curtain. His group of friends jump up and down like a bunch of 11 year old girls who have just sold three crates of Girl Guide’s cookies.

    Another American girl walks past, after seeing the whole thing, and asks if he was a virgin. They all say yes with big grins. She high fives them, they all have a laugh together.

    Just as I’m exiting the district, the final alley, another girl opens her door and waves me over.

    “Please, come inside, come inside” she whispers, hurrying me over with her hands, as if there’s a thunderstorm coming.

    I walk over to talk to her. To be honest, I really just want to sit and interview her. Ask her some terrible questions. What a great blog post it would make afterwards.

    “Come inside, come on.”

    I smile at her.

    “Sorry.”

    “Why not?”

    “I don’t have money.”

    “You don’t have 50 euros? I don’t believe you,” she smiles.

    The funny thing is, I actually don’t have 50 euros.

    “Another time,” I tell her.

    This one doesn’t slam the door in my face, she actually smiles and says okay.

    How nice, I think to myself. I say goodbye and walk on.

    Twenty minutes later, I’m sitting at the bus stop, freezing. Over an hour to wait.

    I buy a cheeseburger from McDonald’s and then sit and think about what a weird night it was. I think about the Jessica Alba lookalike and why she’s there. I think about what a balling pimp the Dutch government is, collecting 36% tax on all that tourist nookie money. I think about whether it’s really that strange, selling sex out of a window.

    I guess yeah, it is kind of strange.

    And then I remind myself, it’s freakin Amsterdam, man. Strange is what we came here for.

    Enjoy De Wallen.

    Want To Stay Near The Red Light District?

    If you’re looking to stay near the red light district in Amsterdam, the absolute best choice in the area is the Sofitel Legend.

    It’s a beautiful classic hotel, not outrageously expensive, and is less than five minutes walk from De Wallen.

    It’s also one of the nicest hotels in the city, full of all kinds of tourists, business travellers and families, so if you’re in town specifically for De Wallen, nobody will suspect what you’re up to!

    You’ll find the best rates here.

    If you’d like something a bit cheaper, the Urban Vibes Guesthouse is very affordable and located right beside the district.

    You’ll find the best rates here.

    How to get to the Amsterdam Red Light District?

    On Google maps, the Amsterdam red light district is named “De Wallen”. It’s easily searchable on Google maps.

    Most likely you will be arriving at Centraal station, although you can get off at any of the stops around the Centrum area as De Wallen is quite big and Amsterdam is very walkable.

    For a first timer, De Wallen is actually a little hard to find, despite being reasonably large and central. It took me a while.

    The easiest way to find it is to head to De Oude Kerk, which is a massive old church in the centre of Amsterdam. Just search for it on Google maps, it is huge and very easy to find. Strangely enough this old church is right in the middle of the red light district. If you arrive at night, once you get to the church you will probably see a few red light windows glowing just a few metres away.

    However, these are not the main windows of the red light district. Keep walking towards the canal opposite the church and you will see alleys crossing over it (if in doubt, follow the other guys/tourists, there will likely be many). Through those alleys will be many windows, and once you come out the other side you will be in the heart of De Wallen with red windows everywhere.

    You can spend hours wandering those alleys but remember, there is a strict no photo policy, and I would strongly suggest respecting it.

    Certainly don’t post any photos online.

    Many of the women there come to Amsterdam just to work in the industry, and have many friends and family at home who don’t know what they do.

    Other than that, enjoy!


    Visiting Amsterdam and…

    Looking for tours and activities at an affordable price? I use GetYourGuide! Always great deals and local perks.

    For travel insurance, I always use World Nomads – get protected for just a few dollars a day!

    Somewhere to stay? Booking.com gives you the biggest selection and the best rates.

    Also be sure to check out my Amsterdam city guide, with breakdowns of where to stay and the coolest things to do!

  • How To Do A 10 Day Juice Fast: A Monster Guide

    How To Do A 10 Day Juice Fast: A Monster Guide

    When I posted about my juice fast on Instagram this week, your questions came pouring in. You all wanted to know how I did it, what juices I drank, whether I was at a retreat, etc etc. I’ve written up this huge post for you all, which will detail everything you want to know, and more.

    I’ve actually done a juice fast before.

    It was when I first bought my juicer, a few years ago. I did a three day juice cleanse, and did a few more over the years, but never managed to get past 3-4 days.

    This time I decided I’d finally push it harder.

    My travels for the year finished around December 22, and I wanted to start immediately, but I decided to wait until after Christmas dinner with my family. Then I figured I’d help finish the leftovers on Boxing Day too. Then part of me wanted to wait until after New Years Eve, but I realised I was just being bitchy. Never leave to tomorrow what can be started today!

    So December 27th I started my ten day juice fast. Before I tell you how it went, let me talk about what a juice fast is, and why you might want to do it.


    Why Do A Juice Fast?

    1. It “reboots” your digestive system

    Did you know up to 30%-50% of your daily energy can be spent digesting food? That’s why your body shuts down after you eat a huge meal. It’s using all its energy to break everything down and send things to the right places. Your stomach, intestines, kidneys, liver, brain –  it all needs to start working. If you’re constantly eating (and therefore, digesting) food, that leaves little energy for anything else, including healing, recovery, cleansing, brain function etc.

    Stopping food intake allows your digestive system to switch off for an extended period of time, meaning your body can distribute it’s energy elsewhere. Most people report large increases in energy after the initial “torture” days of the fast, and even healing of old injuries.

    2. It still gives you all your nutrients

    When you juice vegetables, you extract the nutrients from the vegetable fibre. That means your body needs to digest almost nothing, but you still get (most) of the nutrients of the vegetable. On average days I juiced about 20 servings of fruits and vegetables – far more than what a regular human eats. Even if juicing only gives you half or a quarter of that, it’s still better than the diet of 90% of the people I know. Contrary to what most people think, juice fasting isn’t starving and does not leave you malnourished.

    There are even people who go on permanent or long term juice diets (generally for weight loss reasons), up to six months, and are still fine and healthy. The juice diet is actually considered one of the best ways to elevate nutrition levels while cutting calories to lose weight.

    3. It flushes your system

    If you go on Youtube and see what a dirty colon looks like, it will make you wonder exactly what’s inside yours, too. The modern diet contains a lot of things we shouldn’t be eating/drinking. This results in mucus/faeces/plaque forming in our digestive organs. Some studies estimate you can have up to 2-3kg of old faeces stuck in your digestive tract, which can be from years ago. Fasting can help you flush this old matter out, either naturally or with the help of enemas/colonic irrigation. This is why a juice fast is often referred to as a juice cleanse, as one of the main benefits is the cleansing of your digestive tract.

    4. It’s healthy!

    I don’t need to tell you that a large intake of fruits and vegetables is healthy. A break from eating will also help you rethink how much food you need to eat, how often you eat it, and exactly what you should and shouldn’t be eating. One thing I’ve learned from travel is you only need very small experiences to fuel large changes in perspective – this fast was certainly another example of that.

    5. It’s a challenge!

    Let’s face it – life is easy. 99% of us have never been to war, never lived through a plague, never had to walk into a coal mine and drill into the darkness, waiting for a cave to collapse on top of us just to support our families. We’re already 99% wimp, so sometimes we need small challenges just to make sure we don’t turn 130% wimp. Most people who attempt a juice fast give up, even though on paper it’s not actually that difficult. Challenges are good for us.


    The Rules Of A Juice Fast

    So, what are the rules? It’s pretty simple:

    Only freshly made juice is allowed – no store bought or long-life juices. You need to make them yourself with fresh produce and a juicer, or buy it from somewhere that does. Remember you want juice, not smoothies. Smoothies are just blended up solids, which aren’t allowed.

    Avoid fruit juices due to the high sugar content. General rule is 80% vegetables to 20% juice.

    No food (obviously), but if you are seriously about to die you can eat one or two grapes or berries.

    Herbal tea is allowed (no milk, sugar, honey, or any additives).

    Vegetable broth is allowed (not vegetable soup, big difference)

    Go for at least 7 days. In this particular juice fast I actually aimed for 10 days and ended up going for 11, or just under 2 weeks. Some people try and aim for 2 weeks; I would suggest waiting until you’re more experienced at fasting before going that long.

    Side note: Do you need to go organic? Of course an organic juice cleanse is better than a non-organic one, but it’s not essential. Non-organic produce is still nutritious – just make sure you wash it thoroughly, and you can peel you produce too if you wish.


    My 10 Day Juice Fast Diary

    To give you an idea of what it’s like, here’s a brief diary of my ten day fast:

    Day 1

    I’ve bought two litres of fresh juice from a juice bar (I’m still travelling). One is a red juice (carrots, beets, lime, ginger) and one is a green juice (kale, spinach, celery, apple). I finish both within a few hours, then just drink water. I’m hungry at night so I cheat and eat a small slice of papaya. Maybe better to ease myself in, I tell myself. So I’ve already cheated before the end of Day One. #fail

    Day 2

    I buy a litre of juice at the airport (kale, spinach, celery, apple). It’s from the same shop I bought from yesterday (Top Juice, in Australia). I have a four hour flight today so should be interesting. Day 2 is typically a difficult day; I feel very tired, also because I’m still a bit jetlagged. I fall asleep on the plane, when I wake up there’s a snack box in front of me with cake, yogurt and a sandwich. Get it away from me! The girl next to me looks backpackerish, so I ask her if she wants it. She’s so happy (all backpackers love free food). Finally, I get off the plane – in New Zealand now! I make around a litre of my standard green juice with my juicer at home (celery, cucumber, lemon, ginger, capsicum, apple).

    No bowel movement today.

    Day 3

    HUNGRY. Drink three litres of juice today, two green, one red. Massive headache. I spend most of the day in bed. Still no bowel movement.

    Day 4

    Headache isn’t as bad as yesterday, but still quite light headed. I get out of bed and trip over my backpack, and I’m so dizzy that I stumble around like I’m drunk for a few seconds and collapse into my shelf. Am I dying? I make a red juice and my stomach sings when it hits. Yum. I drink some activated charcoal in the morning too, to try and encourage a bowel movement.

    I also start making some vegetable broth (onions, celery, carrots, garlic, then pressure cook for a few hours). Of course you need to strain it and discard all the vegetables, you can only drink the broth, no solids allowed. The taste is mild, but after adding some sea salt it does wonders to satisfy the cravings for hot, cooked food. I freeze a few cups of it for the rest of the fast.

    By the end of the day I finally have a bowel movement, thank god. It’s mostly solid.

    I do 20 pushups just to make sure the body still works.

    Day 5

    Slept terribly. Weighed in at 56kg! (probably started around 61kg).

    Have 2-3 liquid bowel movements over the day. Charcoal seems to be doing the trick. Most people say their bowel movements reek due to the heavy detox, but mine seem pretty healthy. Energy feeling a little higher now. Took a long afternoon nap.

    I “eat” a mandarin after waking up. By that I mean I put the pieces in my mouth, chew them and get the juice, then spit out the solid. It’s a good trick to satisfy you mentally, and technically isn’t cheating.

    It’s New Year’s Eve today, so I go to a barbecue with a litre of juice with me. I go late to avoid all the food. I do eat two blueberries though late at night (second cheat!).

    However, I’m going home on New Years Eve healthy, not drunk, and mid-fast. What a good feeling.

    Day 6

    New Years Day. Weighed in at 55kg.

    Almost no hunger pangs. I only get them two or three times during the day, where my stomach rumbles for one or two minutes. Other than that I don’t feel hungry at all. Body seems to be embracing the fast now. Had a solid bowel movement, no different to a regular one (haven’t eaten anything in 6 days and still passing solids? Where’s it coming from?)

    Do 20 pushups and a few kettlebell swings just to keep the muscles working.

    Drank about three litres of juice today – two green, one red.

    Brain felt good, worked the whole day. Had a cup of vegetable broth at night.

    Day 7

    Today was the best day so far.

    Woke up feeling good, not hungry at all. The last couple of mornings have been like this – haven’t felt the need to make any juice until at least 4-5 hours after waking. I just get out of bed and start working. Water keeps me happy until the late afternoon. Of course whenever I see food I want to eat, but it’s easy enough to just walk away.

    By mid afternoon I still hadn’t had a juice, and felt enough energy to workout. I did a little yoga, planked, and did fifty pushups.

    Then I took a salt bath to continue my sweat and get some toxins out. Filled the tub with Himalayan pink salt and tea tree oil and soaked for forty minutes – total sweat fest and felt amazing after. The idea of this is to open up your pores and absorb the minerals from the salt directly into the skin while sweating out the bad stuff. Bit of bro-science, but feels good.

    As I’m typing this, it’s 11pm at night and I still haven’t had anything today except water and coconut water. Not hungry at all (I actually feel kind of full, stomach must be shrinking). Amazing.

    Day 8

    Woke up this morning feeling great, tons of energy, not even hungry! Again, didn’t feel the need to drink a juice at all.

    I finally drank one late afternoon, since I thought two days without juice might be unhealthy. I actually started to feel a small headache after. However, by the late evening I was feeling nice and fresh again. Brain was super clear, did lots of work and reading.

    Also knocked out 50 pushups again just to keep things moving…

    Things are getting easier and easier now. Days are flying by!

    Day 9

    Things were feeling a little backed up, hadn’t passed a bowel movement in a couple of days, so I decided to finally bite the bullet and do a colonic treatment.

    If you don’t know what this is, it’s when you flush water through your colon to clear out any faecal matter in your digestive passage. Here’s how it goes:

    First, the guy sticks a nozzle a few inches up your bum (yes, it’s uncomfortable). It’s attached to a colonic machine, where one tube sends water in and another tube sucks it out. He turns on the flow to send water in – you tell him when your guts feel full, then he reverses the flow and sucks all the water out. Then he slowly increases the pressure and alternates between hot and cold water. For the first ten minutes the expelled water was clear, only a few small bits of debris. I figured because I was on a fast and I’m young and healthy, my colon was probably nice and clean. Woop!

    Then after about 10 minutes I started feeling very light headed. I told the guy my stomach is cramping and I’m getting dizzy. He stopped the flow for a moment and told me to relax. Then I told him I’m really dizzy I think we should stop. Then a few seconds later, the expelling pipe filled with dark brown gritty water. “You see that, that’s a lot of toxins leaving your body. Your adrenaline is pumping, that’s why you’re dizzy.” He turned the flow back on and a large amount of dark toxic stuff came streaming out for about 30 seconds, then the water turned clear again. My head cleared and I came out of a huge cold sweat, feeling rejuvenated. It was pretty cool! That happened another two times during the session. Throughout there were also periods where I was flushing out lighter brown water and I could see all the mucus and old fecal matter getting flushed out. I guess this is the cleansing part of the juice cleanse!

    After the session, you need to go sit on the toilet, because there is still quite a lot of water in you. As soon as my bum touched the seat it was a waterfall. Lots of solids came out. Imagine that – no food for 9 days and still had solids pouring out. They were different to normal bowel movements too – heavy, like little rocks.

    Finally I headed downstairs for some water and a little debrief – he said I had a really good result and flushed a lot on my first session, not everyone does.

    On the drive home I felt really light and free, and couldn’t stop laughing. Must have been a big endorphin release.

    Rest of the day was business as usual – juice and rest. However I was expecting more bowel movements after doing the colonic, which didn’t happen. Maybe I’m totally emptied out? Hopefully.

    Day 10

    I woke up feeling a little light headed. Weighed in at 53.5kg.

    Didn’t feel hungry or the urge to make a juice so just drank some water until the evening. Finally made a big green juice – kiwifruit, celery, apple, lemon, ginger, capsicum, cucumber.

    I also made another vegetable broth, this time with lots of tomatoes and drank a large cup of that.

    Still no bowel movement today!

    Day 11

    Woke up super early for my second colonic. I decided to do a another one as I was starting to feel heavy in the guts again.

    This colonic was a lot less intense than the first one. We had a blockage halfway through, so we stopped and I went to the toilet and passed quite a lot of solids. Then I came back and we managed to clear quite a lot of green water and mucus, and by the end I was feeling really emptied out.

    After we were done, I thought about whether to push the fast to 14 days. However because the colonic was mostly clean, I felt like the fast had run its course, and there wasn’t much more to gain from fasting any longer. My system was definitely empty, and it wasn’t even a challenge anymore to not eat – I wasn’t hungry during the days, and my energy was high.

    So I called the fast on the 11th day. Time to eat!

    This is me at 53kg, about 7-8kg lighter than I was on Day One:

    Now, you’re supposed to ease yourself back into eating, so the plan was to be vegetarian/vegan for a few days, as fresh vegetables are the easiest thing for your body to digest.

    First things I ate were some sauerkraut and coconut yogurt to introduce some probiotics. Then I had a big bowl of salad (courgettes, mushrooms, cucumber, tomatoes, garlic, parsley, olive oil) and a coconut. Later at night I ate some cooked veges and some fancy bread, also snuck a few bites of chicken (cheat #3!).

    Here’s the interesting thing: I felt terrible after eating! After the yogurt and kraut I was fine, but after eating my salad I started to get sore guts and felt really tired. I had to go take a nap, and knocked out for about three hours. After that I felt a little better but still sluggish. Over the rest of the evening I came right, but it was the opposite of what I was expecting (I’ll explain why this happened in more detail below).

    As I write this it’s now 2 a.m., my energy levels are okay, guts still a little sore, but I think I should be firing tomorrow.

    Day 12

    Today is my second day of eating. I fasted for the morning and started eating around 4pm. It’s past midnight now and I’ve had a juice with basically everything in it (green and red ingredients combined). I also had some coconut yogurt and paleo cereal, a coconut, some silverbeet, eggplant stew, lentil pasta, a piece of corn, plus some stir fried beans and carrots. Also I had a smoothie with blueberries, cacao, maca, pea protein and almond milk.

    Tomorrow I think my stomach will have readjusted back to normal and I’ll start eating big calories. The goal now is to put my weight back on, with only the healthiest food.

    Overall I’m feeling good, back to normal!


    How To Do Your Own Juice Fast

    So, now for the details. How do you actually do a juice fast? Below I’ve written up the protocol I followed, which I really just made up myself. It will be good to tailor it to your own lifestyle, everyone is different! As long as you follow the basic rules from the beginning, you should be fine.

    A disclaimer – I am not a doctor or nutritionist or any kind of medical professional. Everything I know about juices and fasting is based on my own personal research from books, blogs, documentaries etc. I’ve been juicing regularly for around 4 years; all my evidence is anecdotal and from personal experimentation. Do your own research, please!


    What Is The Best Juicer?

    I highly recommend making your own juice. Juices oxidise quickly, and pre-packaged juices will be nowhere near as nutritious or pure as juice made in your own kitchen.

    Obviously to do this you will need to buy a juicer.

    Juicers are not expensive. In fact they are very affordable.

    You might have seen some with hefty price tags, but the good news is you don’t need the best masticating juicer in the world and in fact, you don’t need a masticating juicer at all. If you’re on a budget, a cheaper centrifugal model is just as good and in fact exactly what I used for several years.

    Where Can You Buy A Good Juicer?

    Juicing is pretty popular now so you can find good juicers at most standard home and department stores, and can easily order one online at Amazon.

    To simplify it for you below I’ve listed two juicers I can recommend you begin with. You can get them easily on Amazon or find a similar model at your local store.

    However there are many to choose from so to simplify it for you I’ve listed two good options that I can recommend below:

    Best Centrifugal Juicer: The Breville Fountain

    breville fountain juice fast

    This is actually the first juicer I ever owned.

    I still have it and it works great. It doesn’t work very well with leafy vegetables, but it works really well with fibrous ones like carrots, celery, beets, apples etc.

    This is a centrifugal juicer and waste is slightly higher with these types, but they’re still really good. When it comes to the best centrifugal juicers, I think Breville is definitely the best brand. They’re reliable and have been making them for years.

    If you’re buying your first juicer, this is the model I’d recommend. Awesome value too at under $100. You can click here to grab one on Amazon.


    Best Masticating Juicer: Aicok Masticating Juicer

    I’ve now upgraded to a masticating juicer because they put out less waste and you can juice more things with them.

    However, they are usually more expensive. If you plan on making juicing a daily habit in your life, the improved efficiency will likely make it worth it.

    What’s the best masticating juicer? Look for one of the quality slow masticating juicers that really take the time to squeeze as much juice as possible.

    These models are great because you can just flick it on and pop vegetables in one by one and they’ll slowly grind away as you wash and chop more in the background. It’s the favourite part of my morning routine!

    I’d say the best slow masticating juicer for newbies would be the Aicok. It’s reliable and sturdy, but without the $400 price tag that comes with the flashier models. You can grab one here on Amazon.


    Best Juice Recipes For A Juice Fast?

    Lots of you asked about this, so I’ll share my top secret juice recipes with you.

    Keep in mind these recipes have been carefully formulated over a number of years using ancient kung fu principles. Please respect their power.

    The Red Juice

    I usually stick to two juice recipes – one red and one green.

    I suppose since I invented these juices I had better name them.

    I will call this juice The Red Dragon, named after that dodgy Vegas casino in Rush Hour 2.

    The red juice recipe:

    • 4 carrots
    • 1 large beet
    • 1 red apple
    • 1 lemon
    • 1 thumb of ginger

    What the red juice is good for:

    Carrots are the base of this juice and really nutrient rich (vitamin A, vitamin C, vitamin K and vitamin B8, potassium, copper, iron and manganese). They also contain beta-carotene, a strong antioxidant.

    Beets contain betanin, a powerful antioxidant. They are also packed with minerals and are full of nitrates, which improve blood flow throughout the body. Weightlifters often drink beet juice for the nitric oxide, which opens up the blood vessels and gives them a greater pump. This is one of nature’s steroids!

    Apples are one of the most nutrition-dense fruits we have. Rich in vitamins and polyphenols and packed with antioxidants. Red apples have slightly more sugar than green ones, but both are good. I use red apples for red juice and green apples for green juice, just to keep it simple.

    Lemons are packed with vitamin C, beta carotene, vitamin A, folate, calcium, magnesium, phosphorus and potassium, not to mention one of the most alkalizing fruits we know of. I use a lemon in every juice I make, including the skin.

    Ginger is another ingredient in all my juices. All around the world you will find people treating ailments with fresh ginger, whether it’s digestion, blood pressure, inflammation, nausea, or just common colds and flus. There is too much good stuff for me to write about it here, but it’s one of the most super superfoods we have. There’s no problem juicing ginger with the skin on, just make sure you wash it first.

    Tips: Go easy on the ginger at the start; it’s strong if you’re not used to it. Use apples to control the sweetness – use less apple if it’s too sweet, add another apple if not sweet enough. Unpeeled lemons are best, but peeling them is fine if you can’t handle the flavour.

    The Green Juice

    What shall we call this juice? I think I’ll call it The Ninja Turtle, named after the best cartoon series in history.

    This juice should be your main juice. As a general rule I like to stick to one red juice per day, and everything else I drink is green juice. Getting your greens is super important on the fast, so drink as much of this juice as you can.

    The green juice recipe:

    • 3 sticks of celery
    • 1 small cucumber (or half a big one)
    • 1 green bell pepper
    • 1 green apple
    • 1 lemon
    • 1 kiwifruit
    • 1 thumb of ginger
    • Any leafy greens you want

    What the green juice is good for:

    Celery is amazing. It’s packed with high amounts of vitamin K, vitamin A, vitamin C, folate, and potassium, plus many other micronutrients. Make sure you juice the leaves as well!

    Cucumber is a favourite for skin fanatics, packed with vitamin A and C, plus a good supply of B vitamins and is highly alkalizing. Also has a high water content so is a great base for juicing. The great thing about cucumber is the mild flavour; it mixes well with anything – you can even add it to your red juice.

    Green bell peppers are high in vitamin A, C and E and a large range of B vitamins. Also one of the best sources of carotenoids you can find (phytonutrients that prevent cancer and other diseases). One of the most nutrient-dense vegetables you can get.

    Green apples have a slightly richer micronutrient profile than red apples and contain less sugar.

    Kiwifruit contains more vitamin C than almost any other fruit, plus is a good source of vitamin K, vitamin E, potassium, folate and manganese. Juice it with the skin on!

    Leafy greens are possibly the healthiest food on the planet. You can include any leafy greens you want, although try use cheaper ones, as you don’t get that much juice out of them. Save the expensive ones for when you can start eating again after your fast. Leafy greens should be a big part of your diet when you start eating solid food again.

    Remember, these recipes are just guidelines and you can add all sorts of other things to your juice. Some good things to experiment with are grapefruits, oranges, rhubarb, chard, wheatgrass, limes, tomatoes, even pineapple and pears. Just stick to that 80/20 vegetable/fruit ratio to keep the sugar level down.

    The vegetable broth

    During the fast, you’re probably going to get some cravings for savoury, cooked food.

    To satisfy this craving I started making vegetable broth as a “cheat drink” during my juice fast.

    This was a lifesaver for me around Day 4-5 when I was dying to drink something other than juice.

    The recipe:

    • 1 onion
    • 4 garlic cloves
    • 1 celery stalk
    • 1 carrot
    • 1 tablespoon apple cider vinegar
    • sea salt and pepper to taste

    Cover and boil for 1-2 hours, use a pressure cooker if you have one. Then strain the broth and drink! Remember – don’t eat the vegetables. This is nothing more than drinking vegetable flavoured water, it should be clear and light. It’s the perfect thing to drink before you go to sleep.


    What To Expect On Your 10 Day Juice Fast

    Day 1-2

    You’re probably going to feel really hungry by the end of Day 1. This is normal since your body is used to eating 3-4 meals per day. Load up on juice and rest. Your body will adjust soon.

    Day 3-4

    This is the torture period and your body is going to start feeling as shitty as possible to try and get you to eat. During this period it’s common to experience a “die-off” or “Herxheimer reaction”. This is when a lot of toxins and yeast in the body start to die rapidly. Sounds good, right? Not really – when they die, they release all the noxious substances they contain, and if they die rapidly they usually release toxins in your body faster than your liver can expel them. That leads to you feeling really sick; headaches, nausea, brain fog, fatigue. Drink a lot of water and green juice and get a lot of sleep.

    The majority of people quit during this time, but prematurely ending the fast during this deep cleanse is very bad for the body. Once you’re in the torture zone, do your best to power through and allow your body to finish cleansing. If you’re really struggling, don’t break the fast completely; try and ease your way through by eating some fresh fibrous fruits that digest easily, like mango, papaya and banana, or maybe even some lightly steamed vegetables. Remember this isn’t about ego! If a healthy “cheat” like this will allow you to continue your cleanse, it’s a good idea.

    If you do this over a couple of days and still feel really ill, you might need to consider breaking your fast. Prolonged die-off is bad for you. Start eating three small, healthy meals a day of fruits and vegetables, like the things I suggested above. Let your body recover, and you can try starting your fast again in a few days. A good summary of die-off and why it happens can be found here.

    Day 5-7

    Your body will start to embrace the fast, your digestive system will switch off and your stomach will start to shrink. You should start feeling more and more energy each day. Hopefully you’ll have some healthy bowel movements around this time too. If you have diarrhea, don’t worry, your body is flushing out toxins. If it smells terrible, that’s also a good thing. Remember that stuff has been sitting in your body! And now it’s gone. Just stay hydrated and get a lot of rest. Make sure you’re getting 2-3 litres of fresh juice per day. By Day 6-7 you should start feeling pretty fresh.

    Day 8-10

    Your body should be well adjusted and you shouldn’t feel hungry at all. Hopefully your energy levels are high and your juices are keeping your nutrient intake intact. You can even get back in the gym and start returning to full workouts. You can decide whether to push your fast for a long period or break it here. Your body will tell you when it’s ready. Either way, it should be reasonably smooth sailing from this point. Congrats, you made it!


    How To Break Your Juice Fast Properly

    Whether you push your fast to 14 days, 21 days or even a month, eventually you’ll need to break the fast.

    This was actually the big mistake I made. How you break your fast is as important as the fast itself! The first thing I tried to eat was that enormous bowl of salad in the photo above, which gave me a a lot of stomach pain and made me really nauseous.

    Now I’ve learned that the correct way to break a fast is to start slow. Drip feed very easily digestible foods into the body.

    The perfect thing to start with is very small servings of fruit. Maybe eat a small slice of watermelon, then an hour later have a few grapes, then an hour later eat a mango and so on.

    Slowly build yourself up to small salads and finally cooked food.

    Remember your digestive system is dormant after the fast. If you start eating steak and burgers and pasta straight away, your body won’t be digest it properly and it will clog up your system.

    You’ve spent so much effort fasting and resetting your body, make sure you restart it in the right way when it’s finally time to start feeding again.

    IMPORTANT: Take probiotics!

    Another thing to remember – your system is empty so it is essential to rebuild the gut! Make sure you eat a lot of probiotic foods like kefir, sauerkraut, sugar-free yogurt (with live cultures), kombucha. This a super important step so let me take you through it piece by piece.

    Probiotic supplements

    The BEST thing you can do at this stage is take a probiotic supplement. This will flood your gut with beneficial bacteria after your fast has killed all the candida, harmful bacterias and parasites in your digestive system. Here’s a good article about the importance of a healthy gut, and how effective your gut flora can be at boosting your immune system and solving many serious health problems

    For a probiotic supplement, my recommendation is the Renew Life 150 Billion. This has a much higher colony count than most off the shelf probiotics, which only give a measly 2 or 3 billion units.

    After a fast, I’d recommend minimum 50 billion units per day, but ideally more.

    Renew Life is my go-to because it’s not too expensive, and you get them easily on Amazon. Click here to grab some!

    It’s almost impossible to overdose on probiotics, so load them up, I’d recommend taking a probiotic supplement 2-3 times a day or even more while you re-introduce food back into your body.

    Fermented vegetables

    Fermented vegetables are perfect because they have been broken down to the point that they’re basically pre-digested. This is the ideal food for after a fast!

    Kimchi is one of my favourites. After a fast I eat a spoonful of kimchi alongside every meal. It’s perfect alongside a salad or soup, or even on the side of some scrambled eggs! A locally batch-made kimchi is what you want, and if made right it should be loaded with good probiotics. Something like this organic kimchi from Small Town Cultures is a great choice.

    Sauerkraut is also great, which is fermented in the same way as kimchi but contains only simple cabbages, rather than a range of vegetables and spices. This organic sauerkraut from Whole Foods is exactly the kind of thing you’re looking for!

    Kombucha

    Kombucha is a fermented soda and is a good replacement for all your drinks post-fast. Instead of coffee in the morning, have a kombucha. Instead of Coke at lunch, kombucha! No wine during dinner, drink kombucha! It’s delicious and it’s good for you and is loaded with probiotics.

    For a great sugar-free kombucha, I highly recommend Remedy Kombucha. All their flavours are great and it’s not expensive at all. You can grab a box here!

    Yogurt

    The last thing I like to eat is yogurt, usually for breakfast or in my smoothies or just for a snack on its own. I prefer to use coconut yogurt as I generally avoid dairy for a few weeks after my fast. Coconut yogurt gives you all the probiotic benefits of regular yogurt and is easy on the stomach too. It’s also vegan friendly if you’re strictly plant based. You can usually find these in your local supermarkets, but if you want to get some delivered a good example is this Whole Foods yogurt by Cocoyo.

    As for food, get lots of leafy green vegetables and fresh fruits in, at least for the first few days.

    Try and stay away from foods that make your digestive system work hard, such as gluten and lactose.

    It’s also been shown that vegetables move through the colon much easier than animal products, so it’s good to stay vegan/vegetarian for a few days as you get the digestive system working smoothly again.

    Let this be an opportunity to make some permanent healthy lifestyle changes too; more fruits, more vegetables, more sleep, less junk food. Your body should be strong and healthy post-fast; keep it that way!

    What you need to get started on your first juice fast

    A juicer!

    Got your juicer yet? There are literally hundreds on Amazon. If you’re a newbie juicer or on a budget, go with the Breville Fountain. If you want to spend a bit more and go masticating, go for the Aicok.

    Glass bottles

    Glass is far preferable to plastic to store your juice and drink from. Even BPA-free plastic isn’t good for you.

    I always drink straight from a glass and juice every glass fresh, but if you’re going to make a day’s juice in the morning and store it, I recommend using a set of glass bottles like these. Don’t store it longer than a day.

    Cleared schedule for 3-4 days

    The initial days of your fast are going to be taxing on your body. Try and set aside 4ish days where you don’t have any big commitments and can stay home and relax. Once you get through the initial few days, you should return to life as normal (you might even feel better than normal!)

    Probiotics

    Really important for when you end the fast. The best thing to take is a probiotic supplement at least twice daily to restore your microbiome. I use the Renew Life 150 billion.

    As foods, I recommend eating fermented vegetables. I like to eat organic sauerkraut such as this one, and/or an organic kimchi such as this one.

    Kombucha is also a great addition. I love this sugar-free kombucha by Remedy Kombucha.


    That’s it! That’s everything I can tell you. I really hope this was helpful and you all take some time to rebuild your health, whether by fasting or diet changes or anything else.

    Remember, the above is all based on my own personal experience – your experience may be different so listen to your body and do what’s best for you. If you have any questions, just leave them in the comments, I’ll be here.

    Good luck!

    Bren

  • What’s The Fastest Way To Learn A Language? 7 Day Plan

    What’s The Fastest Way To Learn A Language? 7 Day Plan

    Hey. 你好. Qué pasa? Nzuri? Bon.

    Over the past few years I’ve seen the dividends of all my language study from my twenties. Often on the road I get the chance to chatter in a foreign language, which often leads to people asking me, “Bren you speak Spanish too? How many languages do you speak?”

    The truth is I speak far fewer than I would like, and nowhere near as well as I would like. But even my scruffy résumé has served me really well on my travels. Just a few words in another language has opened doors to some incredible experiences.

    Language has fascinated me ever since I started travelling – that we all say the same things in such different ways. This led to me spending much time and money during my travels to learn language and reduce my dependency on English. Funnily I always thought language was fun for everyone – like video games and eating ice cream. It didn’t occur to me that many people actually don’t like learning language. Which explains why so many never do.

    What’s the fastest way to learn a language? It’s not complicated. Their a certain things that are better to learn before others, certain words you should learn and certain ones you shouldn’t bother learning at all. If you focus on the right areas, you can find yourself speaking rather quickly.

    Language doesn’t need to be a mammoth task, and it doesn’t require months and months of studying to be able to say a few basic things. In this guide I’ll take you through a few tips and hacks that will have you holding your own in just a few days. Once you experience that and have your first conversation in another language, however broken it might be, I promise, travelling will never be the same again.

    Why learn the local language

    For me it’s mostly about respect. The world is a big place and England is only one country in the top left corner. Not everyone in the world speaks English or even cares to try. Yet every day I see travellers confused and frustrated that locals in other countries don’t understand English.

    Would it not be weird if someone walked into your coffee shop and said “一杯咖啡和一碗沙拉“, and then got angry when you couldn’t understand them? Yet we English speakers seem to do that all the time.

    It goes both ways. If you respect the locals by trying to communicate in their own language, they will respect you back for the gesture. You will make more friends, have more interesting conversations, be welcomed into more communities, and be given more opportunities to experience local life.

    Even if you only learn to say “nice to meet you” and “thank you”, you will be surprised how far that will take you.

    What’s the fastest way to learn a language?

    Here is my basic breakdown, divided into difficulty:

    Level 1:

    • Greetings
    • Numbers (1-100)
    • Basic nouns
    • Basic verbs

    Level 2:

    • Numbers (100+)
    • Basic adjectives
    • Basic adverbs
    • Verbs in the present tense
    • Basic sentence structure (Noun + verb. e.g. “eat apples”)

    Level 3:

    • Verbs in past and future
    • Fuller sentence structure (.e.g. “John likes to eat red apples”)

    Level 4:

    • Everything else

    If you are trying to learn the bare minimum before a trip, I recommend sticking with Level 1.

    This will give you the best chance of communicating without learning anything complex, and sticking to those subjects is definitely the fastest way to learn a language if you just need very basic communication.

    Level 1 only requires memory and no real understanding of the language structure, but will still give you the tools to say many everyday things. That’s perfect! And you can do it in a couple of days.

    Level 2 will take you longer but is not difficult. Level 3 and above is where a little more “study time” is required.

    A 7 day plan:

    Let’s say it’s a week before your trip. Obviously I’m not going to teach you to become fluent in a new language in 7 days. That’s impossible. There are people who’ve spoken English their entire life and are still horrible at it.

    But if we learn smart we can definitely learn to say a lot in a new language in that short time.

    Here are a few interesting things to consider:

    • Even if you speak a new language broken, almost everyone will still understand you. For example, in a restaurant, you don’t need to say “May I please have a bowl of fruit?” You could just say, “Please, bowl, fruit” with a big smile, and you’ll get exactly what you want. I’m not saying you should aspire to speak broken, I’m saying you don’t need to be perfect to start.
    • If you like chicken, you’ll probably say that word quite often. And if you don’t like shrimp, you probably won’t say that word at all. So you need to personalise your learning, rather than just learning generic lists. This cuts your learning time exponentially.
    • Most words you learn in a typical language course are useless. For example you might learn the word “elephant”. How often do you say the word elephant? Maybe once or twice a month. Whereas you say the words “eat” and “toilet” probably every day, and the words “why” and “because” every second sentence. So in reality you only need to learn a few words, much less than you would expect. Just 100 words will get you much farther than you would imagine!

    What I’m getting at is learning a language should be highly personalised, like going to the gym. A grandfather who is 100kg overweight and a 14 year old girl will have totally different training plans. It is the same with language. You can improve your progress exponentially this way.

    Consider this as an example; my Swahili is slightly better than my Chinese. Why is this strange? Because I spent an entire year studying Chinese full time at a university in Shanghai, with professional teachers, exams, textbooks, countless hours of study, homework, class every day. With Swahili, I’ve only done around 50 hours of self-study while in Tanzania. How does 50 hours of self-study get better results than an entire year in a top university?

    The answer; learn smarter. In my Chinese course we had to learn long lists of completely useless words, like mainframe and parliament. Not only that, I had to learn to write and read them in Chinese characters. That led to hundreds, maybe thousands, of hours spent learning words I might use once or twice a year. Imagine how silly it was that I could write the Chinese character for embassy, yet couldn’t order a simple cocktail at the bar.

    When I started learning Swahili I wanted to be smarter. Because I didn’t have exams or teachers, I got to decide all my own material. I used my experience of studying Spanish and Chinese to help me strip the language down to the bare essentials, and create the most efficient language course, designed specifically for me. Not only did I learn faster and better, it was a lot more fun as well. Once I was able to converse about basic things, my vocabulary and understanding rocketed quickly just from everyday conversation.

    The plan below will introduce you to this approach; how to get to a basic conversational level in a new language in just 7 days. I’m going to go through the steps using two languages; first, Spanish, as it’s a language familiar to many. But I’m also going to do this demonstration in Italian.

    Why Italian? Because I’ve never learned a word of Italian in my life, I have no Italian friends and I’ve never even been to Italy. By laying out the steps to learn Italian in 7 days, this will be a perfect simulation of starting a language from absolute zero.

    Note: This also that means some of my Italian below might (definitely) be wrong, so any Italians reading please chill. You can feel free to correct me in the comments too 🙂


    Day 1: Numbers

    Numbers are important because you use them for almost every activity (room numbers, bus fare, shopping, table for four, etc). Also it’s a nice, easy thing to start with when learning a new language.

    We learn 1-10 to begin with. Anybody can do that in any language.

    For most languages, 1-10 takes you a long way. For example, in Chinese if you can count to ten you can count to 99. And if you learn three more words (“hundred”, “thousand”, and “ten thousand”) you can count to a million.

    If you’re learning French however, counting to 100 is like an epic academic quest for enlightenment.

    So it all depends on the language. But we’re just worried about 1-10 for now.

    So the first thing you will learn is:

    English Spanish Italian
    One Uno Uno
    Two Dos Due
    Three Tres Tre
    Four Cuatro Quattro
    Five Cinco Cinque
    Six Seis Sei
    Seven Siete Sette
    Eight Ocho Otto
    Nine Nueve Nove
    Ten Diez Dieci

    If you don’t know how to pronounce a word, Google Translate has an audio option, too:

    Counting to ten is a cool first thing to learn because you can kind of sing it to yourself over and over, in the shower, in the car, wherever you want. It’s like your new ABC’s. It sticks with you too – I can do it in maybe ten to fifteen different languages now, just from memory.

    In reality you should be able to learn to count to ten in any language within 15-20 minutes. A nice surprise for me here was that Italian numbers are so similar to Spanish, which I did not know before! That made it an easy start.

    Leave it there for Day 1.


    Day 2: Greetings and basic words

    Greetings are probably the thing you will use the most so it’s good to learn the most common ones.

    Whenever you walk into a restaurant, greeting your waiters at breakfast, the receptionist, even taxi drivers and strangers on the street. Also for Day 2 it’s a good idea to throw in some basic words that you will use all the time (please, thank you etc).

    Here is a list of starting suggestions. I’d also encourage you to add your own!

    English Spanish Italian
    Hello Hola Ciao
    How are you? Como estas? Come va?
    I’m fine Bien Bene
    Good morning Buenos dias Buon giorno
    Good night Buenas noches Buonanotte
         
    Please Por favor Per Favore
    Thank you Gracias Grazie
         
    Yes Si
    No No No
    Excuse me Disculpe Scusami
    Sorry Lo siento Scusa
    Why? Por que? Perché
    What? Que? Che cosa?
    Who? Quien? Chi?
    Which? Cual? Quale?
    Where? Donde? Dove?

    You may also be wondering where and how you find out all the translations for these lists. I’m just using Google Translate, but Google will give you all kinds of free online dictionaries etc. The resources online are endless – it shouldn’t be difficult.

    I made a similar wordlist for Swahili recently and just asked a Tanzanian friend to sit down with me and translate everything – took maybe half an hour, so that’s another way to do it.


    Day 3: Basic verbs

    To populate this list, think of the verbs that you do every day. Don’t include verbs like “paint” and “sail” because you probably don’t do those things every day (unless you’re a painter or sailor).

    Remember, we’re trying to narrow things down to the most usable words. Limit your list to 20. Here’s a good starting list:

    English Spanish Italian
    To eat comer mangiare
    To drink beber bere
    To sleep dormir dormire
    To wake despertarse svegliarsi
    To walk caminar camminare
    To run correr correre
    To wait esperar aspettare
    To cook cocinar cucinare
    To buy comprar comprare
    To go ir andare
    To come venir venire
    To see ver vedere
    To want querer volere

    Bonus points: After you learn this list of verbs, you would get a lot more mileage out of them by learning how to conjugate. That just means instead of learning the verb in infinitive form (to eat) you could also learn how to say “I eat”, “You eat” etc.

    For example in Spanish, the verb to eat is like so:

    to eat comer
    I eat como
    you eat comes

    And a quick Google tells me that in Italian it is:

    to eat mangiare
    I eat mangio
    you eat mangi

    I just Googled this blog post to figure that out.

    If this all sounds like gibberish to you then don’t worry, just learn the verbs as they are and speak broken to begin with. People will understand you. Also many of you would have studied conjugated languages in high school and already know how this works, so go ahead and spend a bit of time learning the basic forms (I, you, they). Of course this doesn’t apply to all languages.


    Day 4: Basic nouns

    Now it’s time to learn the objects we use every day. Food we eat, items we use, that kind of stuff. Here’s a good list to start:

    English Spanish Italian
    Food la comida il cibo
    Drink la bebida la bevanda
    Room la habitación la stanza
    Car el coche l’auto
    Restaurant el restaurante il ristorante
    Bus el autobús il bus
    Coffee el café il caffè
    Tea el il tè
    Juice el jugo il succo
    Beer la cerveza la birra
    Supermarket el supermercado il supermercato
    Brother el hermano il fratello
    Sister la hermana la sorella
    Taxi el taxi il taxi

    This list is the most open to customising. It’s important to learn things common in your life that may come up in conversation. For example if your favourite sports are boxing and surfing, add those words in. Learn how to say the name of your home country. If your favourite food is chicken and chips, add those too. If you’re a lawyer or engineer, add those, and so on.

    Likewise you need to account for where you’re travelling to. If you’re going somewhere to surf, learn the words for ocean, beach, surfboard. If you’re going hiking, learn the words for boots, mountain etc.

    This is what effective language learning is about. Instead of memorising any old word list, create your own. If you’re not a pilot and none of your family or friends are pilots, don’t learn the word for pilot! Minimise your workload.

    For this list I’d set a word limit of about 25-30 words. At this point would be a good time to go back and start revising all your words from Day 1-3. You can forget them quite quickly.


    Day 5: Common words

    This list is all about words that come up in general day-to-day conversation. Did you know just 100 words in the English language make up 50% of all written material? There are maybe 250,000 words in the dictionary, but a small collection of 100 words make up 50% of your average book.

    Unfortunately that doesn’t help us with our cause much; most of them are words like “be” and “the” and “that”, and obviously going around saying “be that the” in another language won’t do much for us. But the concept is a good one to follow. What are the keywords we most commonly use in general conversation?

    English Spanish Italian
    Up arriba su
    Down abajo g
    Left izquierda sinistra
    Right derecha destra
    Near junto vicino
    Far lejos lontano
    Man hombre uomo
    Woman mujer donna
    Fast rápido veloce
    Slow despacio lento
    Here aquí qui
    There ahí
    This esto questo
    That eso quella
    Some alguno alcuni
    All todo tutti
    None ninguno nessuna
    Inside dentro dentro
    Outside fuera fuori
    Hungry hambre affamato
    Thirsty sed assetato
    Sometimes a veces a volte
    Always siempre sempre

    This list is super important because many of these words will come up in day to day interactions. Asking for directions, asking questions, explaining things to people, pointing to things on a menu. You’ll be surprised how often you use the word “sometimes” or “there”. No matter which level of language you get to these words will always be useful – learn this list well!


    Day 6: Basic phrases and replies

    The interesting thing about languages is they are routine in many ways. For example, if someone asks “How are you?”, 90% of the time the reply will be “I’m good” or “I’m fine” (except in Australia, where they’ll say Yeeah yeah bloody good mate just watching the footy yew!)

    Likewise in Swahili if you say “Mambo” to 100 people, 99 of them will reply “Poa”.

    One thing new language speakers do is learn a bunch of words and phrases like “What’s the time?” and “How much is it?” but never prepare themselves for the answer! If you are anticipating an answer you will have a much higher chance of understanding it, even if they say it fast or mumble it. You will also be able to put together an answer if the same phrase is said to you.

    Here are a few good examples to start with:

    English Spanish Italian
    How much is it? Cuanto cuesta? Quanto costa?
    It’s twenty pesos/shillings Veinte pesos Venti euro
    What is your name? Cual es tu nombre? Come ti chiami?
    My name is Batman Mi nombre es Batman Mi chiamo Batman
    How old are you? Cuantos anos tienes? Quanti anni hai?
    I am 20 years old Tengo veinte anos Ho vent’anni
    Where are you going? A dónde vas? Dove vai?
    I’m going to… Estoy llendo a…. Andrò a…
    What are you doing? Q haces? Cosa fai?
    I am…(eating) Estoy (comiendo) Sto (mangiando)
    Where is…(the dog)? Dónde esta…(el perro?) Dov’è… (il cane)?
    It is…(inside the house) Esta… (en casa) È (in casa)
    Do you like it? Te gusta? Ti piace?
    Yes, I like it Si, me gusta Sì, mi piace
    How is it? Cómo es? Come è?
    Good Bueno Buono
    What’s the time? Qué hora es? Che ora è?
    It’s 2 o clock Son las dos Sono le due
    Who is he/she? Quien es el? Chi è lui?
    She is (my sister) Ella es (mi hermana) Lei è (mia sorella)
    I would like… Quisiera…(por favor) Vorrei…(per favore)

    Day 7: Practice!

    And that’s it.

    If you learn everything above, you would have actually learned a few hundred words, will be able to say many basic day-to-day words and phrases, and will probably understand quite a few things said to you.

    Take notes, write down the parts that you struggle with, revise revise revise.

    Remember language is largely a practice and usage skill, meaning the more you use it the better you will get. Your knowledge also compounds, so while it may seem highly difficult at the start it will get much easier as you learn more words and phrases.

    We’re also skimming the fat on a lot of work that goes into language. Most language schools try to educate you on all four skills (reading, writing, listening, speaking), and we’re instead focusing 90% on speaking. That’s going to decrease your learning time a lot without much downside at all (unless you plan on reading the newspaper every day or writing an essay).

    Also remember, the above lists are just examples. Remove or add words/phrases to make the lists most usable for you, so they represent the things you most use/say in your everyday life. These lists are not complete – they are there for you to build on.

    How much time will you need? The above shouldn’t take you more than 1-2 hours per day. I translated all the lists above into Italian in less than 30 minutes. It helped that it was so similar to Spanish and French (I didn’t expect that) but most romanised languages you should be able to do in similar time. Non-romanised languages like Thai or Chinese will take longer but not painfully so.

    After that it’s just about putting in time. Keep it in a doc on your phone or if you’re old school like me write it on a notepad. Everything above will fit on one page. You can read it on the train or while you’re lying in bed at night. Remember there’s no super IQ needed here – it’s mostly just memorisation so anybody can do it.

    The last and most important tip of all is: Speak! As soon you touch down in the country, use it every opportunity you can. Learning everything is useless if you never use it. Don’t be afraid to make mistakes (nobody is expecting you to be perfect), make it fun and use a few more of your words each day. I’ll admit it’s intimidating at the start, but after a few days you won’t be able to shut up.

    Just a handful of hours and I promise you, your next trip will be a completely different experience.

    Good luck!

    Bren