Category: Travel Tips

  • Is This Finally The End Of Couchsurfing? (And What’s Next?)

    Is This Finally The End Of Couchsurfing? (And What’s Next?)

    If you’re a part of the Couchsurfing community, you’ve no doubt heard the news.

    And you’ve certainly seen the outrage.

    If you log in to your Couchsurfing account today, this is the screen you will see:
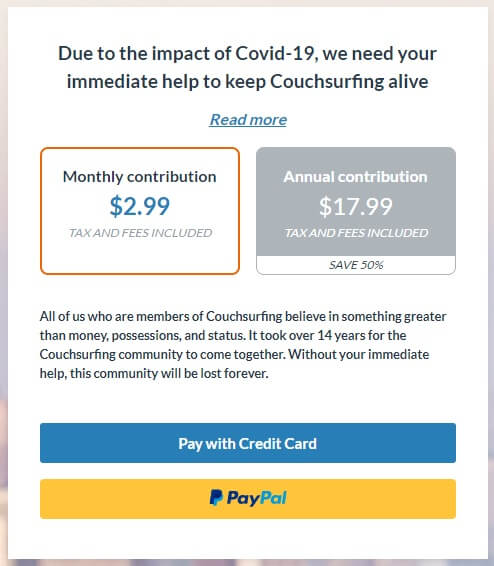
    What’s more, everyone has been locked out of their accounts until they pay the monthly fee. All our friends lists, messages, groups, photos, profiles and references are now locked behind this paywall.

    Many of us have seen this coming, but after nearly two decades of helping people travel the world for free, it’s official. Couchsurfing is no longer free.

    To be 1,000% clear – I am not against paying fees, and I’m not at all against paying a fee for Couchsurfing.

    I prefer it actually. I already pay monthly subscriptions for Spotify, Headspace, multiple blogging tools, multiple WordPress plugins, Audible, a couple of premium newsletters – quite a lot of stuff, actually. I prefer it this way, because when you pay for things like these, they’re usually way better than the free stuff.

    What I do care about is who I pay this money to, and how they use it.

    Over the last few years there have been many “incidents” between Couchsurfing HQ and the community, and “Couchsurfing is dead” was chanted by many longtime members. But most of us let it slide. We tolerated one more stunt, because we love this community that much.

    However, I think this one is finally going to nail the coffin shut.

    Again – it’s not about the $3.

    None of us care about the $3.

    In the words of The Count Of Monte Cristo: There’s a history here that you don’t understand!

    So let me rewind and recount this Couchsurfing story from the beginning, since it’s quite a long and dirty one.

    Couchsurfing and the many “Incidents”: From 1999 until today

    The idea was born in 1999 by an American programmer named Casey Fenton. When travelling to Iceland he found it too expensive to book a hotel, so he randomly emailed 1,500 University of Iceland students from a hacked email list and asked for a couch to crash on.

    He got about 100 offers, and this sparked the idea of creating a website.

    In 2003 he founded Couchsurfing as a non-profit, and officially launched the site in 2004.

    Couchsurfing took over the travelsphere and became one of the most popular travel sites in the world. But rather than blooming because it was such a beautiful site (it wasn’t) it bloomed because of what it stood for.

    Casey Fenton regularly said the goal of Couchsurfing was to create a better world, one couch at a time. As many of you have experienced, the backpacking culture is not guided by money, but by trust and generosity and openness, so the Couchsurfing mission resonated. Everyone loved Couchsurfing.

    There was no money in it, obviously, so from 2006 to 2011, the site was built, coded and moderated entirely by volunteers. The events and groups were also moderated entirely by volunteers. Volunteers from every continent donated tens of thousands of hours of work to keep the site operational and the community growing.

    Many consider this period the golden era of Couchsurfing. Nobody made any money from the site, it was funded purely by donations and 100% a labour of love by travellers around the world. “Hosting” and “surfing” quickly became dictionary terms in the backpacker community. And the community was rich. Any time you were in a new city you could just post in the groups, who’s around this afternoon? And instantly you’d have awesome people to hang out and explore with. I started travelling full time in 2011, and was neck deep in the backpacking community. Couchsurfing was central to the culture. It was everywhere.

    Even in my hometown I used it – after a surf one morning, I felt like hanging around to enjoy the beach. Logged onto Couchsurfing and what do you know? There’s a Couchsurfing event going on. I found them and spent all day lounging on the beach chatting. For those years, the site thrived.

    In May 2011 came the first “incident” that started to split the community. Couchsurfing abandoned its non-profit status and changed to a for-profit corporation. Many of the volunteers that had dedicated much of their lives to the site protested. Why did they need to be for-profit? Where was the profit going to come from?

    But this was just a precursor to the second “incident” that happened four months later. In August 2011 the founders accepted $8 million dollars in a Series A funding round. One year later they took an additional $15 million in a Series B. The beloved site that had operated solely on volunteer hours and donations for eight years raised $23 million of venture capital in 12 months.

    I guess from here, it’s not too hard to guess how the story goes. Probably because we’ve seen this story a thousand times before. When venture capitalists put $23 million into something, they expect to get much more than $23 million back out.

    (according to former CEO Jennifer Billock’s Linkedin, the company was sold again to a private equity firm in 2015, so technically we don’t even know who the owners are right now):
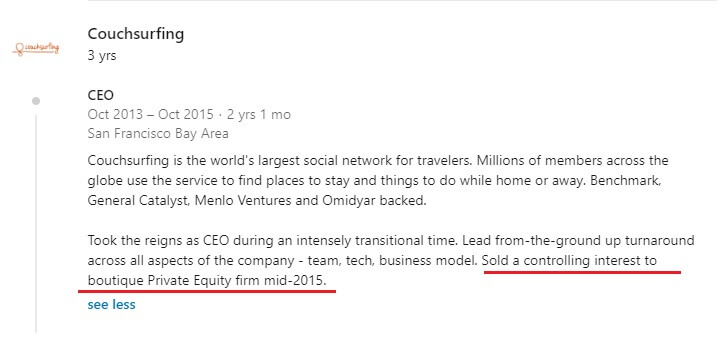
    Almost the entire community was against this (except maybe the founders, and the new owners) but Couchsurfing assured the community nothing would change.

    “We are confident that we will find a way to generate money that doesn’t hinder the amazing experiences that CouchSurfers have,” they wrote on their blog.

    Yet many things started to change.

    The third “incident” was a big one, but inevitable. Couchsurfing started hiring and staffed their own team to rebuild the site, moderate the forums and events and groups, and basically told the volunteers that had dedicated the last six years of their lives to the site they weren’t needed anymore.

    Not to mention, those volunteers that had worked endless hours on the site for years got none of that big payday money. Couchsurfing was now a for-profit company, and this company now owned all the code and the site, and all the profit being made from it went into the pockets of the new owners and staff. The people who actually built the site got nothing.

    This was doubly damaging because the new staff at Couchsurfing weren’t Couchsurfers, so they had no idea how the community actually worked. After they completely rebuilt the site they emailed everyone saying “Yay, look how great the new site looks!”

    And yes it probably looked nicer, but it also damaged the community in a way that wouldn’t become clear until years later. For years Couchsurfing volunteers had built and nurtured “city groups”, with regular meetups and many years of friendships. The site was redesigned and overnight those communities were gone. To give you a comparison, imagine if Facebook rehauled their site, and overnight every single Facebook Group disappeared. That’s exactly how it was with the new Couchsurfing. In their place they built generic city pages with events and forums.

    While trying to turn it into a fancy Silicon Valley website, they destroyed the communities people had spent years building that made Couchsurfing Couchsurfing.

    Those were the foundations of Couchsurfing and looking back now at the big picture, I think this was where the downward spiral really began. Even when they turned for-profit and ads started going up everywhere, the community still survived. But once they imploded the original communities that the site had been built on, it meant the membership started to disband and finally give up on site (or become much less active), and newer, less loyal members started to make up the core membership. As we’d start to see, the site is nothing without a critical mass of loyal members.

    The fourth “incident” was when Couchsurfing tried to start charging fees to surf. This was where they really crossed the line and one of the few times I saw massive pushback from the membership.

    This was a notification I got in 2016 when a host confirmed I could stay with them:
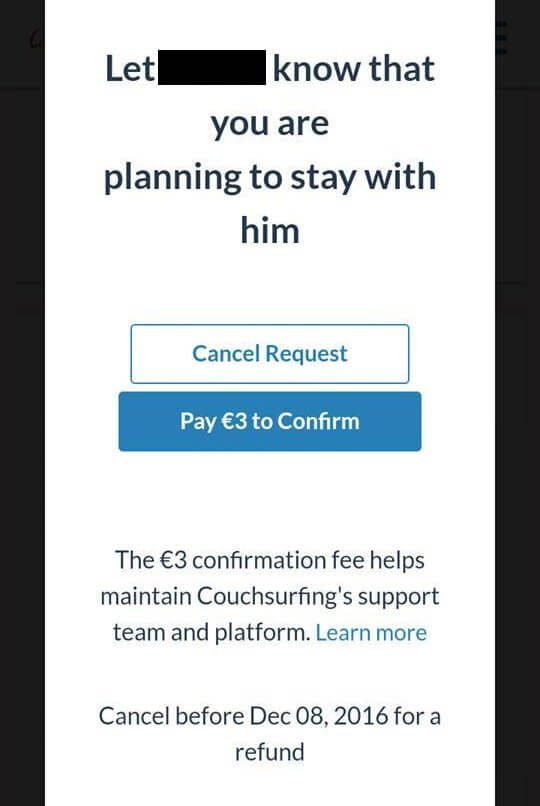
    Again – I have no issue with paying a small fee like this.

    Hosts invest a lot of time and money into hosting. Hosts often pick surfers up from train stations or bus stops, feed them, drive them around, do laundry, provide water and internet and power and linens. I’ve done my share of hosting. It cost money. Always.

    So the fee wasn’t the problem. The problem was hosts were going to put all this effort into hosting, and then the fee wasn’t even going to the host!

    Even then, most hosts would never want to receive a fee anyway. Couchsurfing resonated with us because there was no money involved. If people wanted to pay to stay somewhere, they could go to a hostel. Couchsurfing was supposed to be different.

    To make this a double insult, we all knew exactly where those fees were going. This was 2016 and Couchsurfing were leasing some fancy new offices over in San Francisco:


    Couchsurfing offices

    We were all sleeping on floors and couches while these guys were playing nice in Silicon Valley. But that still wasn’t the worst part.

    What made the move triply bad was Couchsurfing had promised they would never do this. After taking their VC millions in 2011, they published a blog post that said (I quote):

    “CouchSurfing will never make you pay to host and surf. It’s against our vision to exclude anyone from having inspiring experiences for financial reasons, and that’s not going to change just because our methods of generating revenue do.”

    -Couchsurfing 2011

    As you can imagine, the move generated a big uproar (again) from the community, including from myself and other friends of mine on the site:

    They never replied to me or anyone I know, but to my surprise and to Couchsurfing’s credit, they pulled this idea after a month or so and surfing remained free.

    Until now.

    This fifth “incident” happened a few weeks ago where Couchsurfing suddenly locked everybody out of their accounts.

    It didn’t matter if you were one of the most active members of the community and had thousands of positive references and hosted hundreds of surfers per year, and even if you had paid for lifetime verification.

    As soon as we logged in, we were asked to pay a monthly $3 fee to access our profiles again:
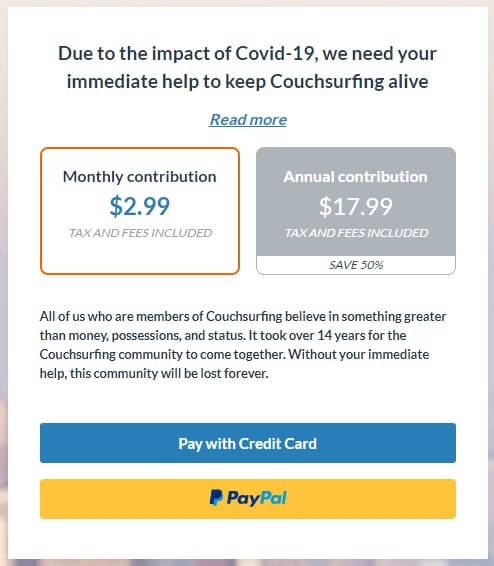
    All our friends lists, photos, references, groups, were suddenly held hostage behind a paywall.

    After promising Couchsurfers would never be forced to pay to host or surf, we were now being forced to pay just to log in.

    When I saw this I was obviously disappointed (again), not because of three dollars, but because of how we got here. Because how did we get here? $23 million squandered over the years on CEO’s we never asked for and who never talked to us, fancy offices nobody needed, being bombarded with ads on every page of the site and app (which still doesn’t work properly), numerous other money grabs over the years which I won’t even go into right now, all the other “incidents” I haven’t even mentioned, and finally it had come to this. Locking us out of our beloved community for $3 per month.

    Which led to the biggest question of all…

    Where has all the money gone???

    Despite painting themselves right now as a company that has always been frugal, and all their staff are now valiantly working from home in the spirit of Couchsurfing and living on ramen, that’s not the case.

    In fact, I’m quite certain Couchsurfing has earned PLENTY of money over the years.

    Don’t forget, I’m not just a travel blogger, I’m also a Chartered Accountant. This kind of thing used to be my job (and now I also know a little about websites). So maybe I can find the money. Let’s have a look.

    How much does Couchsurfing make from verifications?

    They said on their socials last week that only 4% of active members pay to verify their profiles, which usually costs around $30 per year (it differs between countries). So let’s take a guess.

    Of its 12 million members, it’s estimated there are 400,000 active hosts, and you could guess an equal amount of active surfers, giving them ~800,000 active members.

    At 4% that’s 32,000 verified members, $30 per active member, that’s around $960,000 per year in verification fees (a guesstimate of course).

    I have also seen the 2008 financial statements, shown to me by the volunteer accountant from back when CS was a non-profit (us legacy CSers stay pretty tight 🙂 Even then they were bringing in a million per year in verification fees/donations, but with a tiny fraction of the members they have today.

    So I would say $960,000 per year is almost certainly an underestimate.

    How much does Couchsurfing make from ads?

    CS makes money from ads. Every Couchsurfer will tell you there are more ads on the site than Couchsurfers.

    In fact, I can just show you. Here’s what a Couchsurfing profile currently looks like:
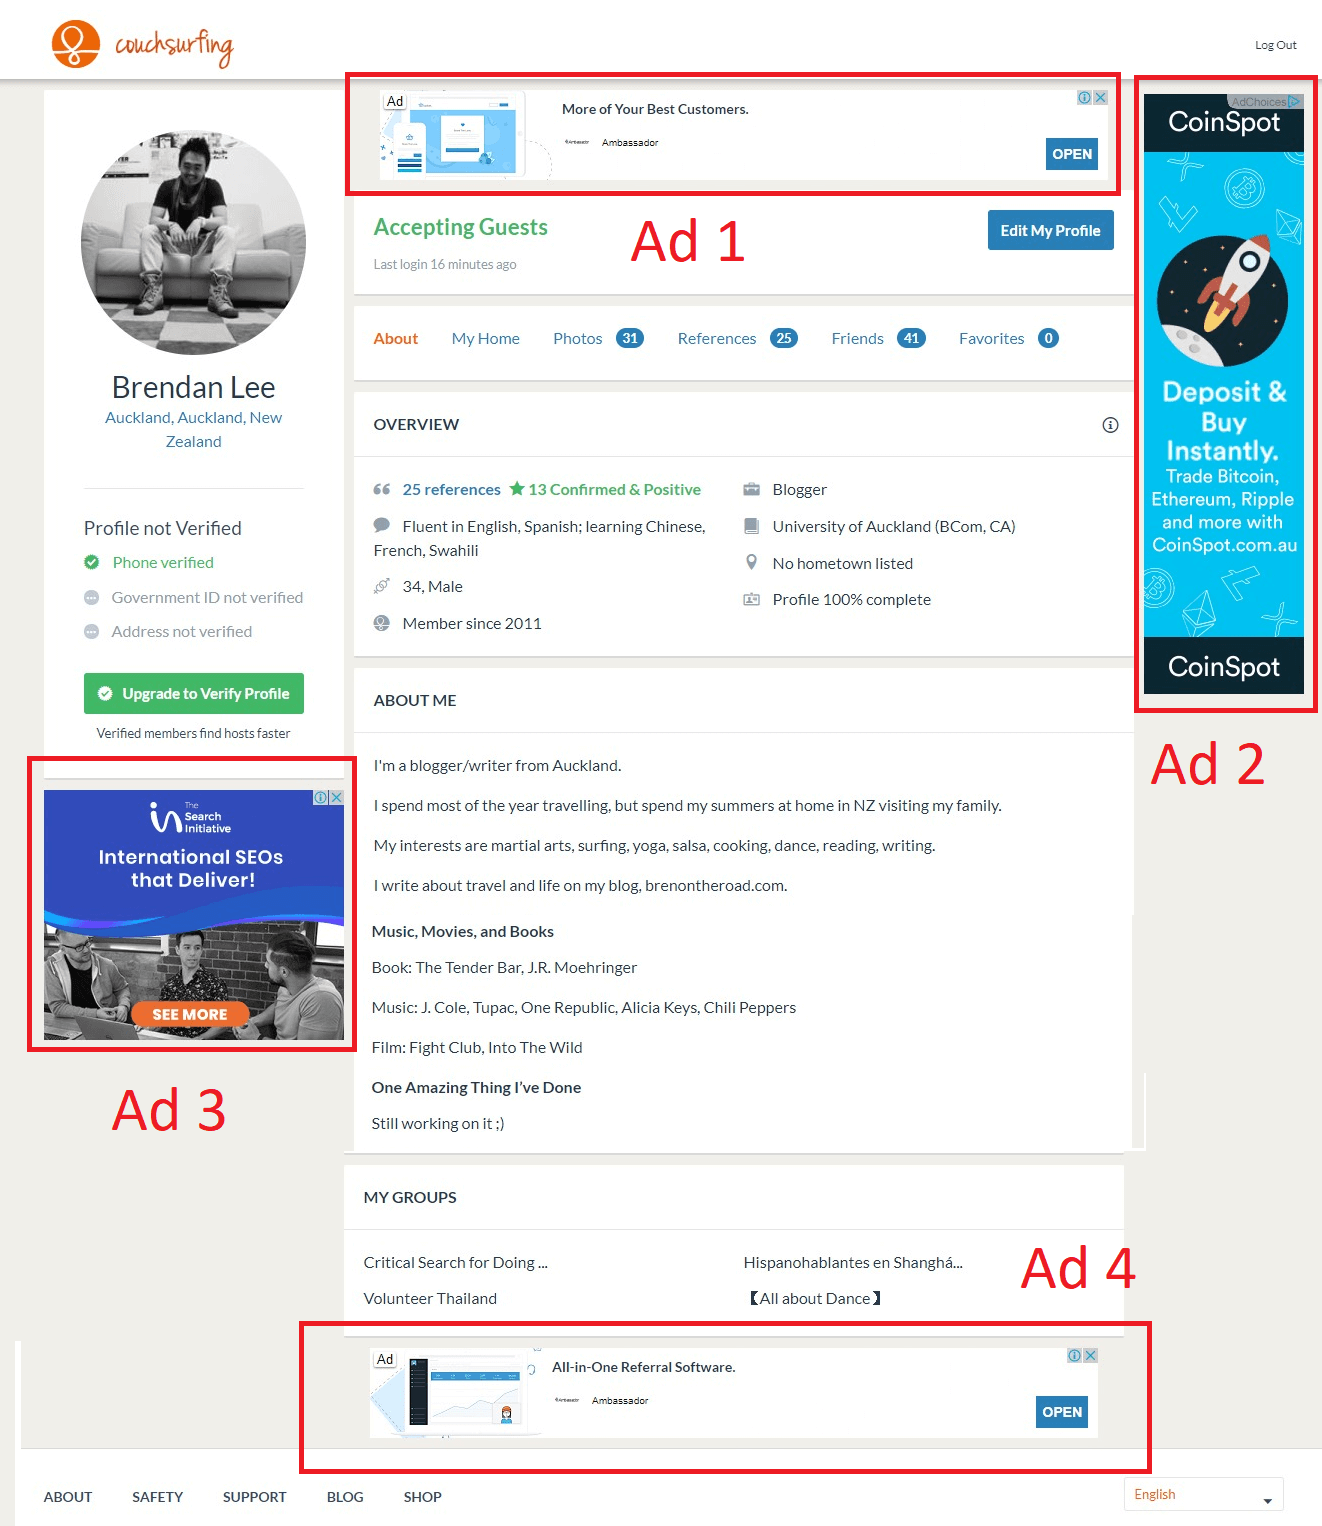
    That’s pretty much as many ads as Google will allow you to put on a page (header, footer, left and right sidebars, and maybe one more in-content).

    In other words, they are maxxing their ad space allowance.

    How much is that in dollars?

    We would need to know their traffic. But we can make a rough guess using some tools.

    Here’s the current Couchsurfer Alexa score, which ranks a website’s traffic/engagement on the internet. It’s the 10,000th most popular site on the web currently:
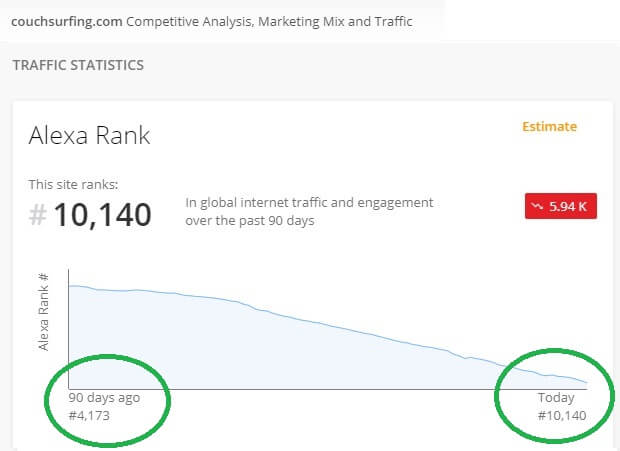
    But you can see that 90 days ago (before Covid 19) their rank was actually 4,000 (that is very high).

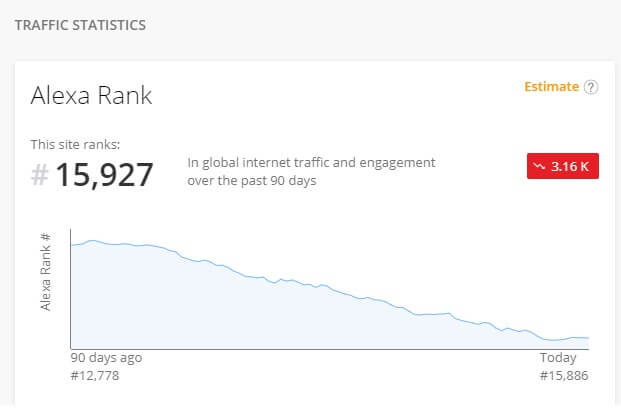
    I don’t pay for Alexa premium so it’s hard to find a perfect comparison, but to give you a yardstick, that puts it significantly higher than a mainstream travel site like The Travel Channel, which ranks around #16,000:
    And a few months before Covid hit, it was ranking almost on par with the NZ Herald – New Zealand’s largest newspaper:
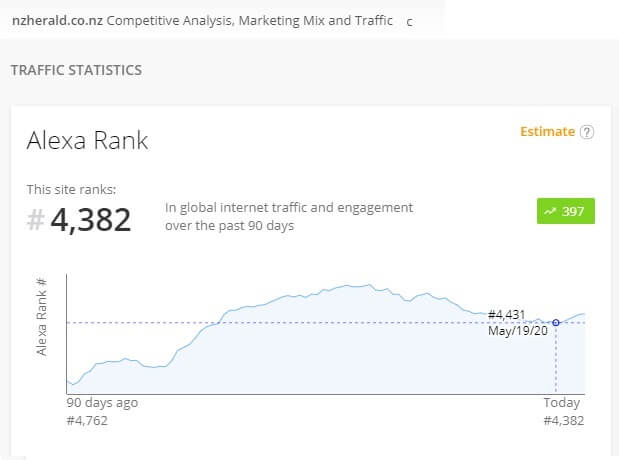
    That’s a lot of traffic. Millions of page views a week.

    We can cross check this with more tools (blogging tools are so much fun, hey?)

    Here’s their score in SimilarWeb, which ranks sites purely on traffic:
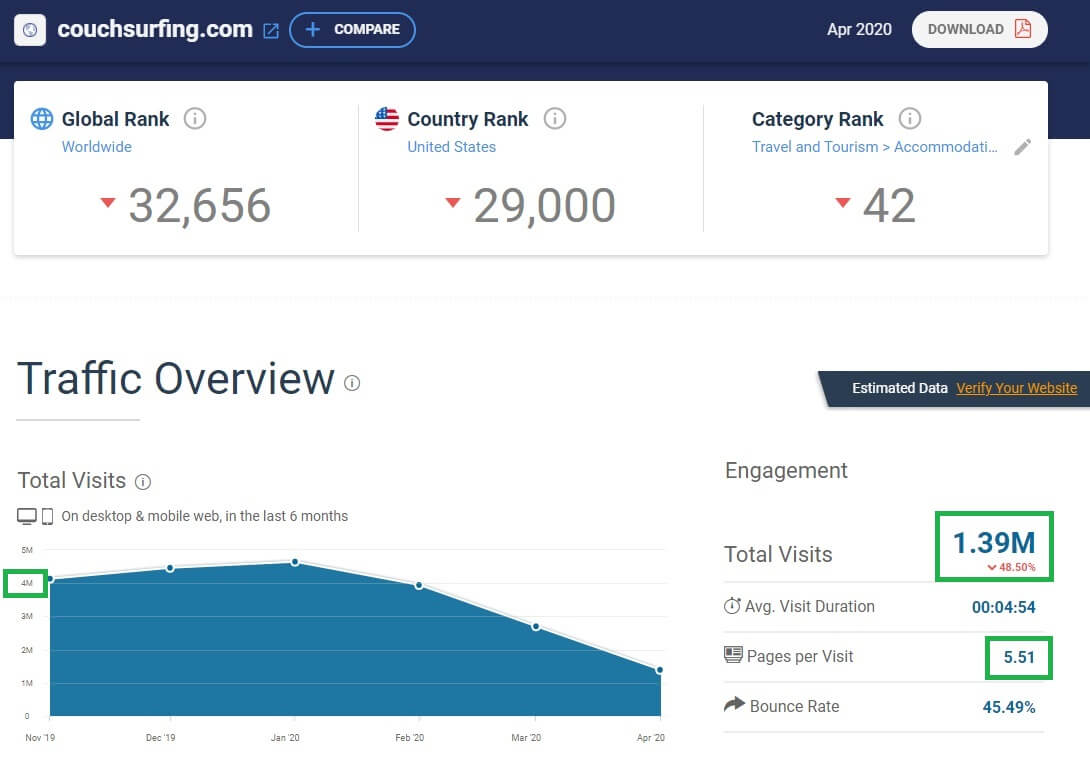
    Couchsurfing ranks 32,000 globally, and is the 42nd most popular travel site in the world.

    More importantly, it had 1.39 million visits in April. Look at the graph though! Before Covid when people were travelling, they were actually doing 4.5 million visits per month.

    You can also see they get ~5.5 page views per visit. Do some math, and that adds up to around 25 million page views per month.

    Just to cross check again and make sure we’re in the right ballpark, here’s the Travel Channel SimilarWeb results:
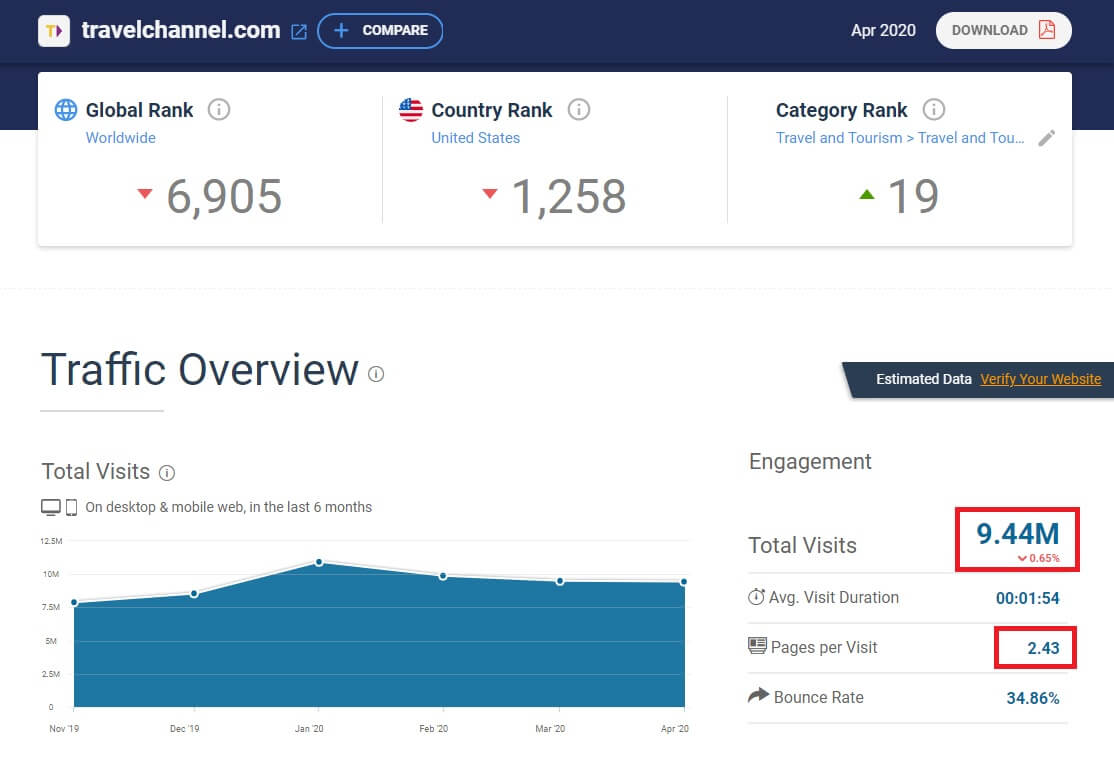
    Their traffic (very interestingly) hasn’t been affected by Covid. They’re doing around 22 million page views a month. Similar to Couchsurfing a few months ago.

    Couchsurfing said last week they will remove ads as part of their new revenue model, but up until last month, we can make a reasonable estimate that Couchsurfing was making as much (or possibly more) money in ads than The Travel Channel, one of the largest mainstream travel sites.

    (Note: Based on my own sites, SimilarWeb isn’t super accurate, but tends to underestimate rather than overestimate. So their traffic is possibly even higher).

    How much ad revenue is that, exactly?

    I know on a blog like mine, 100,000 page views brings in about $1,000 USD. And that’s not with ads in every corner of the page.

    If you really pump out the ads like CS is doing, you can get up to $2,000 per 100,000 page views pretty comfortably.

    Let’s just give a conservative $1,500 per 100,000 views.

    Over 25 million page views, that’s $375,000 per month, or $4.5 million per year.

    So where’s the money?

    $1 million a year in verification fees. $4.5 million per year in advertising. $23 million in venture capital. Nine years. Where is it?

    The only way we’ll know is if they release their financial statements. The community has asked for this numerous times (in fact, we’ve asked numerous times just to be talked to) and we’ve had nothing to date, so I don’t expect we’ll ever see them.

    But I can tell you where that money didn’t go:

    It didn’t go to hosts, who are the foundation of Couchsurfing.

    It didn’t go to volunteers who have spent thousands of hours organising events and keeping the community alive.

    It didn’t go to the volunteers who spent thousands of hours building the site for the first seven years of Couchsurfing’s life.

    It didn’t go to bloggers, influencers and unofficial ambassadors like myself, who for years recommended the site to friends, readers, fellow travellers, while also putting together beginner guides like this to grow the community.

    We can also guess it didn’t all go into the site, which is a pretty standard membership site and doesn’t (or shouldn’t) cost $5 million per year to maintain.

    So where else could it go? Our best guess is it went to the investors, staff and executives who, in all honesty, haven’t added millions worth of anything to the community since they took over in 2011.

    Of course my numbers are estimates and may be wrong; Maybe it’s only $4 million per year. Or even $2 million. Or maybe it’s way higher. Does that change anything? Not really.

    It breaks my heart to finally say it, but I have to.

    I’m breaking up with Couchsurfing

    I’ve resisted this day for a long time. For many of those years on the road, I considered Couchsurfing a part of who I was. It was like a badge we wore, we were so proud of it. The site really did give me so much, friendships, lessons, and changed me as a person. But I guess we all part ways eventually.

    Under different circumstances and different leadership, I’m sure many of us would have gladly paid $3 per month or even $5 or even $10 to support the community we have built over the years, but after this many years of second and third and tenth and eleventh chances and being let down year after year, we can’t do it anymore.

    It’s like having an ex that says they’ll change and stop treating you like ass so you keep getting back together and they’re still treating you like ass ten years later. Well, for many of us that ex is Couchsurfing.

    It’s heartbreaking because with the community we had, we really could have been something great and different, a free community that thrived and built something revolutionary like Wikipedia or Afrikaburn. In fact for a few years, that’s exactly what we were. But unfortunately it has ended up as ten years of so much hope and so many disappointments. It’s a fool me once fool me twice (or ten times) scenario now, and I don’t want to be the fool anymore.

    Let me give them some credit where it’s due. I used CS heavily up until around 2018, and met some of my closest friends on the site. I can attribute dozens of my best ever travel experiences directly to Couchsurfing.

    The site has changed my life.

    Of course we knew there were people earning huge salaries off our community, while we all slept on floors and tried to show people money wasn’t everything – that disconnect wasn’t lost on us.

    But we let it slide and stayed on board, because the site meant so much to us. To be fair, it still gave us what we needed. The site was used by us to meet people and find hosts and connect with other travellers, and in that sense it worked just fine. As long as they didn’t change things too much, we tolerated it.

    But I think now it really has changed too much.

    When Couchsurfing released the news of this latest move, I was sure it was just another money grab hiding behind the excuse of Covid 19, and this was also the word recently on reddit by a former CS employee:

    “Some time ago, I joined as an employee of CS because I was passionate about this project.

    Unfortunately, I was only able to make a small dent, as the profit incentives were quite misaligned.

    I was quite disappointed by the leadership. Don’t blame the employees. I know many of them were true couchsurfers and had real heart. (Read the glassdoor reviews, skip past the obviously fake ones). I doubt that most of the leadership has ever even couchsurfed in their life.

    The leadership sees a golden goose and doesn’t love it. That’s it. This latest thing is a cash grab.

    And bird for bird, this one needs to die so a new phoenix can rise from the ashes.

    The concept of couchsurfing has been released into the world, and like the best ideas, the idea itself will never die.

    XO. Stay Safe. Stay Curious. Stay Awesome.”

    I can’t confirm that post is actually from a CS employee, but it lines up with a lot of what we’ve heard through the grapevine. The employee reviews on Glassdoor are similar.

    Will Couchsurfing survive?

    I guess this isn’t a surprise; this is what happens when you take big investor money. Investors aren’t interested in hearing how many nice travel stories they’re creating. They’re interested in profit.

    And of course that’s not always evil – you can do it and can do it the right way.

    Couchsurfing is really just a social network after all – people connecting people. And it’s not impossible to do that for free; Facebook, Instagram, Twitter, Snapchat, Google, all do it, all are much more complicated than Couchsurfing and have never charged me a cent. For some reason, Couchsurfing just never figured it out.

    So my guess is this ends in two ways. Either CS is lying and they have plenty of money, and a few people are going to get even more rich off all the new fees. Or they’re not lying, they really are going broke, and soon they’ll disappear. Maybe a combination of the two.

    Either way, I can be certain Couchsurfing will no longer be the Couchsurfing we knew and that spirit will move elsewhere. If the site continues, it will be a different type of travel community. The entire premise of Couchsurfing was that money was irrelevant, and anybody with a free spirit could be one of us. Obviously that is no longer true, so it may become more like an upper middle class, millenial, glamping, Airbnb hybrid kind of high society place with a membership fee.

    Maybe that type of thing will thrive, I really don’t know. If it does, all my best wishes to them.

    However I am also going on record today to say:

    I will not be paying the Couchsurfing monthly fee (at least not under the current management), meaning I will no longer be using Couchsurfing and Couchsurfing is no longer a service I am recommending.

    I know I have been a champion of the Couchsurfing brand for almost a decade, have promoted them endlessly on my blog, to many thousands of people, but as always things change and it’s time to explore something new.

    The site is still active and anyone is still welcome to sign up and pay the fee and use it, but my recommendations will now move elsewhere.

    What’s comes after Couchsurfing?

    It’s important to remember Couchsurfing isn’t just a website; it’s an idea, and a set of values, and a community.

    Ironically Couchsurfing said this quite well in their lockout message:

    All of us who are members of Couchsurfing believe in something greater than money, possessions, and status.

    This is true and while Couchsurfing itself no longer embodies this ethos, the members still do and communities can be rebuilt anywhere, from the ground up, just like we did before.

    There are three active communities up and running already.

    The first is BeWelcome. This is a site very similar to Couchsurfing (pretty much the same) and is run by volunteers on a donation target of $1,500 per year. It was founded in 2007 and has around 130,000 members.

    The second is TrustRoots. Most people I’ve met talk quite highly of TrustRoots, which has about 36,000 members and is also very similar to Couchsurfing. I am unsure of their budget but they are a registered UK non profit.

    What do I think of them? They’re both great. They’re also both very anti-profit, possibly to the point it is hampering their potential. I don’t think profit is dirty, I just think obsession with it is. I think they could also use someone at the helm who can really push the site full time – something that Couchsurfing had for its early years. Regardless I think with a little push in the right direction, both have the potential to do quite well. Maybe neither of them want to be the next Couchsurfing anyway, and are happy where they are.

    A third site being developed right now is Couchers.org. They’re open about their goal of replacing Couchsurfing as the go-to site for surfing and hosting. What the team has put together so far looks great. If you’re a CSer, I’d highly recommend signing up for the beta. Watch this space – it looks promising.

    There is also a fourth option, which is Facebook Groups. I’m already a member of several Couchsurfing Facebook Groups, and a lot of activity happens in there, including finding hosts and surfers. I think this will grow as people migrate off the platform and into these groups to stay in touch. If you search for a Couchsurfing Facebook Group in your city, you’re likely to find one.

    The fifth option is your own travel network. When we Couchsurf, what are we actually trying to find? People. Usually people to stay with, or people to hang out with. And we don’t need millions of people, usually we just need one.

    In fact, in many countries I visit these days, I always have an old travel friend who is happy to let me crash, or will say “I know someone that lives there, let me hook you guys up!” And their friends become my friends, and the circle grows. This is really Couchsurfing in its purest form, travellers helping travellers connected by other travellers, and you don’t need a website with millions of members (or dollars) to do it.

    The sixth option is the space itself evolves, and it kind of already is. This is likely where I’m heading. If people actually want to pay to join a travel site, I would recommend something that gives you more than just a basic social network. The best example I know of is NomadList.

    It’s a community of people who actually live and work on the road full time, and not only do you get access to tons of useful info, you’ll be mixing with other web entrepreneurs like bloggers, Youtubers, programmers, freelancers etc too.

    Since this lifestyle is growing rapidly I think NomadList will actually become huge. You can also find people to crash with, and I’m sure a lot of the members were Couchsurfers too back in the day (CS is mostly centred around younger backpacker student types). I also love that its founder levels.io is super transparent about running it, building it, how much it earns etc. I’ve pretty much watched him build it from the ground up on Twitter over the last few years. Been very cool to see. The site is free to use, but also has a premium membership.

    Going forward I will probably use all of these resources in some way, and continue to report to you on my experiences and which ones have worked best.

    Lastly, I’ve also donated 2x the yearly subscription Couchsurfing was asking for to BeWelcome and Couchers (will do the same for TrustRoots once they’re accepting donations) and I’ve also paid for a lifetime membership at NomadList.

    Just to show that it was never about the money 🙂

    Sending love always!

    B

    Disclaimer: The figures in this article are all guesstimates. I do not have access to Couchsurfing’s financial statements and everything is a best estimate based on the information and tools mentioned.

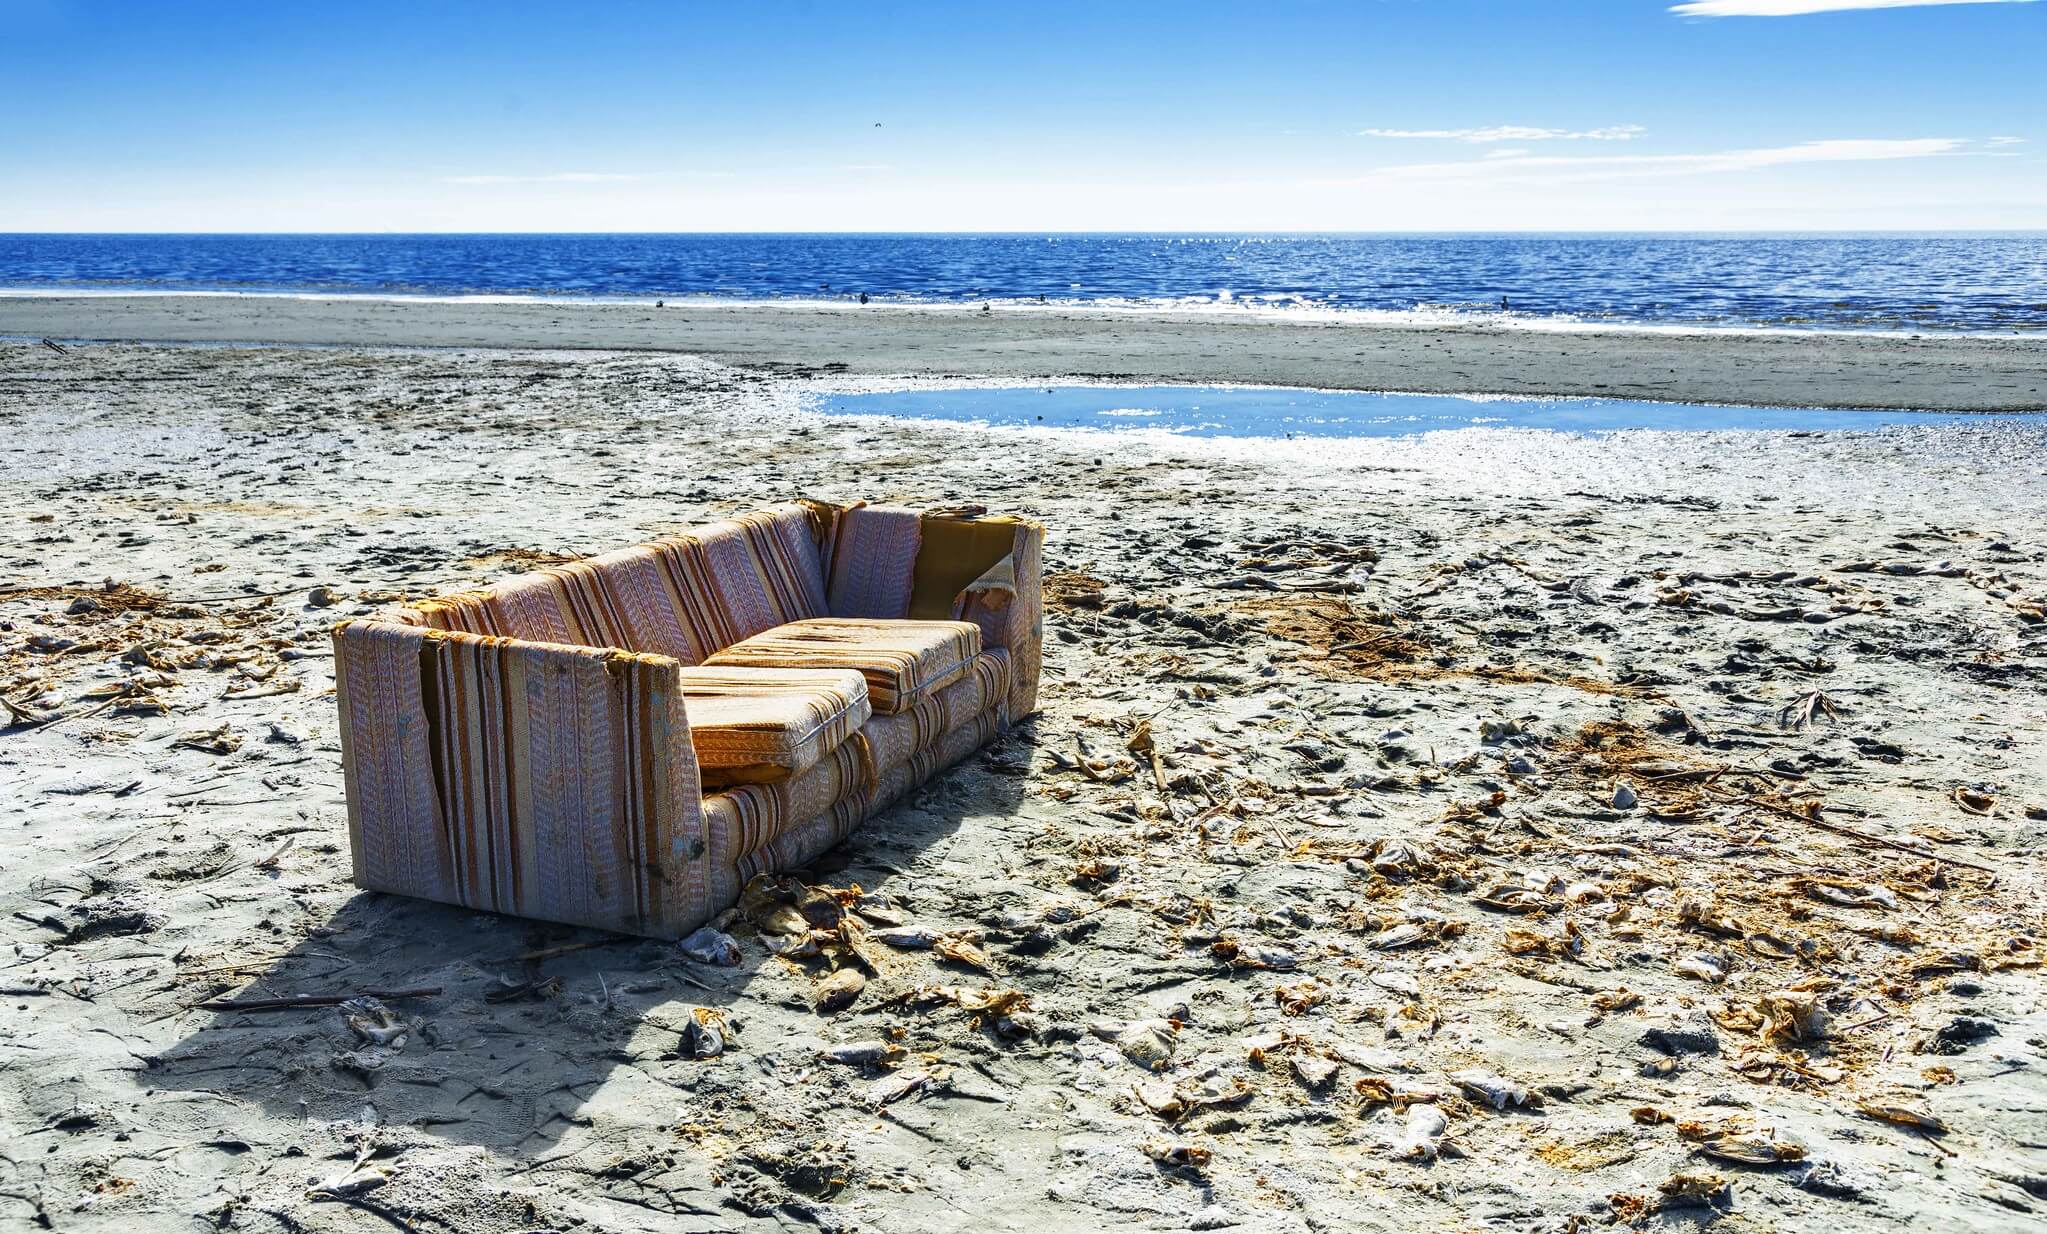
    Photo credit: Bob Dass @ Flickr
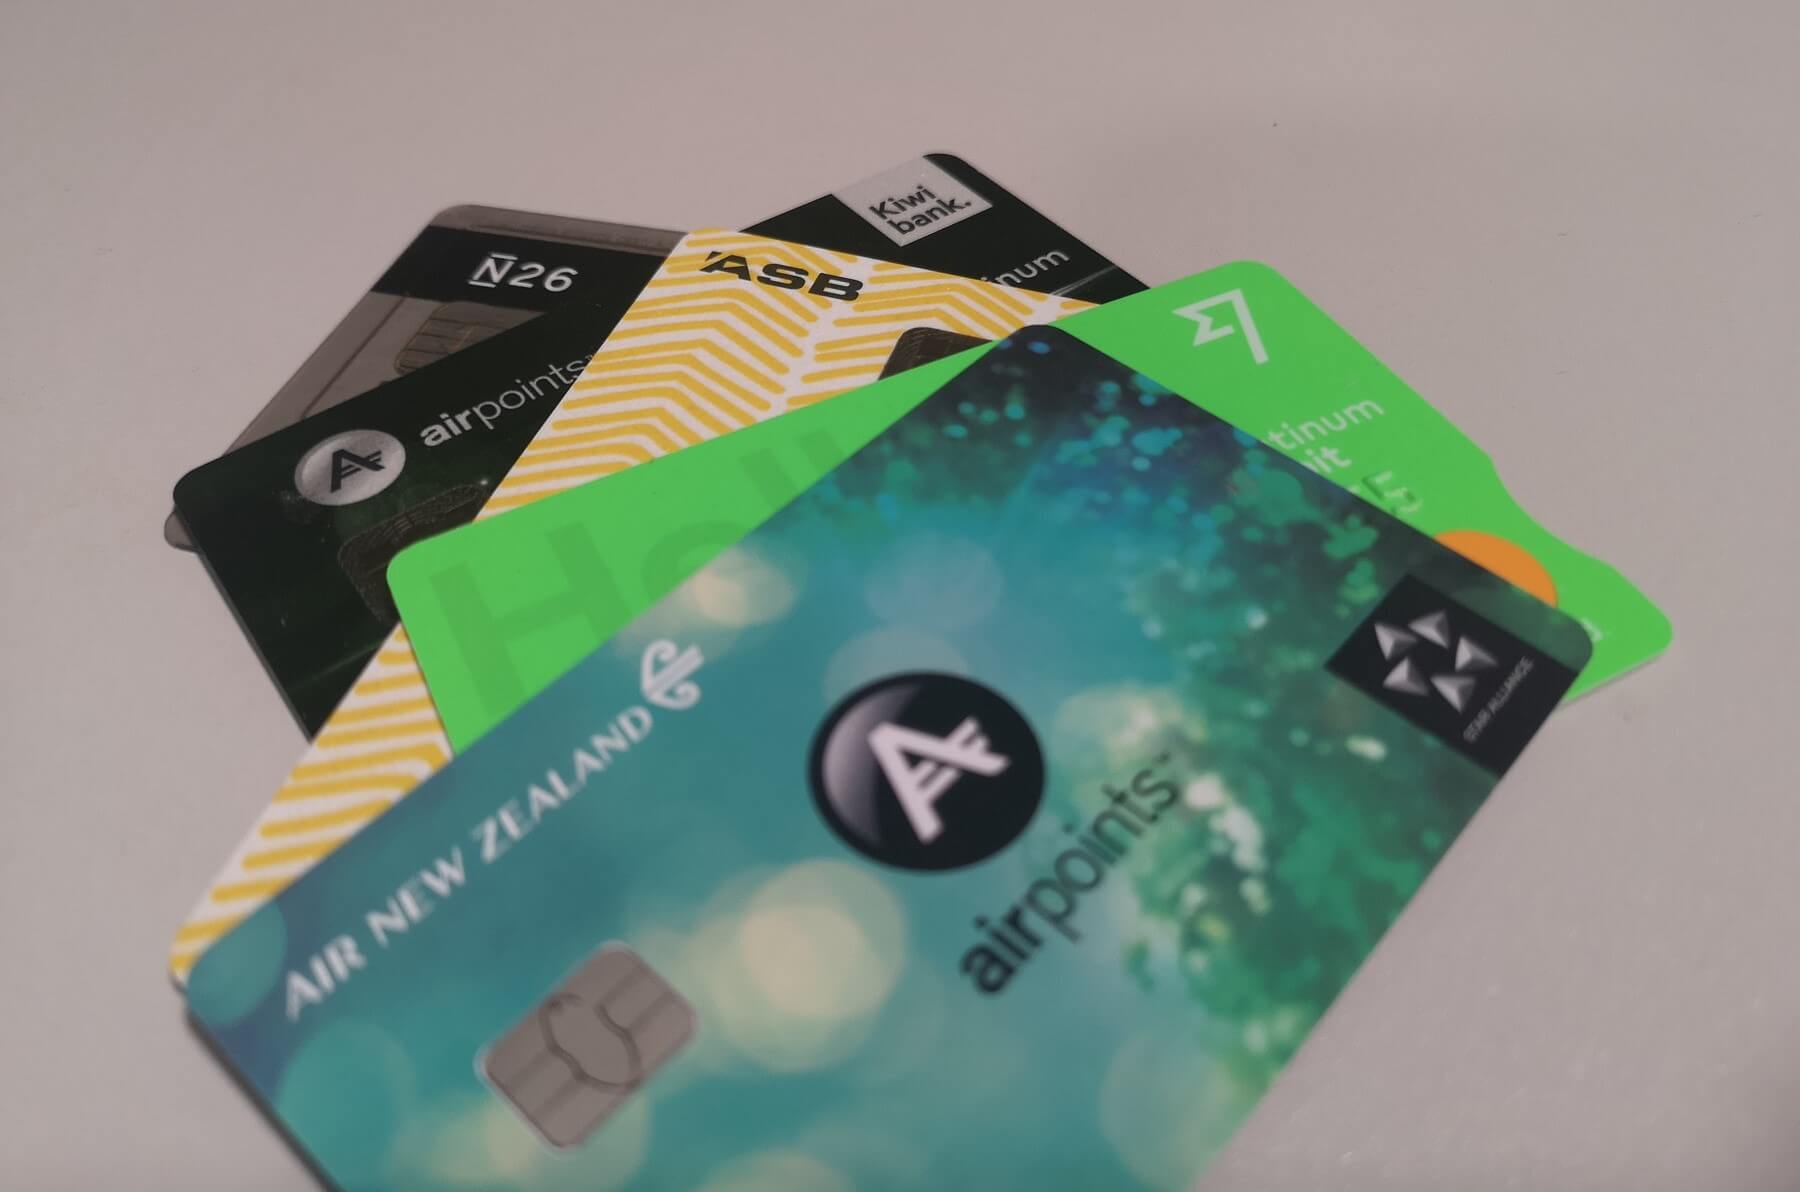
  • The Best Travel Cards And Bank Accounts For Kiwi Travellers
    The Best Travel Cards And Bank Accounts For Kiwi Travellers

    QUICK SUMMARY

    The best travel card for Kiwis right now is the Wise debit card.

    To be frank, it’s in a league of its own right now and there is nothing close to it.

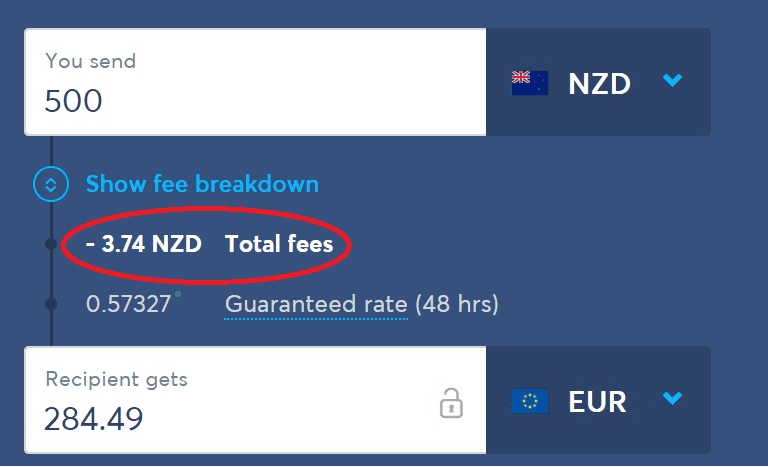
    It allows you to load NZD and exchange it to all other major currencies at a fair rate (better than any NZ bank rate).

    It also allows you to get bank account numbers (!) in other currencies, so you can receive payments in those currencies.

    Finally, it’s all manageable within a very modern and easy-to-use app.

    If you do not wish to sign up for a Wise card and want to just use your NZ bank, the best option right now is ASB. 

    Their fees for ATM withdrawals are the lowest, so you can get yourself cash in practically any country in the world without losing too much in fees.

    This article is a part of my travel tips series for New Zealand travellers. If you’re not from NZ, this post won’t apply to you. You can see the rest of the Kiwi traveller guides by clicking here.

    As a New Zealander, trying to find the best travel cards and banking options has been a frustrating affair. Why? There’s just not that much to choose from.

    Banks in larger countries are faced with higher competition and are forced to give their customers bundles of perks, while in NZ the banks enjoy a nice oligopoly which leaves us at the mercy of a few big players.

    What that means is we never enjoy double and triple frequent flyer point deals, large signup bonuses, zero foreign transaction fees and ATM fee refunds. We don’t have great travel credit cards or reward schemes. Very unlikely that you’ll be getting free lounge passes or New Year bonus points.

    However, there are still a few good options for us Kiwi travellers. And of course, it’s still important that you don’t lose money. With the wrong setup, you can end up paying hundreds in fees for currency conversions, overseas ATMs, interest, monthly and annual fees and more.

    That’s what I’m gonna help you with today.

    In this post I’ll break down the best travel cards, bank accounts, and some other lesser known options, and show you how over ten years of full time travel, I’ve managed to keep my bank fees down, gain several free flights on Airpoints, all while enjoying affordable and easy access to all my money, in various currencies, anywhere in the world.

    Note: This is a long post with a lot of numbers. If you don’t care for the analysis and just want to know what cards/accounts to get, you can skip straight to the bottom.


    Part 1: Getting rid of ATM fees

    The main way I access money while travelling is via ATM.

    Not everyone knows this, but you can use ATM’s overseas exactly the same way you use them in New Zealand. You get cash in the local currency, usually get a very good rate, and it comes straight out of your normal NZ bank account. It’s very safe and easy.

    In many countries, I never use a credit card or travel card at all. I just visit the ATM once or twice during my trip, and use cash for everything.

    However! If you don’t set up your bank accounts right, this can end up costing you a lot in fees.

    Here’s an example of when it doesn’t work out so well for you:

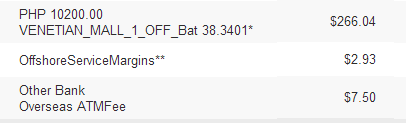
    bankfee

    I wanted to withdraw 10,000 Philippine pesos, which is around $265 NZD. At the time of this withdrawal, the interbank exchange rate (the ‘real’ rate that banks use) was around 38, and I was given 38.34.

    So instead of paying $265, I paid $266.04.

    That’s a pretty good rate. At one of those currency exchanger booths, you’d lose 2-3% off that at least.

    However, let’s look at the fees here:

    Offshore service margins: This is a fee they charge for withdrawing foreign currency, and will usually be between 1-2%. In my case, the fee is 1.1%, or $2.93 (that’s actually low for a NZ bank).

    Overseas ATM Fee: This is a fee charged for using an ATM outside your banking network. It usually ranges between $5-$10. In this case it’s $7.50 (quite high).

    Local ATM Fee: This is a fee the local bank will charge for using their ATM (everyone takes a cut!) As you can see, I wanted 10,000 pesos, but got charged 10,200. That extra 200 is the usage fee (around $5.50).

    So for one $265 withdrawal I’ve been charged $3 in service margins, $7.50 by my NZ bank and $5.50 by the local bank whose ATM I’m using.

    That’s a total of $16 for one withdrawal. If I do that once a week it’s going to add up to around $700 a year – not cool.

    So, how do we avoid this?

    Choose a bank with no foreign ATM fees

    When I first wrote this article a few years ago, the only bank that offered free foreign ATM withdrawals was Westpac, through their membership with the Global ATM Alliance.

    Things have changed since then.

    In early 2018, ANZ announced they were waiving ATM fees both in NZ and overseas, and ASB followed suit later in the year and BNZ not long after that. Meaning most banks in New Zealand now waive all foreign ATM withdrawal fees.

    However, if you really want to see who gives the best deal, we need to add up all the fees involved:

    Overseas ATM fee summary (updated May 2020)

    Bank

    ATM fee

    Offshore service margin

    ASB

    no fee

    1.10%

    Kiwibank

    $6

    2.50%

    ANZ

    no fee

    2.50%

    BNZ

    no fee

    2.25%

    Westpac

    $2

    2.50%

    Westpac (Alliance ATM only)

    no fee

    2.50%

    As you can see, ASB is easily the front runner here. But what we really care about are actual dollar amounts.

    Here’s what your fees will look like when making the following withdrawals at an overseas ATM:

    Bank

    $250

    $500

    $1,000

    $2,000

    ASB

    $3

    $6

    $11

    $22

    Kiwibank

    $12

    $19

    $31

    $56

    ANZ

    $6

    $13

    $25

    $50

    BNZ

    $6

    $11

    $23

    $45

    Westpac

    $8

    $15

    $27

    $52

    Westpac (Alliance ATM only)

    $6

    $13

    $25

    $50

    This picture was a lot more complicated just one or two years ago, but now there’s no contest when it comes to the best bank for NZ travellers: ASB.

    The bank account I use is their Streamline account, which is managed entirely online, has a free EFTPOS card, and no fees.

    How do you use a NZ EFTPOS card at an ATM overseas?

    To use your NZ EFTPOS card at overseas ATMs, it works exactly the same as it does back home.

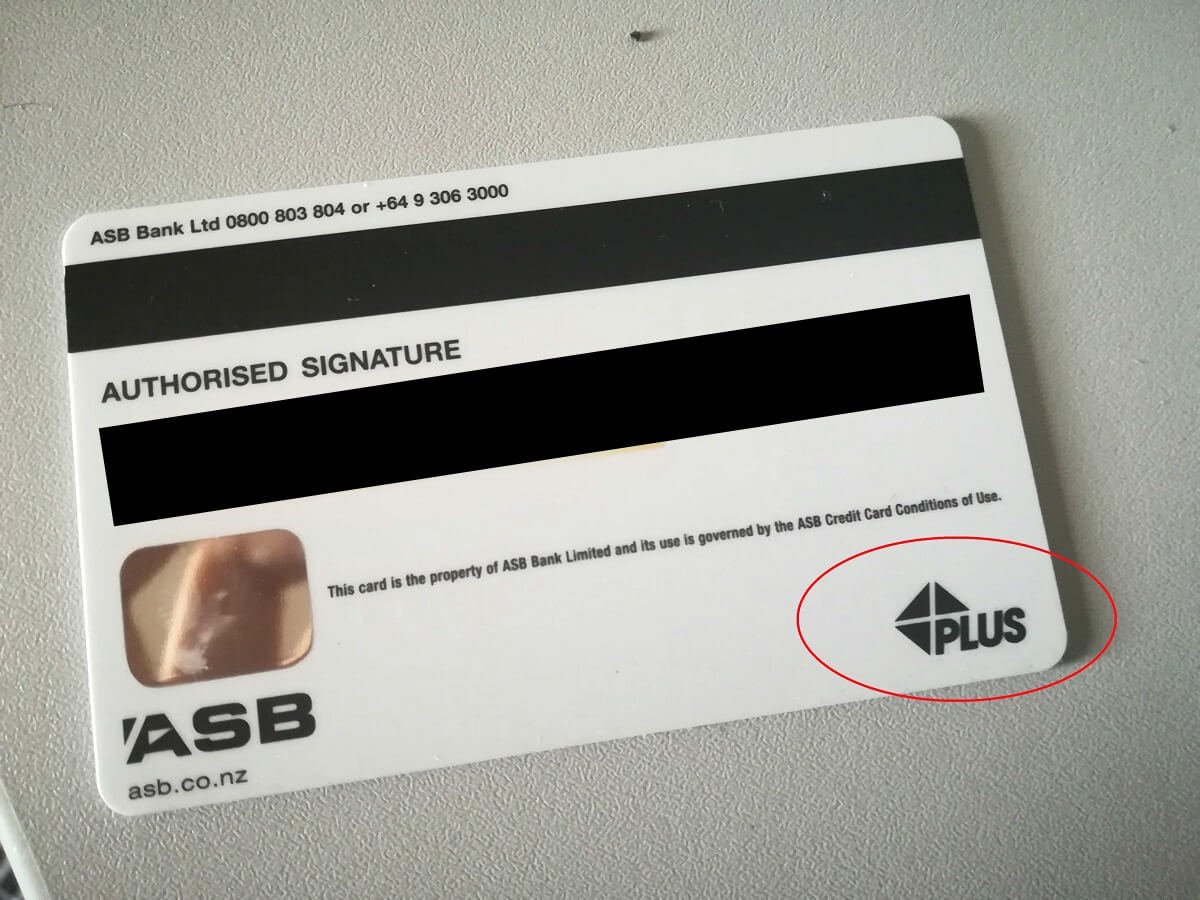
    As long as your Eftpos card has a PLUS, Cirrus or Maestro symbol on the back, you can use it at almost any ATM in the world.

    Check the back of your card and you should see one of those symbols, most NZ cards are either PLUS or Cirrus. 

    For example, here’s the back of my ASB card with the PLUS symbol:

    Then when you visit an ATM, you’ll see a sticker that shows what cards they accept, it will look like this:

    Since those symbols are displayed there, it means your EFTPOS card will work just fine.

    Just put it in, enter your PIN and away you go.

    It’s also really important to remember not to choose “credit” when you make your withdrawal. Choose check or savings or whichever your bank account is connected to.

    If you choose credit, it will not be an EFTPOS withdrawal but a cash advance on your credit card. That incurs interest, a worse fx rate and maybe some other fees as well.


    Part 2: Prepaid debit cards/travel cards

    These types of cards the best travel cards available today when it comes to fees/usability.

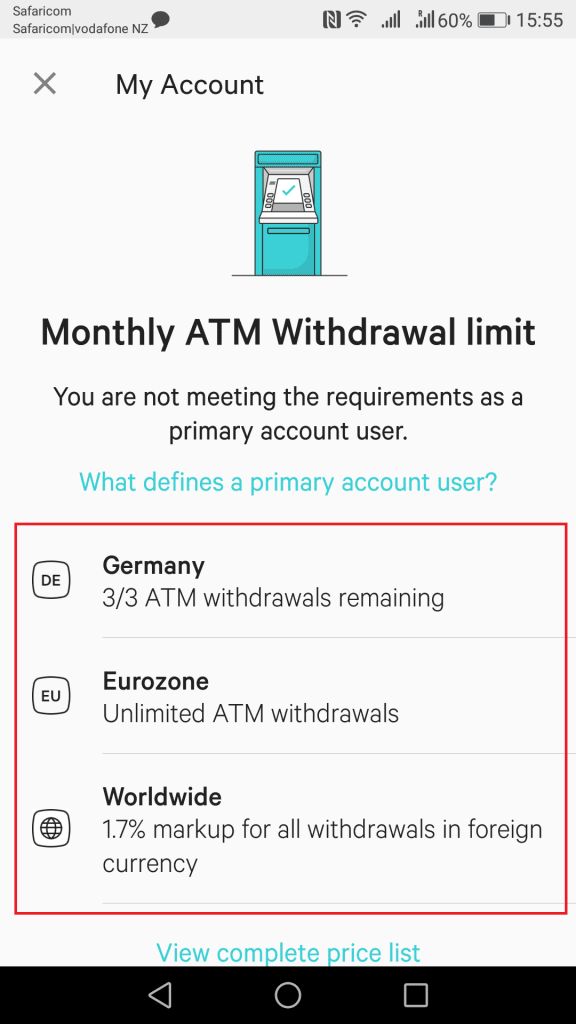
    They allow you to pre load different currencies (around 9 different ones) onto a prepaid Visa or Mastercard, meaning you can make purchases/ATM withdrawals in those currencies without paying the foreign exchange fees.

    Some also offer free ATM withdrawals.

    The 3 main ones available to New Zealanders are the Air NZ Onesmart, The Travelex Cash Passport, The Wise Debit Card and the Loaded for Travel card.

    First off, Loaded For Travel has been phased out. You might still see people using them, but they’re no longer being issued as of 2020. So that one is out. 

    Let’s compare the other three. We’ll look at the foreign exchange rate, the fees, and the overall ease of use for each card.

    As a benchmark, right now the NZD/USD rate is 0.6185, so we’ll base our analysis below on this:

    travel money nz

    Onesmart

    The Air NZ Onesmart card is a Mastercard debit card by Air New Zealand. It is managed via your Airpoints account and is pretty easy to use.

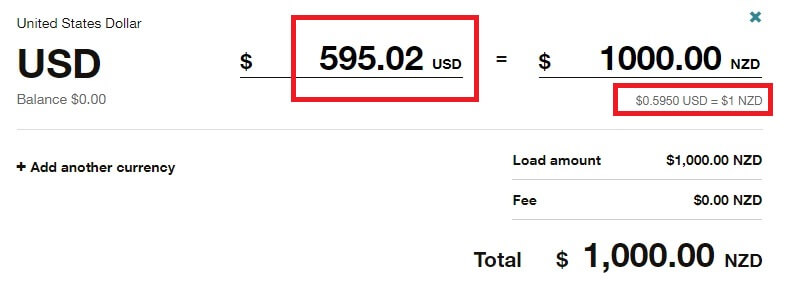
    When looking at the rate, here’s what you’ll get when loading $1,000 NZD into USD.

    best travel cards nz

    $1,000 NZD gives us $595 USD.

    That’s not very good.

    With an interbank rate of 0.6185, that means they’re taking a cut of  3.7% (that’s a lot).

    There is also a load fee of 1.5%, a currency conversion fee when you use the card of 2.5%, and a $1 monthly fee. 

    However the Onesmart does give you other perks, such as earning Air NZ Airpoints on your purchases and 3 free ATM withdrawals a month.

    Getting the card is free.

    Travelex Cash Passport

    The Cash Passport is a travel debit card available from Travelex. You may have seen their currency exchange booths and ATMs in the airports. 

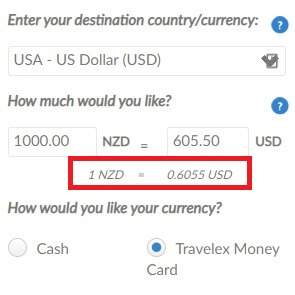
    Here’s their current rate when loading $1,000 NZD to USD:

    best travel cards

    $1,000 NZD gives us $605 USD.

    That’s better than the Onesmart (which gave us $595).

    The rate is 0.6055, compared to the interbank rate of 0.6185, so they’re taking a cut of 2.1%. Not extravagant, but not great either.

    Travelex also has a bunch of other fees:

    •  $10 initial load fee
    •  1% subsequent load fee
    • $4 monthly inactivity fee
    •  $10 closure fee).

    Looking at that you’re already guaranteed $20 in fees to simply open and close an account. ATM withdrawals are free.

    Could still be better than a Onesmart, depending how often you plan on using it.

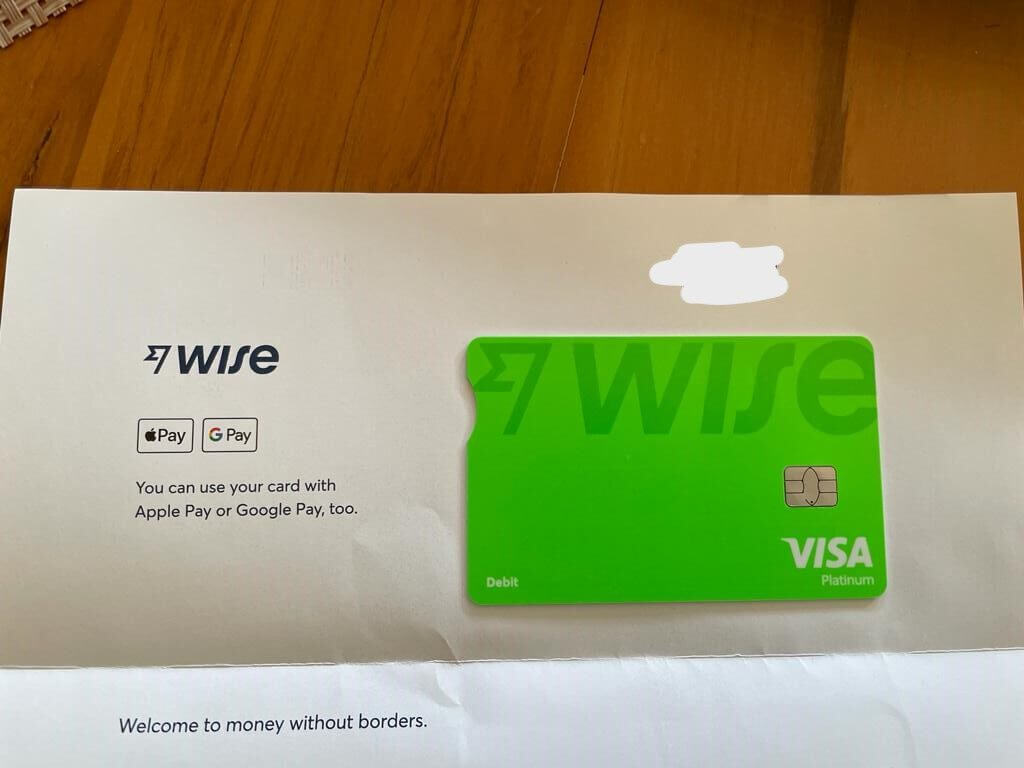
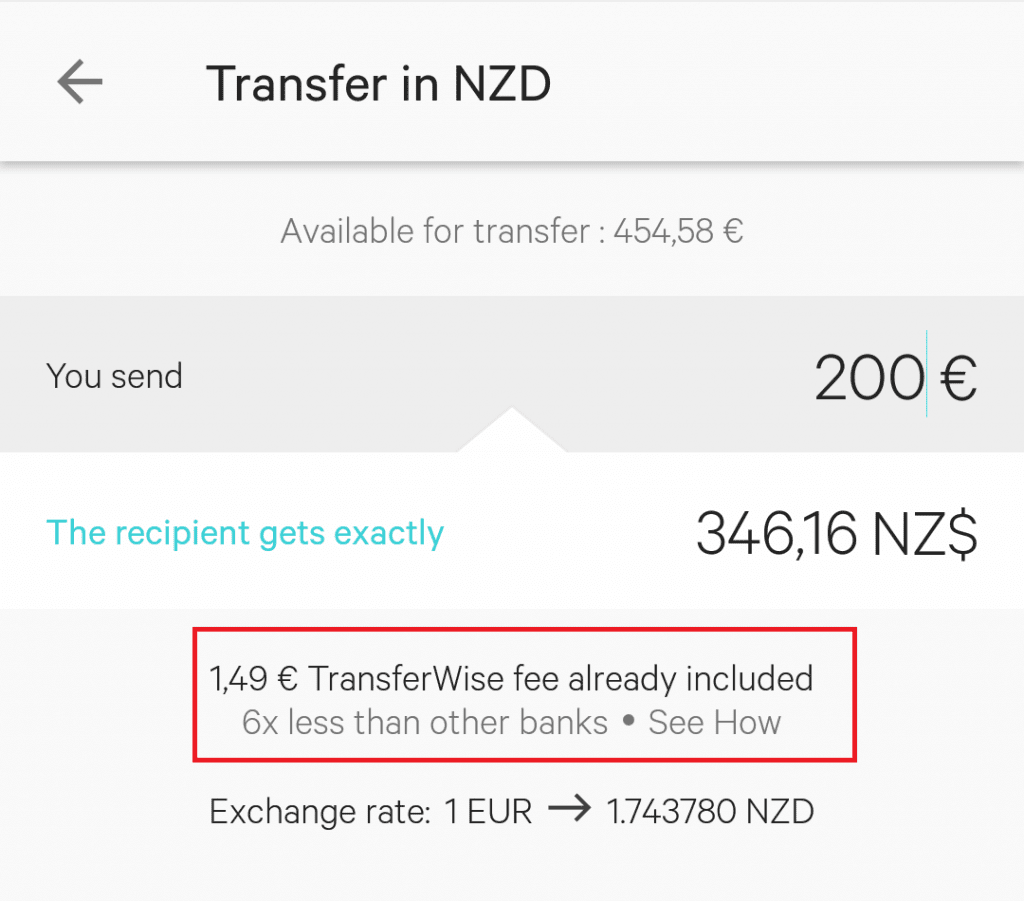
    Wise Debit Card

    Wise is a European money transfer service, but started offering debit cards and “borderless” bank accounts a few years later. 

    Their debit card came out around 2018 for Kiwis.

    I’ve been using it and it’s been pretty great. 

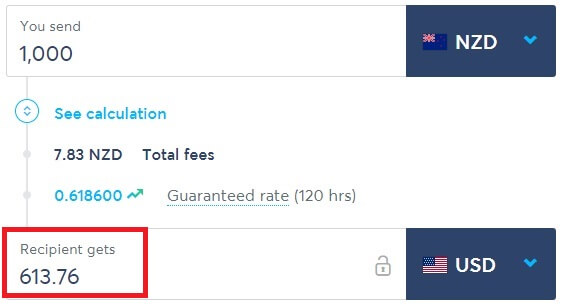
    Here’s what rate you get for loading $1,000 NZD to USD.

    At a rate of 0.6186, that almost exactly matches the interbank rate to four decimal places (actually slightly better).

    So the currency exchange fee they are taking is zero. That’s amazing.

    Of course they also have a fee like the previous cards, which here works out to $7.83, or 0.7%. That’s really low!

    Ordering a card is not free; it costs $14 NZD. 

    After that there are no monthly fees, and you get free ATM withdrawals of $350 per month (2% thereafter).

    There are also many other perks to owning a Wise card – you can open bank accounts in various currencies, get an IBAN number, and receive money in foreign currencies too.

    So which prepaid travel card is the best?

    Let’s put all that info together and see if we can get a winner:

    Onesmart

    Travelex

    Wise

    Exchange rate margin

    3.7%

    2.1%

    0%

    Setup fee

    no fee

    $10

    $14

    Load fee

    1.5%

    1% 

    0.7%

    ATM withdrawal fee

    3 free/month

    no fee

    free up to $350/month

    Closure fee

    no fee

    $10

    no fee

    Inactivity fee

    no fee

    $4/month

    no fee

    Monthly fee

    $1

    no fee

    no fee

    Airpoints

    Yes

    No

    No

    First, the Onesmart exchange rate is so crap that I would disregard it altogether – there is no way you would save money with it when you’re losing 3.7% every time you load money.

    That leaves Travelex and Wise.

    Because the exchange rate is also rather terrible for Travelex (and literally perfect for Wise), that would be enough for me to recommend Wise outright.

    Add in the fact that Wise has no closure fee, no inactivity fee, no monthly fee, and the cheapest load fee by far, and it’s a no brainer.

    The $14 set up fee is the one downside, but it is a one-off, and over the long run is easily worth it. In fact, you will make that back in savings the first time you load money.

    Travelex also ran into financial problems in early 2020, and it seems risky to have money stored on one of their travel cards right now. Them disappearing is not impossible.

    So easy decision here: Best prepaid travel card for Kiwis is the Wise Debit Card.

    You can sign up for yours here.


    Part 3: The best travel credit card for Kiwis

    Let’s move onto travel credit cards.

    The trick with credit cards is to minimise your fees, never pay interest, and try and earn some reward points along the way.

    We’ll start with fees. What are some of the fees you typically pay with credit cards?

    Here’s an example:

    kiwibank

    For this particular transaction, I purchased a $111 USD air ticket on Cambodia Angkor Air.

    On that date the interbank rate was 0.875, and they gave me 0.873. That’s good. 

    But you’ll also see I got charged fees of $3.18; around 2.5%.

    I personally do not want to add 2.5% to everything I buy, just because I’m using plastic.

    Unfortunately there is currently no bank in New Zealand that offers a credit card without foreign transaction fees, so this is unavoidable.

    However, having a credit card is very handy during your travels, so I think it’s a good idea to always have one on you, even if our options aren’t great in NZ.

    Since there are literally hundreds of different cards available in New Zealand, I’m not going to compare them all. What I will do is compare a few “free” credit cards to see which gives us the best deal.

    The following credits cards all have no annual fee and are reasonably easy to get approved for:

    ASB Visa Light

    Kiwibank Mastercard Zero

    Warehouse VISA

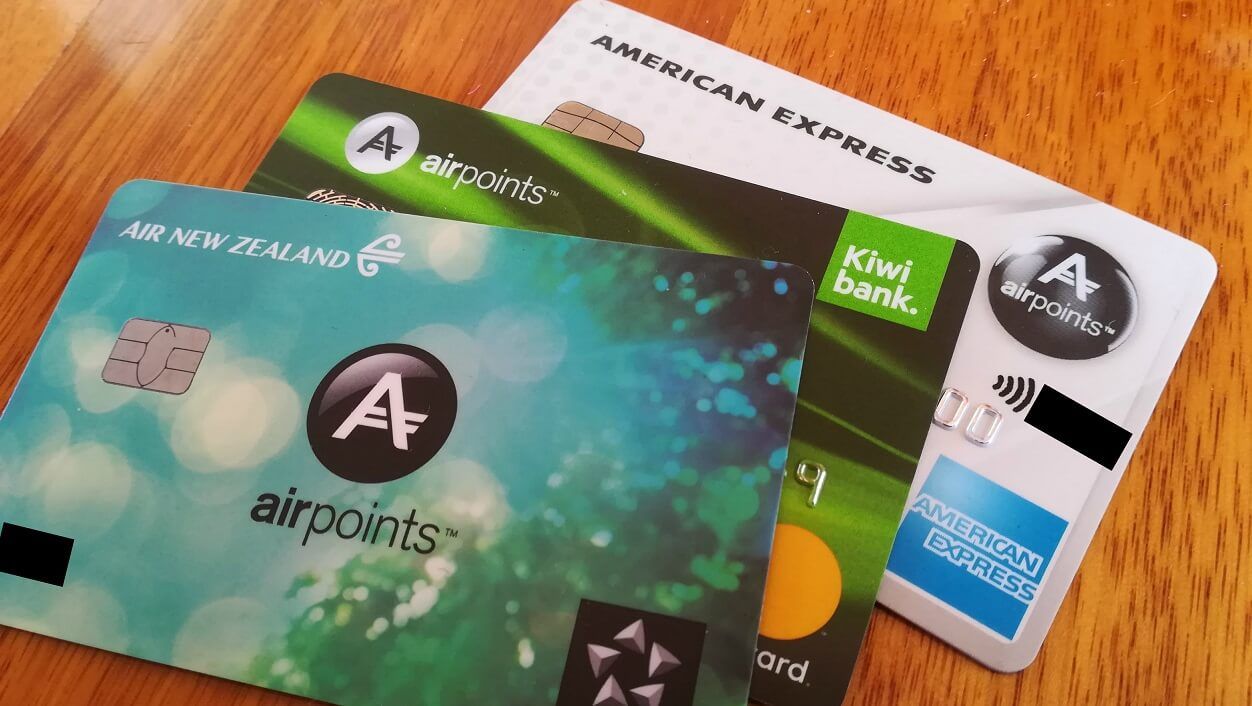
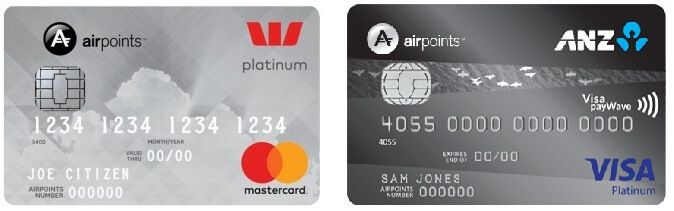
    AMEX Airpoints

    Annual fee

    no fee

    no fee

    no fee

    no fee

    Cash advance fee

    no fee

    $6

    $2

    $5

    FX fee

    2.1%

    1.85%

    2%

    2.5%

    Interest rate on purchases

    13.5%

    16.9%

    19.95%

    19.95%

    Interest rate on cash advances

    22.95%

    22.95%

    22.95%

    21.95%

    Airpoints

    No

    No

    No

    Yes

    All are pretty similar across the board.

    The main differentiator is the ASB Visa Light has no cash advance fee, meaning any ATM withdrawals are free. They should be free anyway on your EFTPOS account, but have this as a safety net is great as well.

    The other thing is the AMEX Airpoints card is free and gives you a chance to earn Airpoints, plus you get a $50 signup bonus – that’s also important and I’ll address that more later.

    Let’s take a look out how these fees actually translate into numbers. These are the fees you would pay if you made the corresponding purchases or ATM withdrawals:

    ASB Visa Light

    Kiwibank Mastercard Zero

    Warehouse VISA

    AMEX Airpoints

    $500 from ATM

    $11

    $15

    $12

    $18

    $1,000 from ATM

    $21

    $25

    $22

    $30

    $2,000 from ATM

    $42

    $43

    $42

    $55

    $500 in purchases

    $10.50

    $9.25

    $10

    $12.50

    $1,000 in purchases

    $52.50

    $46.25

    $50

    $62.50

    $2,000 in purchases

    $105

    $92.50

    $100

    $125

    Summary:

    The ASB credit card is best if you’ll need to make ATM withdrawals.

    The Kiwibank card is best if you’ll want to make actual purchases.

    This is under the assumption you pay the bill on time and don’t incur any interest.

    Either way, credit cards should be a backup only, and you should use your ASB EFTPOS for ATM withdrawals and Wise debit card for purchases on the road wherever possible.

    Don’t forget about Airpoints!

    This is more a tip for while you’re in New Zealand, but make sure you’re taking advantage of Airpoints!!

    If the average New Zealander uses an Airpoints credit card in their day-to-day life, they should easily get a free air ticket to Aussie or Bali each year.

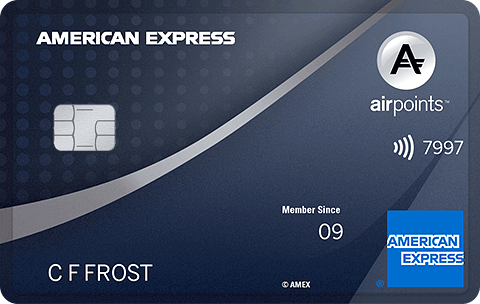
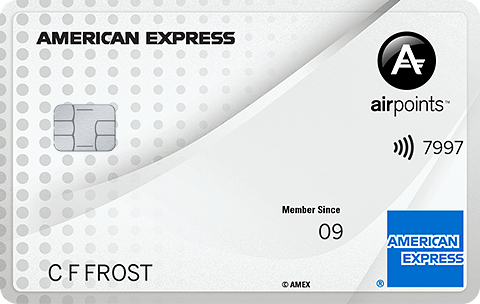
    If you’re after a good, cheap, fast-earning Airpoints card to use, the American Express Airpoints card is the easy winner.

    It’s the only zero-fee Airpoints card there is, plus the Airpoints earn rate is even better than some of the more expensive cards from the NZ banks. I’d highly, highly recommend applying for it today while it’s around. Often they also have a $50 signup bonus, which makes it an absolute no brainer. Check here if the bonus is on offer and to get your free card.

    For a more thorough breakdown of Airpoints cards in New Zealand – I’ve got an entire guide which analyses every single Airpoints card available in New Zealand. You can check it out here.

    Another credit card tip: Paying in NZD (if it’s a good deal!)

    Sometimes shops and websites will ask if you want to pay in NZD instead of local currency.

    This can be a good idea sometimes. 

    Whenever the shopkeeper asks if you’d like to pay in NZD, always ask what the amount will be. Then pull out your phone and do a quick conversion (I use the Oanda app) and check if it’s a fair amount.

    Nine times out of ten they will be taking a big commission on the exchange rate. That means even though you’ll avoid FX fees on your credit card, you’ll end up paying more to the shop and it will probably end up costing you more overall.

    There are good opportunities to do this though. Take a look at this example.

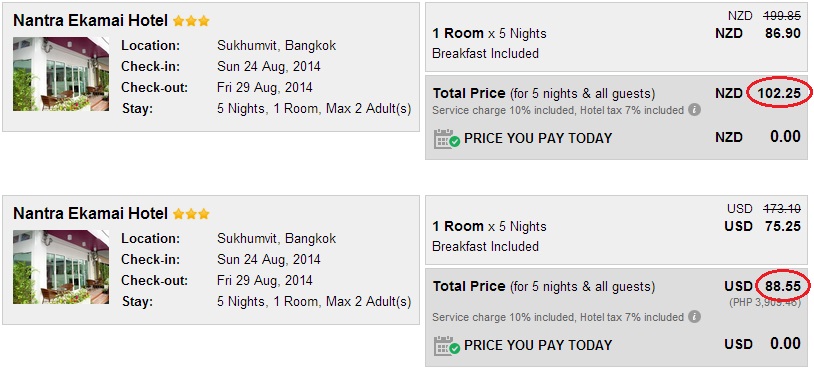
    This is a hotel booking form from one of my favourite booking sites, Agoda. It’s for a hotel in Bangkok:

    agoda

    Their prices are USD listed ($88.55), however they also give me the option to pay in NZD ($102.25).

    If I choose to pay in NZD, I’ll be getting a conversion rate of 0.866, compared to the current interbank rate of 0.867.

    That’s very good, and much better than what AMEX will give me if I pay in USD and let them convert it (it was around 2.5%, remember?)

    Therefore I often make online bookings in NZD (assuming the rate is good), which eliminates foreign transaction fees, and also lets me earn some Airpoints along the way.

    In the case that it’s better to pay with USD, just use your Wise debit card.

    Summary for the best travel credit card:

    There is no ‘good’ travel credit card in NZ (that I know of).

    However, it’s always good to have one anyway. My recommendations are:


    So which travel cards/bank accounts do I use?

    Here’s the summary of what I use currently to keep my fees as low as possible and money as easily accessible on the road.

    The main card I use while travelling is my Wise Card. Nothing else is anywhere near as good. 

    However, as backups:

    • I have an ASB Streamline Account (no fees), which I use to withdraw larger amounts of money from ATMs. I have never visited a country where I could not do this.
    • I have an Airpoints American Express (no annual fee), which also has no fees and earns me Airpoints. I barely use this while travelling, but I use it for pretty much everything I buy while in New Zealand. If you’re not already, I’d highly recommend signing up for one today and start stacking Airpoints! I also recommend you read my guide on travel hacking for Kiwis.
    • Lastly, I carry a small amount of USD in cash for emergencies. 

    Between these options I manage to keep my bank fees almost non existent – in fact you might have noticed every single card has no annual fee.

    I also get to earn a few frequent flyer points along the way. Pretty good, no?

    What should you use?

    If you’re on a shorter trip (say 2 weeks – 1 month), it becomes much less important what card you will use.

    If you’re just going to Australia, you can simply use your NZ Eftpos card to get money from ATMs. You can even use your ANZ and Westpac cards and their equivalent ATM in Australia.

    If you’re going on a longer trip, or travelling around the world, you absolutely need a Wise card. That option can hold you down in almost every country. Keep an ASB Eftpos card handy, and possibly one other bank account too as a backup.

    That’s it!

    Best of luck in your travels and as always, if you have any questions, drop them in the comments below. 

    B

  • Surviving AfrikaBurn: A First Timer’s Guide To Tankwa Town

    Surviving AfrikaBurn: A First Timer’s Guide To Tankwa Town

    Think you’re ready for your first AfrikaBurn?

    I had my first AfrikaBurn this year, and can tell you it is magical, inspiring, life-changing, enlightening, and I’m certain you’re going to have a significant experience there (you can read my full diary here).

    However, there is a lot to think about before you go.

    AfrikaBurn might be many great things, but it is also exhausting, dangerous, challenging, dirty, and both physically and emotionally overwhelming. There is a lot you need to prepare for – food, water, gifts, camping, transport, sun, rain, wind, costumes, tickets, lights, safety, budget. Living in the Karoo for a week is no joke! So many people go unprepared, and this ends up dampening their experience significantly. So my first piece of advice is, be prepared.

    That’s what this guide is for, and is my gift to all first timers heading to Tankwa Town. I want to make sure your first Burn is as great, even better, than mine, and this guide will have all the information you need to make that happen.

    Contents

    1. What is AfrikaBurn?
    2. Buying Tickets for AfrikaBurn
    3. Your Camping Options
    4. Transport to AfrikaBurn
    5. What do you do at AfrikaBurn?
    6. Understanding the Burns
    7. Safety and Security
    8. Volunteering
    9. Gifts
    10. MOOP
    11. Packing List
    12. Budgeting For AfrikaBurn

    What is AfrikaBurn?

    To attend AfrikaBurn, you must understand AfrikaBurn.

    AfrikaBurn is not a music festival, a rave, a carnival, a concert, or any other kind of arts event or festival.

    The truth is, there isn’t really a word to describe it. We simply call it, a Burn.

    Each year, 12,000 people venture into South Africa’s Karoo Desert and volunteer their time and resources to build a city. The city is known as Tankwa Town.

    Tankwa Town is a city of Radical Inclusion. Everyone is invited to live in Tankwa Town, however they are asked to live by a few guiding principles.

    First, Tankwa Town is completely Decommodified. Money is useless in Tankwa Town. It’s not allowed there, and doesn’t belong there. There’s nothing to buy, nothing is allowed to be sold, there are no businesses, no branding, no sponsors, no advertisements, no markets, no stores.

    In fact, there’s nothing at all in Tankwa Town, except what you take with you. The entire city is built from the ground up, by you. Whatever you take there, is what you will find there. If you want a restaurant in Tankwa Town, you build it. If you want a concert, build a stadium and create it. Tankwa Town is created entirely by the Community, and limited only by your imagination. If you don’t build it, it won’t be there.

    Because there is nothing in Tankwa Town, you also need to take everything you need to survive for a week; water, food, shelter, clothing, electricity. This is called Radical Self Reliance. Some say, your ability to survive in the desert for a week serves as your Tankwa passport. Those who can’t do it, simply can’t come.

    How does a town survive without money? Tankwa Town survives on an economy of Gifting. Residents are free to provide anything they want, but they can only gift, and expect nothing in return. Those who don’t know what to gift can volunteer as city staff – Rangers, Cleaners, Cooks, Lost & Found, Gate Staff. Everybody is expected to give something to the town. Otherwise, it can’t exist.

    Radical Self Expression is a key component of life in Tankwa Town. There is no dress code, you express yourself freely in whatever way you choose. You can wear outrageous outfits, or wear nothing at all. Often the world tells you there are certain things you can and cannot wear or do. But not in Tankwa Town. In Tankwa Town, you are free.

    In the centre of Tankwa Town is the playa, a large open circle of desert filled with artwork. Throughout the week, the artworks are burned by the artists; the oldest standing tradition of the Burn. The burns teach us Immediacy, and that the city is transient, life is transient. It reminds us that we built this city together, and will destroy it together, that it was only here for a moment, and nobody saw it but us.

    Finally, we live by the principle of Leave No Trace. At the end of the week, everything that hasn’t been burned is dismantled or destroyed and removed from the desert. We leave the desert spotless, as if we were never even there. The city remains only in our memories.

    The 11 Guiding Principles of AfrikaBurn

    These are the unwritten “laws” of Tankwa Town. They are not enforced as laws, but they are encouraged and expected to be respected by all who attend. I’ve mentioned most of them above, but here is the full list:

    1. Radical Self Expression – Express yourself truly and honestly.
    2. Radical Inclusion – All are invited and respected.
    3. Radical Self Reliance – Your survival is solely your responsibility.
    4. Decommodification – No buying, no selling, no advertising, no money.
    5. Communal Effort – We work together.
    6. Civic Responsibility – We value a civil and responsible society.
    7. Participation – We achieve change by personal action and being involved.
    8. Immediacy – We are here right now, all we have is this moment.
    9. Gifting – Give to the community without expecting anything in return.
    10. Leave No Trace – Respect the environment, leave it as if we were never here.
    11. Each One Teach One – A self reliant community depends on freely passing knowledge to one another.

    Buying Tickets For AfrikaBurn

    To enter Tankwa Town, you need a ticket.

    Tickets in 2019 cost 1900 ZAR ($132 USD).

    There is only one place you should buy your ticket, and that is directly from the AfrikaBurn website. You will need to set up a Burner profile, and you can purchase it with any regular debit or credit card.

    Make sure you use your full legal name on your ticket purchase and that it matches your passport/drivers license. You will need to show your ID when you enter the gate and it will need to match.

    I would also highly recommend printing your tickets out, don’t rely on your phone. You never know what can happen out there.

    (If you’re wondering why you need to buy a ticket to a decommodified event: AfrikaBurn is a non-profit, and funds go towards things like admin, legal, materials for DPW volunteers to set up the town infrastructure (toilets, roads etc), not to mention renting a big ass desert for a week, among other things). Full financials are on their website.


    What are the camping options at AfrikaBurn?

    One thing that wasn’t clear in any of the official guides is, how does the camping actually work? Are you allowed to just camp on your own or do you need to join one of the Theme Camps?

    The answer is, you can absolutely camp on your own without joining a camp, and in fact that’s how Burners traditionally attended Burns. Theme Camps were things that popped up later as the events became bigger.

    What’s a Theme Camp?

    Theme Camps are camps that plan to offer some kind of service to the burn, such as an area to serve food or a bar or something similar. Generally these camps need a lot of members to cook, clean, set up the camp and basically keep things running smoothly, so they invite volunteers to stay with them and help out. Lots of people join a Theme Camp for their first Burn, but you definitely don’t need to if you don’t want to.

    If you’re planning on joining a Theme Camp, make sure you get in touch with the camps early. There should be a full listing of Theme Camps on the AfrikaBurn website and their contact details.

    Find the ones that resonate with you and ask if they’re looking for people to join. The advantage of Theme Camps is they’re generally located closer to the centre of town, so it’s a lot less walking for you every day. The other advantage of Theme Camps is they generally provide things like water and food and a big stretch canopy shelter for you to camp under, which can appeal to first time Burners.

    If you’re camping solo, you’ll be located a little bit further away, but if you get to the Burn early (first or second day) you should be able to get a spot not too far away. As a solo camper, you’re going to have a lot of other things to plan for too. We’ll talk about all that in the packing section below.

    Of course, you can also arrange to camp with a group of friends and that is common too.

    Plug and Play Camps

    These are camps that, for a price, offer to set up your camping, transport all your supplies into the desert, and basically offer you a hotel-like service for your week in Tankwa. These camps are strictly prohibited at AfrikaBurn. If you’re offered a plug-and-play experience, do not accept it and report it via the website. Not only does it go directly against the principles of AfrikaBurn, it may be shut down by Burn HQ if/when they find out about it.

    Cost sharing with other campers is fine (you bring the tent, I’ll bring the food, let’s all chip in for gas etc), but AfrikaBurn HQ can request financials if your camp is large to ensure no profit is being made.


    Transport To Tankwa Town

    Getting to Tankwa Town is a mission, it’s about 8 hours by bus, 4-5 hours by car. What makes it even more difficult is the road. It’s a shitty unpaved road and punctures are super common. I caught the bus to Tankwa, and our luggage vehicle had a blow out about halfway through. Check it out:

    As you can see, this road is no joke.

    Here are your options for getting to Tankwa:

    Drive yourself

    Most people drive themselves to Tankwa. It’s about a 4-5 hour drive assuming you don’t have any real problems. I worked as a greeter on the gate and a lot of people were arriving with flat tyres, even in good weather, so be prepared for that. Have a couple of spares and a puncture kit, and make sure you know how to change a flat.

    The directions from all major cities can be found on the AfrikaBurn website.

    If you are planning to drive, and you’re planning to camp solo, I would highly recommend a camper if you can afford it. It will just remove so many of the weather considerations you need to make when camping in a tent. Especially if you’re staying the whole week, the extra comfort will be worth it.

    AfrikaBurn Bus

    The bus is an ideal option for those coming in from overseas and don’t have car. It totally removes the need to worry about driving, changing tyres, keeping spares and tools, vehicle passes and so on.

    In 2019 the Burn Bus was 1095 ZAR return (about $75 USD). It leaves at midnight on the Sunday before opening and returns at 1pm on the Sunday of closing. The bus is pretty comfortable, and can fit all your stuff. My main concern was whether I’d be able to fit all my camping gear and water on the bus, but the ticket says “anything you can fit in the taxi on the way to the bus stop, you can fit on the bus”

    The one major downside of taking the bus is it’s a super long bus ride, around 8 hours each way.

    Tickets are sold on Quicket.

    Carpooling

    There are lots of people heading to the Burn and many of them will have free seats. The best way to find a ride is to post on the Facebook group Tankwa Ride and Share. This is a group specifically for finding and offering rides to Tankwa.

    Again, the main issue is space, because even if people have spare seats, they may not have room for all your stuff. Don’t try and arrange your rides one or two days before the event – arrange them early as open seats become much rarer as the event gets closer!


    What do you actually do at Afrikaburn?

    I got this question a lot. If there are no concerts or performances or famous people to see, what do you actually do at AfrikaBurn?

    It’s a city. You live in it.

    And like any city, there is always stuff going on. When you arrive, you will receive a map and a WTF? Guide, so you know What The F*ck is going on. It will detail all the Theme Camps, Artworks, Mutant Vehicles, Classes, Talks, Events and so on:

    Also, like all cities, it is totally different during the day and night.

    I don’t want to say too much as so much of AfrikaBurn is figuring the city out for yourself and creating your own unique adventure. But here’s a general idea of what goes down:

    AfrikaBurn during the day

    The day is when most of the events are happening. The centre of town is along the Binnekring and Buitekring (translates to “inner ring” and “outer ring”). For reference, you can check out the town map.

    Walking along the Binnekring during the day will present you endless Theme Camps offering food, drinks, playing music and hosting events. Just from memory, 2019 had things like desserts, wine, ribs, burgers, yoga, sauna, movies, massages, pancakes, fresh juice, and lots of dancing. There are also lots of classes, talks and discussions about many subjects – spirituality, sex, life.

    People also enjoy exploring the artworks during the day, so you’ll see many people out on the playa. There will also be Mutant Vehicles out on the playa with DJ’s playing sets for anyone after an afternoon dance.

    What’s a Mutant Vehicle?

    Tankwa Town is a pedestrian and bicycle only zone. All vehicles that come into Tankwa are required to drive straight to their camping spot and park for the duration of the week. The exception is Mutant Vehicles. Mutant Vehicles are pieces of mobile art, usually modified cars or trucks. All need to be inspected and approved as Mutants by the DMV (Department of Mutant Vehicles).

    If you wander around the Buitekring and the camping zones in the day, you’ll find more Theme Camps, generally smaller and lesser known ones. For example, everybody knows Pancake People because it’s on the Binnekring, but nobody knew about Maple Camp because it was a few blocks away on Butterfly Road. So during the day, make sure you take the time to really explore the map, you’ll find a lot of gems out there.

    Personally, I love the day much more than the night. It’s when the real conversations are had and friendships are built. My advice is definitely don’t sleep in! Get out of your camp, start interacting. There’s lots to do and people to meet!

    AfrikaBurn At Night

    After sundown, Tankwa Town turns into one enormous party like you’ve never seen. The bars and clubs all let their speakers blare at full volume, people are dressed in fairy lights and glow sticks, crazy fur coats and costumes, and drugs and alcohol are everywhere. The playa is also filled with Mutant Vehicles pumping tunes and creating mini dancefloors all across the desert. The party goes right until sunrise and even then it doesn’t stop.

    Not everything at night is about partying though. In 2019 we had State Of Bliss which opened a jazz lounge and served tea, there was Sweet Love Cinema which screened movies until the a.m., plus lots of people just chill in their camps and relax.

    Remember, the nights are freezing cold, so make sure you have something warm to go out in at night. Also, some places serve drinks at night, but not many. If you plan on hitting the nightlife hard, make sure you bring your own alcohol.

    In your daypack

    When you venture around the town, you need a backpack to carry all your things with you. The most important things to remember are days are sunny, nights are cold, it’s dusty and you need to hydrate. Sanitiser, lip balm, buff, dust goggles, sunglasses, WATER, plate, cup and cutlery, map, headlamp. Here’s what a typical daypack (and nightpack) might look like:


    The Burns

    Every night there are burns scheduled, usually between 6-8pm. To understand why the artworks are burned, you need to understand the origins of the event.

    In 1986, two friends built a wooden statue of a man and burned it on a beach in San Francisco. It was a ritual attended by about 30 friends. This ritual continued each year, and eventually became known as Burning Man. More artworks started to be built, more people started attending, and it grew so big it got moved into the Black Rock Desert. Today, 80,000 attendees head to Black Rock each year and construct an entire metropolis for Burning Man. This is known as Black Rock City.

    Tankwa Town is South Africa’s version of Black Rock City, and both cities live by the same core principles. The burns are a central tradition of Burning Man, and AfrikaBurn.

    The burns are symbolic because they represent the impermanence of the city, and life in general.

    I would highly recommend attending as many burns as possible. They are the essence of the event and what it stands for, and they mean different things to everybody. The Burn Schedule is up every day at OCC (check the map).


    Safety and Security

    While incidents do happen in Tankwa Town, they are rather rare, especially considering the environment.

    One provider of security are the Tankwa Town Rangers. Rangers are not police officers, they are Burners just like everyone else but volunteer to patrol the city and keep the peace. For example, they give directions to people who are lost, if someone has parked their car blocking the road, a Ranger might ask them to move it, if a parent has lost their child, a Ranger will help them radio it in to HQ. A big part of a Ranger’s job is to ensure people are safe, so if anyone is seen passed out or incapacitated, Rangers will escort them to the Sanctuary tent – a first aid tent where they can get medical treatment or rest.

    There are also police, medics and ambulances present in Tankwa Town, however they are only called in as last resorts, for serious medical emergencies, or if laws have been broken. Often Rangers will radio incidents into Ranger HQ, and HQ will decide if they need to escalate it. Medical evac is also available.

    For the burnings, there are fire marshalls present at every burn, who secure a safety perimeter and then monitor the burn until it’s complete. There have been incidents of people running into burns, so marshalls are large in number and security around burns is taken very seriously. Many burns are cancelled or postponed because of wind concerns.

    There are also Event Guardians, local staff which act as general security for the event. They generally are stationed on the main streets and just observe for any problems, but I didn’t see them often.

    The Self Reliance principle is pushed a lot in this respect. People are generally encouraged to look after themselves and solve problems themselves wherever possible. For example, at Ranger training we were told not to get involved in fights or arguments between people. Radio it in if it gets out of hand, otherwise, let them settle it on their own.


    Volunteering

    Volunteering is encouraged for all burners, and you will see the sign “One burner one shift” posted on the Binnekring by the volunteer booth. Particularly for those not involved in a Theme Camp, volunteering is the ideal way for you to contribute to Tankwa Town and embrace the principle of Communal Effort. I volunteered every day Mon-Fri as a Ranger, Greeter, Fluffer and Ice Slinger and each shift added so much to my experience.

    If you’re a first time Burner, I would highly recommend volunteering as a Ranger. This is the absolute best way to learn how the town works. As a Ranger, you’re forced to learn the map because people will see your orange vest and ask you directions, so you will very quickly learn your way around town. This will add so much to your enjoyment of Tankwa Town; by the end of the week, I met people who still didn’t even know various parts of the town existed. As a Ranger, I’d been forced to walk the town end-to-end over my shifts, I didn’t even need the map by the end of the week.

    To be a Ranger, you will need to attend Ranger training, either before the Burn in Cape Town or during the first two days of the Burn at Ranger HQ.

    To sign up as a volunteer, you can either do so beforehand on the website, or in Tankwa Town at the volunteer booth.


    Gifts

    Gifts are something a lot of people don’t prepare for and end up regretting. You are going to have so many incredible moments and connections with people and having a small gift to exchange can really add a lot to the experience.

    Some people gift things like candy, chocolates, one girl gifted me a mini waffle while I was on Ice Slinger duty and it was the most perfect and delicious thing to receive at that moment. Little gestures like this make up part of Tankwa’s magic so I’d suggest thinking about what kind of gifts you might want to bless the city with.

    I took about 60 of these bracelets and they were all the rage, people loved them! Anytime I saw someone doing something nice I would put one on their wrist, like the guy performing jazz at the State of Bliss lounge or the guys cooking the ribs each day, or even just someone who gave me a compliment or a hug. Often people I’d given them to would stop me a few days later on the street and be like “Hey man thank you so much for this bracelet I love it!” My only regret is I didn’t take more, I should’ve taken 200!

    Tankwa Town is the perfect place to rediscover the joy in giving, so make sure you’re prepared with meaningful gifts you can spread each day 😉


    MOOP

    Before we get to the packing lists let’s talk about MOOP.

    MOOP stands for Matter Out Of Place and refers to anything that doesn’t belong in the desert. Everything from cigarette butts to beer cans are MOOP. In fact, every single thing you bring to Tankwa with you is MOOP. One of our Burn Principles is Leave No Trace, so everything you bring with you, you must take back with you, including your trash. Even biodegradables like orange peels and apple cores are MOOP. Things like that take a long time to biodegrade in the desert, you need to bag it and take it all home. If you’re going to the Burn, do not MOOP!

    If people see you mooping they will call you out for it. You should do the same.


    AfrikaBurn Packing List

    This is the largest and most important section. Remember, there is nothing in Tankwa Town provided for you, except toilets.

    That means you need to take everything needed to survive for a week in the desert – a week of food and water, good shelter, warm clothes, bedding, transportation, medicines, any electricity you need and so on.

    Below is my recommended packing list. There may be other things you need to consider, but this is everything I took and I didn’t run into any major problems out there.

    Camping

    • Tent – My advice for tenting is to spend a little extra and get a larger tent that is wind and waterproof. A tent like this will probably cost you around 1,000 – 1,500 ZAR. A 3-4 person tent is about right for solo camping, as you’re going to have a lot of stuff. You’re also going to be very tired at the end of each day and you want your home to be comfortable. This is the exact tent I used (Oztrail Genesis 4V Dome) and I ordered it straight off Takealot, they delivered within 48 hours and it was perfect. My friend nicknamed it the mansion because it was so nice and spacey compared to tents of most other solo campers 😀
    • Rebar – When the wind decides to show up in Tankwa it is vicious. Normal tent pegs are about as useful as toothpicks. You need rebar. Rebar is that steel reinforcement bar they use on construction sites. We had a dust storm on Day 2 and without rebar my tent would have stood no chance. Afterwards the town was littered with tents lying in bits. If you don’t have rebar during a strong wind storm, kiss your tent goodbye. Don’t believe me, check out the video. I bought my rebar from Outdoor Junkies in Capetown, they sell ready-made rebar pegs for Burners at around 25 ZAR a pop. Worth every penny.
    • Hammer – To get your rebar into the ground, you’re going to need a hammer or mallet. Even with a good mallet, it still wasn’t easy getting my pegs in, the ground in the Karoo is like concrete. To be honest you shouldn’t have any trouble borrowing a mallet of someone in the campgrounds, but just be aware that you need one.
    • Mattress – Again, the Karoo ground is rock hard, it’s not like sleeping on grass. You’ll need a mattress or sleeping mat. Something like this is perfect.
    • Sleeping bag – It is freezing cold at night in the Karoo, sometimes sub-zero. Make sure you bring a warm, thick sleeping bag, something like this.
    • Pillow – I didn’t actually take a pillow, would’ve been nice though!

    Food

    You need a week of food. It’s up to you whether you want to cook or not. I personally decided against cooking, as it meant there would be so many more things to bring, and would use more water too. Instead I survived on wholesome ready-to-eat foods:

    • Rusks – Bring a variety, they don’t take up much space and are nutritious.
    • Dark chocolate
    • Protein bars – Bring a variety (chocolate, peanut, dried fruit, seeds etc)
    • Biltong – Ostrich, beef, kudu – great source of protein.
    • Nuts – Bring a variety.
    • Health snacks – I had a lot of those healthy snack balls and bars, usually made of dates and nuts and seeds.
    • Other snacks and treats – Cookies, sweets, dried fruits etc.

    If you do plan on cooking, you should know they do sell ice in Tankwa Town. It is the only thing allowed to be sold there (as a food safety issue), and is sold by the AfrikaBurn team. Therefore you will be able to keep meat fresh (and drinks cold) as long as you buy ice each day.

    One tip: Don’t get too worried about food. Lots of theme camps serve food and most people take way too much. By Day 4 or 5 people will be happily giving away their food so they don’t need to take it back. I only took about 4-5 days worth and I still had this full box to bring home:

    Of course that doesn’t mean you can go unprepared! Take the minimum amount you think you’ll need for a week, and that will definitely be enough. If you have any left over, you can gift it.

    Water

    The recommended amount is 5 litres per person per day. This includes drinking, washing, brushing your teeth etc.

    I took 30 litres (six 5L bottles) and ended up giving 3 of them away on the last day. However this is because I was working as a Ranger so I was able to fill up my water bottle at Ranger HQ each day, and also there was a Theme Camp offering showers so I did most of my bathing there.

    I still recommend taking 4-5L per day, even though you may not use that much. It’s always better to be overprepared, and you can always gift it if you have any left over.

    Clothing

    • Costumes – Radical Self Expression means you’re encouraged to wear whatever you want! You will see lots of people wearing extravagant things, and also lots of people wearing nothing at all. Dressing up is awesome fun and a big part of the Burn. A good place to get stuff in Cape Town is at the Grand Parade on Wednesday and Saturday mornings, and the vintage stores in Observatory (Bang Bang, Voom Voom, just walk down that street, there are several). Coats For Africa is another great shop.
    • Warm jacket – The nights are very cold in the desert so you need something warm. Big fur coats are popular because they’re warm and they look awesome.
    • Buff – I used my buff every day and it was a life saver (you can get them here). You can wear a buff so many different ways so it serves you in all weathers – wind, sun and rain. This is me wearing it as a full head mask during one of the very windy days:
    • Full brim hat – The sun can be brutal in the day.
    • Walking shoes/boots – Unless you’re taking a bicycle, you will be walking a lot! And I also recommend walking over biking, because it will be so much more natural for you to stop and talk to people, make new connections, and wander down little streets and into little camps. Make sure you have shoes you can walk several kilometres in each day (and be sure to tape up your feet if you’re prone to blisters).
    • Sunglasses – Obviously.
    • Dust goggles – When the dust storms hit, they hit hard and you can barely open your eyes for five seconds without dust getting in. You may be lucky and have no dust storms, which is great, but if they do come you absolutely need goggles. Ski goggles like these ones are super affordable and will do the job perfectly, even swimming goggles, or you can buy some cool steampunk ones from a vintage shop or on Amazon:
    • Thermals – Again, the night is cold. You may not get much sleep if you’re not warm. Handy for wearing under your clothes while walking around the playa at night too. Something like this is perfect.
    • Warm socks – For sleeping!
    • Flip flops – Really handy for doing things around camp and quick trips to the toilet. Also, the ground is reasonably flat and not too hazardous out there, on hot days, lots of people walk around in flip flops. Gives your feet a break from your boots too.
    • Gloves – Hands freeze at night.
    • Everyday clothes – You don’t need to dress up in costume every day, sometimes it’s nice to just walk around in a tank top and shorts. Light long sleeve shirts and pants are ideal to keep the sun off you. Bring a versatile wardrobe, you get all kinds of weather out there.
    • Final day clothes – This was one of the best tips I received. Fold up a full set of clothes and wrap it up tightly in a plastic bag. These will be your clothes for the trip home at the end of the week. Trust me, the last thing you want to do is spend 5 hours in a car sitting in dirty dust covered clothes. Having a fresh set of clothes for that final trip is heaven.

    Toiletries

    • Toothbrush/toothpaste
    • Toilet paper/paper towels – The toilets always have toilet paper, but having your own is handy, also just for cleaning around camp.
    • Lip balm – Essential! The desert destroys lips.
    • Baby wipes/wet wipes – Absolute life savers. You can use them tissues, wiping down cutlery and cups, sanitary wipes, and many other things. “Wet wipe showers” are also common and effective. I took about 12 packs and used almost all of them.
    • Moisturizer – Skin gets battered out there.
    • Nasal spray – For the dust!
    • Hand sanitiser – Essential, used it daily.
    • Sunscreen

    Tools and supplies

    • Power bank – For charging phone and camera (there’s no reception in Tankwa, but phones are still good for taking photos and notes).
    • Headlamp – Essential! Get a good strong headlamp like this one , you will use it alot to get around town after dark.
    • Torch – Not essential if you have a headlamp, but still handy.
    • Spare batteries – Obviously.
    • Duct tape – For fixing shit.
    • Pad and pen – Good for writing down phone numbers, contacts, notes.
    • First aid kit – You don’t need a treasure chest, but at least take some essentials. I had band aids, Dettol, tea tree oil, tape.
    • Locks – Stuff does get stolen at burn, lock your tent. Use a code lock, keys get lost.
    • Cup – Essential! Drinks are gifted everywhere but you need your own cup. Use a carabina to latch it to your waist for easy access, or even string it around your neck.
    • Plate – When gifted food, you can often just use your cup but a plate or small lunchbox helps.
    • Spork/cutlery
    • Fanny pack – I used my fanny pack every day, it was very handy for the small things like lip balm, sanitiser, wipes, notepad etc.
    • Backpack – You’ll need a small daypack to carry things with you during the day – water, sunscreen, scarf or warm clothes, cup, plate, maybe even a camera.
    • Umbrella/raincoat – We only had a tiny bit of rain and I just stayed in my tent. But if rains are heavier, you might really want these.
    • Trash bags – There are no bins in Tankwa. You need to take all your trash home with you!!
    • Lights – You need to light yourself up at night. There are cars and bikes all over the place and if nobody can see you it’s a problem. Many people like to use Christmas lights, but I think glow sticks are ideal -cheaper and you can also gift them. I took a tube of 100 and gave most away, you only need 4 or 5 per night to be fully lit up. Just make sure you take them all home with you! Glow sticks are full of chemicals and are the worst kind of MOOP. You can usually get a tube of 100 for less than $10.

    Other optional supplies

    • Buckets – Buckets come in handy around camp – as a basin to bathe, as a rubbish bin for the corner of your tent. Also note that you cannot just dump grey water (water with soap in it that you’ve used to bathe, brush teeth, wash dishes etc) in the sand. If 12,000 people dumped grey water around the campground it would be a huge muddy swimming pool! You need to collect it and let it evaporate – buckets are perfect for this.
    • Broom/dustpan – Cleaning your tent is nice every few days, as the dust gets everywhere quickly. You can just use a makeshift broom out of some paper, but having a proper dustpan is very handy.
    • Bicycle – Many people bring bicycles – they aren’t necessary but you will be doing a lot of walking without one. You can also rent a bicycle for the week from Pedals For Peace.
    • Camera – You don’t see many cameras in Tankwa Town since the dust ravages them, but if you know what you’re doing and have a dustproof lens, you can get some amazing shots.
    • Table and chairs – If you plan on lounging around your tent, bring foldable chairs and a table. Not so necessary as a solo traveller, but if you’re coming as a group you’ll probably want this to be able to eat and just chill out together.
    • Umbrella/shade – Something that can change your entire camp is having a shaded area outside where you can just sit and relax. I spent most of my time at other people’s camps, but if you plan on spending a lot of time in camp relaxing, you’ll want to arrange something like this. Either some big picnic umbrellas or a tent with a shade attached.
    • Generator – Not necessary in my opinion, but a lot of camps bring them.
    • Gas cooker/stove – If you plan on cooking. Make sure to adjust your water supply accordingly for washing dishes/cooking needs.
    • Fire extinguisher – If you’re cooking, you’re advised to bring one.
    • Musical instruments – Always a winner!
    • Extra set of car keys – If you’re driving, definitely bring two sets of keys. Things get lost easily in the Karoo. Last thing you need is to be stranded out there.

    Budgeting For AfrikaBurn

    How much does AfrikaBurn cost?

    I came to Cape Town around two weeks early to make sure I was properly prepared for AfrikaBurn. As you can see from the packing list, there are a lot of things you need to buy.

    Here’s a very rough breakdown of all the things I bought for Burn:

    • AfrikaBurn ticket: 1,895 ZAR / $132 USD
    • Bus ticket: 1,090 ZAR / $76 USD
    • Tent: 1,299 ZAR / $90 USD
    • Rebar: 141 ZAR / $10 USD
    • Backpack 190 ZAR / $13 USD
    • Fannypack 100 ZAR / $7 USD
    • Satchel 120 ZAR / $8 USD
    • Sunglasses 20 ZAR / $1.50 USD
    • Storage boxes 102 ZAR / $7 USD
    • Headlamp and batteries 239 ZAR / $16 USD
    • Jacket 150 ZAR / $10 USD
    • Scarf 40 ZAR / $3 USD
    • Scarf 50 ZAR $3 USD
    • Boots 560 ZAR / $39 USD
    • Hat 60 ZAR / $4 USD
    • Hoodie 150 ZAR $10 USD
    • Thermals 120 ZAR / $8 USD
    • Socks 130 ZAR / $9 USD
    • Gift bracelets 680 ZAR / $47 USD
    • Costume stuff (vests, hats etc): 990 ZAR / $69 USD
    • Food: 1,600 ZAR / $111 USD
    • Water: 110 ZAR / $8 USD
    • Miscellaneous (sunscreen, first aid, wet wipes etc): ~500 ZAR / $35 USD
    • Things I was able to borrow: Sleeping bag, mattress, cooler bin.

    TOTAL 10,700 ZAR / $716.5 USD

    Obviously there were various things I already owned so didn’t need to buy, like a power bank, buff and so on. Also, since I’m on the road I can’t really carry much with me, so I literally had to buy almost everything. If I were travelling to South Africa solely for the Burn, I would’ve brought a lot of stuff from home.

    Luckily South Africa is relatively inexpensive, so preparing for Burn isn’t as expensive as other European festivals or Burning Man. And if budget is really a problem, you can sell most of your costume stuff at vintage shops when you get back. I gave most of mine away, but I did sell my tent pretty easily when I got back to Cape Town.

    Also, once you get to Tankwa Town you won’t be spending anything, so you only need to budget for preparations beforehand. And, since it was my first Burn I was slightly overprepared; you should be able to do it for much less if you just stick to the essentials.


    Final Tips For AfrikaBurn

    • I know it’s hard after reading a huge guide like this, but go without expectations. Don’t look forward to anything, just let the experience happen.
    • Don’t sleep in. So much great stuff happens in Tankwa Town during the mornings and afternoons.
    • Take people’s contact details. It’s very unique connections you make there.
    • Goggles, wet wipes, cup, gifts, rebar, buff. These small things will make such a big difference! Make sure you have them.
    • Take some photos, but not too many. Try and live in the moments.
    • Get involved in everything. Go to all the events, volunteer as everything, attend the events that are way out of your comfort zone. That’s the secret to self discovery in Tankwa Town.
    • Go on the first day! In my opinion the first 3 days are the best. You experience the town building and coming to life. The final days are quite different, in fact some people come to Tankwa just for the party at the end of the week. So the crowd changes a bit. Definitely experience the early days if you can.
    • Try to appreciate the whole experience of Burn. I met people who literally just slept in the day and partied at the Cobra all night. I talked to them about different places around town and they hadn’t even heard of them. There is so much more to see than just the raves.
    • Express yourself radically, give lots of hugs and gifts, and have HEAPS OF FUN 🙂

    That’s everything I have to say. Writing this guide has been my Each One Teach One, and providing it here to you is my Gift.

    SEE YOU IN THE DUST.

  • What Is The Best Airpoints Credit Card?

    What Is The Best Airpoints Credit Card?

    This article is a part of my travel tips series for New Zealand travellers. If you’re not from NZ, this post won’t apply to you. You can see the rest of the Kiwi traveller guides by clicking here.


    Busy? To skip the analysis and go straight to the results, click here!

    If you’re a travel fiend and you’re not racking up Airpoints yet, what is wrong with you?! You don’t like free holidays? You don’t want discounts on all your flights? Get on board, bro!!

    Luckily for you I’ve researched this topic inside out and am about to break it down for you – the best Airpoints credit cards, how to use them and what to watch out for before you sign up.

    Here’s the deal: Travel hacking in New Zealand is still in the little leagues, but that doesn’t mean you can’t get a bunch of free stuff. I’m only in New Zealand a few months per year, and I barely spend any money here, and I hardly fly Air NZ (I mostly fly budget airlines like Jetstar and Scoot), but even I have over a thousand dollars worth of Airpoints sitting in my account for a rainy day. That’s a free flight to almost anywhere in the world!

    If you haven’t been stacking Airpoints, I suggest you start!

    What are Airpoints?

    what is the best airpoints credit card

    Airpoints are New Zealand’s version of frequent flyer miles, and are managed by our national airline, Air New Zealand.

    Unlike many frequent flyer miles programs, Airpoints dollars are much easier to understand.

    One Airpoints dollar is worth the same as one New Zealand dollar – so if you’ve accumulated 1,000 Airpoints dollars it means you can buy a $1,000 plane ticket.

    Nice and simple.

    Airpoints expire after four years from the date they are accrued.

    How to earn Airpoints

    First thing you need to do is join Airpoints. This is free. Just sign up here.

    Now to start racking up Airpoints dollars. There are many ways to do this, but one of the best ways is to use an Airpoints credit card.

    Every time you use an Airpoints credit card to purchase something, you get rewarded with Airpoints dollars. The great thing about this is – you don’t even need to do anything special. Just keep buying all the same things you buy right now, but start using an Airpoints credit card instead.

    For most people, that’s going to give you at least a free domestic or Aussie flight each year.

    How to Use Airpoints Credit cards

    Contrary to what most people think, credit cards are not complicated. To earn Airpoints with credit cards you don’t need to churn a ton of cards and you don’t need to spend any money on fees. As long as you choose the right card and always pay your bill on time, you can have a credit card and earn Airpoints and pay no fees whatsoever.

    One important thing to note here is you need to manage your finances properly for your Airpoints strategy to work. That means:

    1. Always pay your credit card bill on time. If you don’t, you’re going to be charged late fees which will cancel out any Airpoints you earn pretty quickly.
    2. Always pay your credit card bill in full. If you just pay the minimum payment you will be charged interest which will also cancel out any Airpoints very quickly. Make sure you pay the full account balance every time.

    As long as you do these two simple things, you can literally pay nothing in fees or interest the entire year, including annual fees. I’ll go through how to do that below.

    What is the best Airpoints credit card right now?

    As you’ll see in the next few minutes this is a slightly complicated question, and will vary from person to person.

    There are lots of Airpoints credit cards. ANZ, Kiwibank, Westpac and American Express all offer several different Airpoints cards, ranging from basic to platinum. I’m going to break down each of the cards so we can see which is best for you.

    If you want to skip the analysis and go straight to the results, click here.

    Let’s begin with the entry level cards.

    Entry level Airpoints credit cards

    Entry level cards are the cards with the lowest fees. They also come with the fewest perks. My goal is usually to spend as little money as possible, so I’m a big fan of the entry level cards, and tend to use them over the fancy juiced up cards.

    There are currently four entry-level Airpoints cards available in NZ. Here’s what’s on offer:

    Annual fee Earn rate Breakeven point
    American Express Airpoints$0 $100 = 1AD $0
    Westpac Airpoints Mastercard$70 $150 = 1AD $10,500
    ANZ Airpoints VISA$65 $170 = 1AD $11,050
    Kiwibank Airpoints Low Fee Mastercard$50 $200 = 1AD $10,000

    (swipe left/right to scroll)

    The first column shows the annual fee for each card.

    The second column shows the “earn rate”. The earn rate is how many dollars you need to spend on your card to earn an Airpoints dollar. For example with the Kiwibank Airpoints Low Fee credit card, every time you spend $160 you will earn 1 Airpoints dollar.

    The final column is where I have calculated the break even point. The break even point is the amount you need to spend on the card per year before it becomes “profitable”.

    As an example, since the Kiwibank card costs $50 per year to have, that means we need to earn at least $50 Airpoints dollars for the card to be worthwhile. If we’re paying $50 in annual fees but only earning $20 in Airpoints dollars, that’s a loss of $30, meaning we’d be better off not having the card at all.

    From the table you can see the breakeven point on the Kiwibank card is $10,000, meaning you need to spend at least that much per year to be in “Airpoints profit”.

    As for which card is best at this level, it’s a super easy choice: the American Express Airpoints card.

    The American Express Airpoints card is currently the only Airpoints credit card on the market with no annual fee. It seems kind of odd that Amex has the cheapest card available, you would probably suspect it would be Kiwibank, but it’s not the case.

    The American Express Airpoints card also has a better earn rate than any other entry-level card: 1 Airpoints dollar (AD) for every $100 NZD you spend. So it’s the cheapest card and it earns you the most Airpoints. Easy choice.

    Sign up bonuses

    One thing that can change those numbers significantly is a good sign up bonus.

    Sign up bonuses change all the time, but at the time of writing this article the only sign up bonus available on entry level cards is with American Express; you will get 50 free Airpoints dollars with the American Express Airpoints card once you’re approved and meet a minimum spend of $750 within 3 months (available to new Card Members only). Click here to check if this bonus is still available).

    As a comparison point, you would need to spend $7,000 on the Kiwibank Airpoints Low Fee credit card to earn 50 Airpoints dollars, so an up-front bonus like this is definitely worthwhile.

    (Westpac and Kiwibank also offer sign up bonuses at select times during the year, but they’re not available right now. I’ll update this article when they do come around).

    Which entry level Airpoints card should you get?

    The best entry level card is easily the American Express Airpoints card, which should be clear to see from the numbers we crunched above. If you’re not a big spender and just want to start stashing Airpoints without paying any fees, this is the perfect card for you.

    However, I’d hold off from applying for any of the above cards just yet. That’s because the platinum cards might be an even better choice for you. Let’s take a look.


    Platinum Airpoints credit cards

    While the entry level cards are good for dabbling in Airpoints, the platinum cards are there for people who want to get serious about earning a lot of Airpoints fast. As for which card is best, it’s slightly harder to pick a winner at the top end of the Airpoints card range.

    Let’s take a look at what’s on offer:

    Annual fee Earn rate Breakeven point
    Amex Airpoints Platinum195 70 $13,650
    Westpac Platinum (earns $220 over $7k) 125 110/220 $20,501
    Westpac World (earns $190 over $15k) 310 95/190 $43,901
    Kiwibank Platinum180 115 $20,700
    ANZ Platinum180 110 $19,800

    So, which card is best?

    If you’re going for earn rate, American Express leads the way again with the American Express Airpoints Platinum at $70 = 1 Airpoints Dollar. It’s the best earn rate of any Airpoints card available today. 

    As for fees, the cheapest card is the Westpac Airpoints Platinum Credit Card, with an annual fee of $125. However, it’s earn rate (1 Airpoint dollar for every $110 spent up til $7k, then 1 Airpoint dollar per $220 thereafter) is the worst. You’ll break even slower with this card.

    The most expensive card is the Westpac Airpoints World Credit Card, which has an annual fee of $310, and the worst break-even point.

    However, those numbers still don’t paint the full picture. You need to consider this: A good earn rate won’t matter if the annual fee is high, and a high annual fee might not matter if the earn rate is high. The only thing we should be looking at is how much Airpoints profit we actually make on each card, because that’s all that matters in the end. I’ve worked that out in the table below:

    Annual fee Earn rate $10,000 $15,000 $25,000 $50,000
    Amex Airpoints Platinum195 70 -52 19 162 519
    Westpac Platinum125 110/220 -48 -25 20 149
    Westpac World310 95/190 -205 -152 -99 32
    Kiwibank Platinum180 115 -93 -50 37 255
    ANZ Platinum180 110 -89 -44 47 275

    To explain how this table works, let’s take the third column as an example.

    In this column we’re assuming annual card spending of $25,000. At the American Express Platinum earn rate ($70 = 1 Airpoints dollar), that level of spending will earn you 357 Airpoints dollars. Take away the Amex Platinum annual fee of $195, and that will give you a total Airpoints profit of 162 Airpoints dollars, which is the number you see in the table.

    Basically Airpoints profit = Airpoints earned minus the annual fee.

    In the chart above I’ve worked out the “Airpoints profit” for all the platinum cards at spending levels of $10,000, $15,000, $25,000 and $50,000.

    As you can see, the American Express Airpoints Platinum is definitely the most profitable card to have once you hit the breakeven point. That’s because it has the best earn rate. Once you have made back your annual fee, it will earn you Airpoints faster than any other card and the gap only widens as your spending rises (some cards might earn you Airpoints faster in special situations or retailers, but for everyday spending, the AMEX Platinum is number one).

    Another thing to note is all platinum cards make a loss at the $10,000 level of spending. Once you get to $15k of spending, every card still produces a loss except the AMEX Airpoints Platinum.

    That means if you plan on spending less than $10,000 on your card each year, do not get a platinum card. You will be losing money. Stick to one of the low level cards, preferably the American Express basic card, because it has no annual fee.

    Now before we decide which card is best overall, there’s something else we need to talk about first: perks!


    Perks

    Platinum credit cards are renowned for perks. Let’s go through some of the perks offered by the cards above.

    Status points

    If you’re after Status Points, the front runner is the Kiwibank Airpoints Platinum Credit Card, which gets you 1 Status Point per $200. Both the Westpac Platinum Airpoints card and Westpac World Airpoints card earn you 1 Status Point per $225 spent, and the Amex Platinum and ANZ Platinum earn you 1 Status Point per $250 spent.

    Status Points determine your frequent flyer status. As an example, you need 450 Status Points to become a Silver Airpoints member. Once you get to silver, you get all kinds of fancy lounge and baggage bonuses and so on. To accumulate the required 450 Status points within a year, you’d need to spend $90,000 on your platinum card. Because I don’t spend anywhere near that amount I don’t even really look at my Status points, but if you’re a big spender your Status Points earn rate might be important to you. Of course you can also earn Status points by actually flying – for example a trip from Auckland to Sydney might earn you 10-15 Status points, depending on your flight. You can read more about Status points here.

    I’m not going to delve into Status points in this article because I think they’re irrelevant to most of us. Status points don’t save you money, and you can’t use them to buy plane tickets. They just give you special frills like priority check-in, baggage privileges and whatever.

    Status is nice but it’s not something you need to focus on when trying to max your Airpoints strategy. I had one year where I flew Air New Zealand and Star Alliance a shitload and still didn’t reach Silver, so it’s going to be pretty tough for regular travellers to amass those kinds of Status points (let alone travel enough to really enjoy them).

    Remember I’m a strong budget travel advocate, and dislike needless spending. Our goal here is to focus on earning real Airpoints dollars that can buy you plane tickets and save you money.

    Koru Club

    Every platinum card gives you a joining fee waiver for Koru club and a $145 membership fee discount – this seems pretty standard. But unless you fly Air New Zealand over ten times per year I would also say Koru Club is a waste of money – it’s $629 per year.

    For that fee you get lounge access and some check-in and baggage perks – nothing you can’t just pay for at the time anyway. So you really need to be travelling a lot for Koru to be worth it, even with the discount. Anyway, every platinum card offers the same perks for Koru, so whichever card you choose you’ll get it anyway. You can read up on all Koru club benefits here.

    Travel insurance

    All platinum cards also give complimentary overseas travel insurance. Interestingly, American Express is the only one that gives free domestic travel insurance as well. I haven’t looked into each policy specifically, but usually credit card insurance is for trips up to 30ish days and travel must be booked on the card.

    More exclusive cards like the Westpac World Airpoints card cover you for up to 120 days. All the policies vary slightly, but it’s too dense a topic for me to summarise here. You can check out the details in the terms and conditions of each card.

    Lounge access

    I won’t lie, airport lounges are pretty cool. At the moment most of the cards get you lounge access but at different levels.

    The Kiwibank Platinum Airpoints credit card and ANZ Platinum Airpoints credit card both give you one pair of Koru Lounge passes for every $20,000 you spend on your card, which is pretty shitty. I believe the Koru passes give you access to any Air NZ or partner lounge, which you can see here.

    The American Express Airpoints Platinum is the next level up. You automatically get two lounge passes to the American Express Lounge at Sydney and Melbourne Airport, and you also get two VIP passes to any Priority Pass lounge (Priority Pass lounges can be found in pretty much every major airport around the world). You get these without having to meet any minimum spend. So when it comes to free lounge access – Amex is a few notches up on Kiwibank and ANZ.

    Westpac has two premium cards. The Westpac Platinum Airpoints card does not give you lounge access at all. The Westpac World Airpoints card gives you full Priority Pass membership, meaning you get unlimited Priority Pass lounge access. I’ve confirmed with Westpac that this equals completely free access, so you will pretty much have free lounge access in every major airport in the world. Not bad!

    One thing to remember – lounge access is cool but doesn’t mean the card is worth getting. You can get into most lounges for $50ish anyway, so paying hundreds in annual fees for “free” access isn’t always a good deal. Think of it as a cool bonus, rather than something you specifically get the card for.

    Sign up bonuses

    Sign up bonuses are one of the main things you should look at before signing up for a platinum card. As our goal is to earn Airpoints, what could be better than getting a big chunk of Airpoints dollars just for signing up?

    Again, sign up bonuses change all the time, and the banks rarely offer them. The only one who has a long-standing sign up offer is AMEX.

    The American Express Airpoints Platinum is offering a 400 Airpoints dollars sign up bonus once you’re approved and meet a minimum spend of $1,500 in the first 3 months. The $0 annual fee AMEX Airpoints card has a $50 signup bonus. (available to New Card members only).

    Every card tends to offer some sort of bonus throughout the year, so do remember to check back periodically.


    Are the platinum cards actually better?

    Now that we’ve looked at both platinum cards and standard cards, let’s compare them. The table below shows the amount of Airpoints profit you will earn with each card at each level of spending (including a deduction for each card’s annual fee). You should recall I showed this table earlier with only the platinum cards. This new table compares all cards (basic and platinum).

    Annual fee Earn rate $5,000 $15,000 $25,000 $50,000
    AMEX Airpoints0 100 50 150 250 500
    AMEX Airpoints Platinum195 70 -124 19 162 519
    Westpac Airpoints70 150 -42 -8 25 108
    Westpac Platinum125 110/220 -80 -25 20 149
    Westpac World310 95/190 -257 -152 -99 32
    Kiwibank Low Fee50 200 -25 25 75 200
    Kiwibank Platinum180 115 -137 -50 37 255
    ANZ Airpoints65 170 -36 23 82 229
    ANZ Platinum180 110 -135 -44 47 275

    From the table you can see the standard American Express Airpoints card is the best card overall right up to $25,000 of spending. Then somewhere around $28,000 the American Express Airpoints Platinum overtakes it to become the more profitable card, and will remain the most profitable card at all levels of spending after that.

    The Westpac World Airpoints credit card is the least profitable card up to $25,000 of spending, and gets overtaken by the Kiwibank Low Fee Airpoints credit card around the $40,000 mark, so if you’re looking to earn Airpoints fast, those would be two cards to avoid.

    Don’t forget the sign up bonus!

    Remember if you’re getting a big sign up bonus, the picture changes slightly.

    For example, if you get 200 Airpoints dollars as soon as you sign up, most cards will become profitable straight away. Here’s a revised table taking sign up bonuses into account:

    Annual fee Earn rate Signup bonus $5,000 $15,000 $25,000 $50,000
    AMEX Airpoints0 100 50 100 200 300 550
    AMEX Airpoints Platinum195 70 400 276 419 562 919
    Westpac Airpoints70 150 -42 -8 25 108
    Westpac Platinum125 110/220 -80 -25 20 149
    Westpac World310 95/190 -257 -152 -99 32
    Kiwibank Low Fee50 200 -25 25 75 200
    Kiwibank Platinum180 115 -137 -50 37 255
    ANZ Airpoints65 170 -36 23 82 229
    ANZ Platinum180 110 -135 -44 47 275

    After bonuses, the American Express Airpoints Platinum is the clear leader, which has a solid 400 Airpoints dollar sign-up bonus (basically a free flight to Aussie!). This easily makes it the most profitable card across the board at any level of spending.

    Remember the bonus is a one-off signup bonus that you only receive in your first year, so after the first year this table becomes irrelevant. You should refer to the earlier table when deciding on a long term card.


    Airpoints debit cards

    Some of you are probably wondering if there are any Airpoints debit cards out there, since debit cards have become pretty popular lately.

    There is only one Airpoints debit card I know of which is issued by Air NZ itself. In fact, Air NZ should send you one as soon as you sign up for Airpoints. It’s actually a pretty cool card – it’s called the Onesmart card and doubles as a Fly Buys card and a multi-currency travel card. To use it as a debit card, you can just jump online and activate it in your Airpoints account.

    But is it any good?

    Here are the numbers:

    Annual fee Earn rate Breakeven point
    Air NZ Onesmart card$12 $100 = 1AD $1,200

    As you can see it’s a nice cheap card with a low breakeven point, but the earn rate is pretty dismal. Using it to try and earn any significant amount of Airpoints wouldn’t be too fruitful.

    I’ve actually used this card on a few trips and didn’t end up recommending it. The main reason was the exchange rates were super loaded. Any Airpoints you do manage to earn will quickly be eaten up by losses on currency exchange. And it’s simply not worth using it in NZ when the credit cards earn you Airpoints so much faster. So my overall recommendation for this card is: Avoid.

    I did a more thorough breakdown of NZ debit cards in my guide on banking for NZ travellers – you can check that out here.


    Summary: Which Airpoints Credit Card Do I Recommend?

    Now that we’ve crunched the numbers, here’s what I recommend:

    #1 Best Airpoints Credit Card

    The first card I recommend getting is the American Express Airpoints Platinum (assuming you are eligible for the signup bonus). Here’s why:

    • The Airpoints signup bonus is only offered on your first American Express card. Therefore make sure your first Amex card is the one with the highest signup bonus, because you can only get one!
    • The Amex Airpoints Platinum is the most profitable card, period, and has the best earn rate as we saw from the numbers above. No card will earn you more Airpoints on your spending and get you more free flights than the Amex Airpoints Platinum.
    • The Amex Platinum card has the best value perks (free travel insurance, smartphone screen insurance and airport lounge passes). The only card with better perks is the Westpac World, which is much more expensive (double the price) and has a lower earn rate.
    • The Amex Platinum is technically free for the first 2 years. Although there’s a $195 annual fee, you get a 400 Airpoints dollars sign up bonus (new Card Members only), meaning technically you get to use the card for free for 2 years. It’s the most attractive card available in New Zealand right now, hands down.

    You can apply for an American Express Airpoints Platinum card online here.


    #2 Airpoints Credit Card

    If Amex or the banks aren’t offering any signup bonuses, my recommendation is the basic American Express Airpoints. Here’s why:

    • It’s the lowest fee Airpoints card on the market ($0 annual fee).
    • It has the best earn rate of any entry level card ($100 per Airpoints dollar). That’s basically earning 1% back in Airpoints on everything you spend (that’s amazing for a zero-fee card).
    • It’s the second most profitable card behind the Amex Airpoints Platinum. Also, if the Amex Airpoints Platinum bonus is being offered but you don’t qualify for the card (bad credit, not enough income), you can sign up for this card instead and still get the $50 Airpoints bonus.

    Even if you’re not that interested in Airpoints, this card has no annual fees and most of the year offers a 50 Airpoints bonus on sign up (new Card Members only). You’re literally being paid $50 to fill out some forms. If that’s not a good enough deal for you, I don’t know what is.

    You can apply for your $0 annual fee American Express Airpoints card online here.

    Another cool thing is if you go with the American Express Airpoints Platinum, after the first year you can just downgrade to the $0 annual fee American Express Airpoints to avoid the $195 annual fee. Or, if you feel the annual fee is worth the higher earn rate, free travel insurance and lounge access, you can just keep it.

    As we saw from the tables above, if you spend $28,000 or more per year on your card, it’s more profitable have the platinum card, even with the annual fee. So if you’re spending that level, keep the card, if not, downgrade. Pretty simple eh? 🙂


    Third option

    Because the American Express cards are so superior in earning power, I don’t really recommend getting other Airpoints credit cards unless they’re free.

    However, the thing with American Express is it isn’t accepted everywhere. I use it at the supermarket and gas station without problems, which is where I spend most of my money anyway, but some smaller businesses won’t accept it.

    Therefore it can make sense to have a backup Visa or Mastercard, just in case.

    My usual recommendation is to use a Visa debit, EFTPOS card, or get the zero-fee card from Kiwibank or ASB. They’re not Airpoints cards, but they’re free, and since you’re doing most of your spending on your Amex you shouldn’t be missing out on many Airpoints anyway.

    If you absolutely must get a Airpoints Visa or Mastercard today, just look at the spending tables above and determine which one will be profitable for you. As a starting point, the Kiwibank Airpoints Low Fee credit card is the cheapest card ($50 per year) but also has the lowest earn rate ($200 per Airpoints dollar). You’ll need to spend at least $10,000 per year on that card for it to be profitable.

    As a sidenote, sometimes ANZ and Westpac sometimes offer a “no annual fee” bonus on new signups, so you can actually get the ANZ Airpoints Platinum credit card or the Westpac Airpoints Platinum card free for year! If that offer is available (click here and here to check) definitely go with that as your backup Visa/Mastercard.

    In all cases, I would still recommend getting the Amex Airpoints Platinum first, as it will simply earn you far more Airpoints and get you a free flight sooner than any other card. It’s a no brainer.


    That’s it!

    Hope this helps you all get tons of free flights and if you have any questions at all, just leave them in the comments.

    Safe travels,

    Bren

  • The Ultimate Travel Hacking Guide For Kiwis

    The Ultimate Travel Hacking Guide For Kiwis

    This article is a part of my travel tips series for New Zealand travellers series. If you’re not from NZ, this post won’t apply to you. You can see the rest of the Kiwi traveller guides by clicking here.


    Firstly, a disclaimer before any of you get too excited:

    Travel hacking in New Zealand is pretty shit.

    Unlike the States, where you can literally find yourself with more free stuff than you know what to do with, in New Zealand you should be happy with maybe one free flight per year. That’s still great, but don’t expect to be flush with an endless supply of free first class tickets.

    All free travel is good travel anyway, so it’s important you make the most of the opportunities we do have. In this guide I’ll give you an intro to travel hacking and what we can do to make it happen in New Zealand.

    What is travel hacking?

    Travel hacking can mean several things, but mostly it’s just a fancy name for getting lots of frequent flyer points/miles.

    The idea is you will set up systems/bank accounts/credit cards that will allow you to earn lots of frequent flyer points during the year, and at the end of the year you should have enough for a free holiday.

    In New Zealand, your best travel hacking option is to base your strategy around Air New Zealand Airpoints. It’s our national airline and most point-earning opportunities are going to be with them.

    The first thing you need to do is sign up for Airpoints. This is free and you can do this here.

    The next step is earning Airpoints fast. There are four main ways to do this:

    1. Credit card bonuses
    2. Credit card spending
    3. Airpoints partners
    4. Travel

    I’ll go through the best strategies for each below, so you can get your first free flight as soon as possible!


    Credit card sign ups

    This is one of the easiest ways to get free Airpoints dollars but also one that you need to micro manage quite closely.

    Banks love it when you sign up for credit cards. Most people in New Zealand are financially illiterate, so a new credit card usually ends up meaning lots of interest, late payment penalties and fees. Obviously banks love this.

    Therefore to encourage people to sign up, most banks offer a signup bonus.

    For example, during the year Kiwibank and Westpac offer up to 300 Airpoints dollars as a sign up bonus on their platinum cards (these bonuses usually come out around January-April, watch out for them!). Just signing up for those two cards is going to give you 600 Airpoints dollars – easily enough for a free return ticket to Aussie.

    Too good to be true? Not really. Just a few things to watch out for here:

    Watch out for the annual fee

    Even though you get a sign up bonus, you still need to pay an annual fee for the card.

    Annual fees range from zero dollars all the way up to almost $400 per year. It’s important to make sure the annual fee doesn’t completely cancel out your bonus.

    As an example, during select months the Westpac World Mastercard offers a 400 Airpoints dollars sign up bonus. However, the annual fee is $395. Therefore you’re only making a $5 “Airpoints profit”. Sometimes the perks can make this card worth it, but from purely a profit point of view it’s a poor choice.

    On the other hand, the American Express Airpoints card offers a 50 Airpoints dollars sign up bonus, and the annual fee is zero. Even though the bonus isn’t huge, that’s an instant Airpoints profit of $50, which is a much better outcome.

    Therefore, it’s important to check the bonus actually covers your annual fee and then some. It it does, you can just sign up for the card, get the bonus and then never use the card, and it will still be worthwhile.

    Cancel after the first year

    The general idea with these bonuses is to get the bonus, then cancel the card within the next year.

    The reason you don’t want to keep the card is because you’ll need to pay the annual fee every year, which usually isn’t that cheap. Most cost around $100-$200 per year.

    Usually what I do is sign up, get the bonus, then keep the card and use it to earn Airpoints for a year (since you’ve already paid for it). Then before the next annual fee becomes due, cancel the card.

    Of course if you like the card, you can always keep it. Some cards like the American Express Airpoints Platinum offer pretty good perks, like lounge access and free travel insurance, so if those are things you use regularly you might want to hang onto it.

    Always go for the biggest bonus

    The thing about Airpoints sign up bonuses is they’re only available for new customers. This is really important to understand.

    For example, you can’t sign up for the standard Westpac Airpoints card, get the bonus, then the following year sign up for the Westpac Airpoints Platinum and get the bonus, and then the following year get the Westpac World and get a bonus again.

    The bonus is usually only available to new customers. That means it makes sense to always go for the biggest bonus, because that’s most likely the only one you’re going to get.

    Some cards operate on an exclusion period, meaning if you close your cards and cease to be a customer, after a certain amount of time you become eligible as a “new” customer again. For example, at Kiwibank the exclusion period is 18 months. So in that case, you could sign up for a Kiwibank card, cancel the card, wait for 18 months, then reapply and get the bonus again. But even if you wanted to try that, it would still make sense to always go for the biggest bonus. If you want to max your Airpoints earning strategy, chasing the biggest bonus is key.

    Don’t sign up for too many cards

    Contrary to what most people think, churning through a lot of credit cards won’t significantly affect your credit rating, unless you’re going through a stupid number each year.

    What affects your credit rating are unpaid bills, loan defaults, bankruptcies – things like that. If you never pay off your credit card and leave money owing on them, then your credit score will take a hit. But if you sign up for one or two new credit cards per year and always pay them off on time, you shouldn’t have anything to worry about.

    My advice here is to just keep things under control. Don’t apply for absolutely everything straight away. I know it can be tempting to just sign up for everything at once, but that can actually compromise your applications. Just sign up for one or two cards, there’s always next year!

    Stay up to date

    Good sign up bonuses only come around once or twice a year. It’s important to keep an eye out – but “booster” season, where the big bonuses come on offer, usually happens in the early months (Feb-April). Keep your eyes peeled during these months.

    The only cards I know that offer bonuses year-round are the American Express cards. Both the American Express Airpoints card and American Express Airpoints Platinum offer a nice bonus and both are great cards as I’ve broken down in my Airpoints credit card guide.

    Update December 2018: The American Express Platinum Airpoints card just lifted its sign up bonus to 300 Airpoints dollars. That’s a very good deal! Check it out here.

    In fact, if the bonuses are on offer and you don’t already have an Airpoints credit card, I’d recommend applying for one of these today.

    If in doubt, go for the free American Express Airpoints card. It has zero fees and you get a $50 Airpoints signup bonus. You’re literally getting offered $50 to fill out some forms and use the card for a month. No brainer! You can apply online here.


    For a thorough breakdown of Airpoints credit cards in New Zealand, I highly recommend checking out my Airpoints Credit Cards Guide. It breaks down all the perks, earn rates, fees and bonuses of every Airpoints card in NZ, and will help you find the perfect card for you!


    Credit card spending

    The next best way to earn Airpoints is by earning points on your everyday spending. Now that you have an Airpoints credit card, everything you purchase on it, even if it’s a pack of gum, will earn you valuable Airpoints.

    This means things like groceries, petrol, clothes, coffee – pretty much everything you spend money on should be purchased with your Airpoints credit card.

    Now, that doesn’t mean you need to spend more money! All you need to do is keep buying the same stuff you buy every day, but use your Airpoints credit card to pay for it.

    How to earn Airpoints on your credit cards fast

    To maximise your Airpoints earnings, there are a lot of little tricks you can do.

    One is to make little adjustments to your shopping habits. For example, there’s a Chinese fruit shop that only lets me pay by credit card if I spend over $20. That means instead of visiting there every couple of days to buy fruit and veges, I just go once or twice a week and do slightly bigger shops. I still spend the same amount of money, but I get to earn Airpoints on all of it.

    Another thing you should do is think about everything you spend money on that you don’t use a credit card for, and if there is some way you can start. I know one guy convinced his landlord to let him pay his rent on his credit card, and another who convinced his employer to use his credit card to pay some company expenses (expenses like Facebook ads and Google ads is good for this. See if you can make something happen!)

    If you run a business, you’re probably already paying for a lot of stuff on credit card, so make sure that’s going on an Airpoints card and you’re earning points for it. I know a guy who runs a pretty successful dropshipping store and pays for all the orders on credit card. He literally flies everywhere for free because of the tens of thousands of dollars running through his card each month.

    People also do things like always paying for group dinners/outings on their cards and getting everyone to pay them back, instead of splitting the bill at the restaurant.

    Get creative, this is what a lot of travel hacking is about – making slight changes to how you do things in everyday life in order to max your points balance. Make it a lifestyle!

    Always pay off your card on time!

    If you find yourself paying interest and late fees on your credit card, it’s going to cancel out all the Airpoints you’ve been earning. Therefore it’s imperative that you pay you card off on time. Be diligent about this! If you don’t get this part right, your whole travel hacking endeavour becomes pointless – you would be better of burning all your credit cards and going back to living off cash.

    The rule is you should never be paying credit card fees or interest, ever, except for your annual fee.

    Achieving this is simple:

    1. Always pay your card off on time.
    2. Always pay your card off in full (not just the minimum amount).

    Just put a reminder in your phone for the end of each month and pay your credit card off that day. You can do it all through internet banking, it takes less than five minutes. Most cards email you when your statement is ready as well.

    If you pay your card off in full, and on time, you should never be paying fees, penalties or interest, ever.


    Airpoints partners

    Double dipping by using Airpoints retailers

    Airpoints has several retail partners around New Zealand where you will earn points just for shopping with them.

    For example, one of these partners is Mitre 10. If you buy something at Mitre 10, they’ll scan your Airpoints membership card and you’ll earn some Airpoints, just for shopping there. That’s your first dip. Then you can also pay for the items with your Airpoints credit card and earn Airpoints again on the same purchase.

    Shopping at these retailers whenever possible is a good way to pad your Airpoints account out with a few extra points, especially if you’re making a big purchase like a dishwasher or fridge (my smart money advice would actually be to buy those things on Trademe rather than a store, but if you prefer to go brand new, definitely try and get some Airpoints ;))

    Some of the more popular Airpoints partners are Z Energy, Mitre 10, New World, Harvey Norman, Liquorland, Tower Insurance, Mercury Energy. Check these out, because a lot of them have pretty good specials. For example Mercury offers double Airpoints dollars every time you pay your electricity bill. There are about 60 partners in total – you can see the full list here.

    This doesn’t mean you can spend more money!

    This is important.

    The premise of a good travel hacking strategy is that you earn your Airpoints for free.

    Do not start paying more for stuff or buying more stuff just so you can earn Airpoints. This defeats the entire purpose of travel hacking.

    For example, you might see that New World is an Airpoints partner so it might be good to go double dip there. But there is no point in grocery shopping at New World to earn $2 in Airpoints if it means you spend $25 more on groceries (New World is expensive). That’s a loss of $23. Obviously it makes more sense to just keep shopping at Pak N Save or the Chinese supermarket and save $25 on groceries.

    It’s the same with filling up your car at Z service stations and earning 1 Airpoints dollar when you can go to G.A.S. or Gull and save way more money.

    This is common sense, but even I catch myself sometimes wanting to fill up at Z just to swipe my Airpoints card. Obviously spending an extra $10 to fill up your car just so you can earn a few cents in Airpoints is stupid. Real dollars are always better than Airpoints dollars.

    You should not find yourself spending more money just to earn Airpoints. If you are, try to rethink your earning strategy because you’re doing something wrong. Your goal should only be to earn Airpoints on money you were already going to spend anyway.

    Take advantage of partner deals

    Quite often, Airpoints partners will offer you special deals that will allow you to earn a quick chunk of airpoints, and just other miscellaneous deals in general. Usually they’re all compiled on the Airpoints website – check them out here.

    The Airpoints Mall

    The Airpoints Mall is a place where you can shop at a variety of retailers online and earn Airpoints bonuses for your purchases.

    There’s actually quite a good selection of shops in here, mostly clothing shops like ASOS, Smith & Caughey, Ezibuy. The only one I ever use personally is Groupon, but there’s a good chance one of the places you shop at is in there.

    Of course, you can double dip here as well! You’ll get Airpoints by shopping in the Airpoints mall, and then you’ll get Airpoints again on the same purchase if you use your Airpoints credit card to pay.

    You can view the full Airpoints Mall listing here.

    Again the same rule applies here. Don’t go shopping just for the sake of earning Airpoints. You should only come here when you were already going to buy something from these stores and want to collect some Airpoints on top. I don’t do a lot of online shopping, but if you are the type that does, definitely bookmark the Airpoints mall and check in there before you buy anything.


    Travel

    The last way to earn Airpoints is by travelling.

    This was the original way for earning frequent flyer miles and is still one of the fastest ways to earn Airpoints today. Basically it works like a loyalty program, so the more you fly the more you earn. Along with your flights, you can also earn points on hotel stays, car rentals and other travel related spending.

    Earning Airpoints on Air NZ flights

    Whenever you fly on an Air New Zealand flight, you should get points credited automatically to your account. The amount differs, but if you fly to Aussie you will probably earn around 15 Airpoints dollars. If you fly to the States, you might earn closer to 30-40 Airpoints dollars. If you fly business class or higher you will earn more (but of course I always recommend flying economy).

    You can use their Airpoints calculator for estimates on how many Airpoints you can earn on each route.

    Earning Airpoints on Star Alliance flights

    You can also earn Airpoints on any of Air New Zealand’s partner airlines. Air NZ is a part of the Star Alliance, which means (almost) any Star Alliance flight is also eligible to earn you Airpoints.

    For a list of all the partner airlines you could earn Airpoints with you can click here.

    You can also use the Airpoints calculator to estimate how many points you could earn on each partner airline route.

    How this works is you will book a flight on a partner airline, say it’s Singapore Airlines, for example. Once the flight is over, make sure you keep your boarding pass. In my experience you will need to claim the Airpoints manually after the flight. I don’t think I have ever had Airpoints from partner airlines automatically credited to my account (and I’ve flown a lot). If you don’t claim your points from partner airline flights manually, you won’t get them.

    There is a short period where you need to give Air NZ a chance to credit your points automatically. Usually it’s around two weeks. After that’s over, jump into your Airpoints account and see if your Singapore Airlines points are there. Most likely they won’t be, so simply select “Claim missing Airpoints” and enter all the details from your boarding pass. Your points should be credited within a few weeks.

    My general rule for flights is I always choose the cheapest flight, and don’t really have any loyalties to any specific airline or alliance. My loyalty is to price and nothing else. However, even with this approach you still need to be mindful of which airlines are Star Alliance/Airpoints partners, so you can remember to claim your points after the flight. Don’t forget! So many people leave Airpoints on the table, make sure you grab yours.

    Earning Airpoints on other travel spending

    You can also earn Airpoints on all your hotels, car and campervan rentals and airport parking.

    To earn Airpoints on hotel stays, you should use the Airpoints booking engine which is partnered with Expedia. Basically you will be using Expedia but through a portal on the Airpoints website. I’ve done a quick check and the pricing looks the same between the two, so it’s definitely better to use the Airpoints version. You can use the Airpoints Expedia booking system here.

    To earn Airpoints on car rentals, you can get rentals from Apex, Budget or Avis. Airpoints has a booking engine for this too which you can find here.

    For campervans, Air NZ is partnered with most major rental companies in New Zealand, which gives you bonus Airpoints. You can see their booking site here.

    For all other deals, such as airport parking, taxis, and a few other things, check out the Airpoints booking deals page, it’s all there.

    And again, double dipping applies here as well. For example, if you take a flight to Sydney on Air New Zealand, you’ll earn Airpoints just for booking the flight. Then if you pay for the ticket using an Airpoints credit card, you’ll earn Airpoints again. The same applies for any hotels, car rentals etc you book through the Airpoints website. You should be able to see how this can stack Airpoints pretty fast!


    How much could you earn?

    Let’s mock up a typical year and see how much Airpoints we could actually earn by doing all this.

    Bonuses

    We’ll sign up for a few credit cards. First, we’ll grab the American Express Airpoints card. That’s my favourite Airpoints card because it’s the only free Airpoints card in the country, and I love free stuff. It also gives you a 50 Airpoints dollars bonus.

    Then let’s say we take advantage of some other sign up bonuses. You can sign up for multiple, but I’ll assume we’ll do just one, maybe the Westpac Airpoints Platinum. During booster season (Jan-April) the Westpac Platinum usually has a sign up bonus of 300 Airpoints dollars, and an annual fee of $145, which equals 155 Airpoints dollars in profit.

    Spending

    Minimum wage in New Zealand is $16.50 per hour, after tax that works out to around $28,000 per year after tax. Let’s assume we save half of it (yeah right) so we have spending of $14,000 per year.

    $14,000 per year on the Westpac Platinum will earn you 187 Airpoints dollars.

    $14,000 per year on the free American Express Airpoints will earn you 140 Airpoints dollars.

    Let’s call it in the middle at 175 Airpoints dollars.

    Bonus points

    Let’s say we earn a further 10 Airpoints dollars on double dips and Airpoints partners (most of you should be able to earn more than that, I earn about that in ~3 months, and don’t leave my house much).

    Travel

    Finally, let’s say we take one flight to Aussie during the year and earn another 15 Airpoints dollars. Maybe you could earn this a different way, through renting a campervan, booking a hotel somewhere, a few domestic flights etc.

    Airpoints earned:

    Credit card bonuses 205
    Credit card spending 175
    Partner rewards 10
    Travel 15
    TOTAL 405 Airpoints dollars

    That’s enough for a couple of domestic flights, maybe a flight to Aussie if you’re lucky.

    If you earn around double what I outlined above (~$56,000 p.a.), you’d be looking at ~810 Airpoints dollars, which is a free flight to Asia, depending on the season, or a one-way flight to Los Angeles or Canada, with a few points left over.

    If you earn around triple what I outlined above (~$84,000 p.a.), you’d be looking at ~1,215 Airpoints dollars, which will easily get you to Paris or Rome, maybe even a return flight on a good deal.

    You could also bump this number up significantly by using one of the faster-earning cards and signing up for more bonuses. If you’re using one of the platinum cards, you’ll probably be enjoying lounge access and free travel insurance too.

    How hardcore your travel hacking gets is totally up to you!

    How to get started:

    Sound good? Here’s what you need to do to get things going:

    1. Sign up for Airpoints. It’s free – just click here.
    2. Get yourself an Airpoints credit card. You can find out which card is best for you in my Airpoints credit card guide here. If you just want the easiest, no frills card, I’d recommend the free American Express Airpoints card, which is what I use. It’s the only free Airpoints card on the market, so you can’t go wrong with that one (you can’t lose money on a free card!)
    3. Bookmark the Airpoints deals page here. Check in each month.
    4. Bookmark the Airpoints Mall. Check in here before you go shopping for anything.
    5. Start using your Airpoints credit card at every opportunity and racking up points. Get creative with it. Don’t forget to pay your card off in time and in full every month.
    6. Watch the points stack up and repeat!

    Best of luck and hope to see you in the air soon 🙂

    Questions? Leave em below.

    Bren

  • How To Take Cool Photos Of Yourself While Travelling Alone

    How To Take Cool Photos Of Yourself While Travelling Alone

    Yo Bren if you’re always travelling alone, who takes all those cool photos of you?

    I guess they’re talking about photos like this:


    A post shared by Bren (@brenontheroad) on

    And this:


    A post shared by Bren (@brenontheroad) on

    And this:


    A post shared by Bren (@brenontheroad) on

    And this:


    A post shared by Bren (@brenontheroad) on

    I actually don’t take that many photos of myself while travelling, but there is always a time when I’m alone, sometimes completely, completely alone (as in, 1,000 miles from anybody) and I still manage to get cool candid snaps of myself. All the photos above I took of myself while travelling alone, sometimes in the middle of nowhere.

    So how do you do it?

    Well, there’s no real big secrets, but there are a few basic camera tricks and some sneaky travel tools.

    Really there are only two ways I take my own photos:

    1. Asking other people

    The most obvious way to get snaps of yourself while travelling is…ask somebody. Pretty obvious. But not a lot of people like to do it. I guess it can be a little embarrassing when they line you up in a shot and then you do one of your Calvin Klein poses. But still – if there’s anybody around I usually ask someone. And there are actually a few good tips that will get you much better photos from a stranger. 

    Tip #1: Compose the photo yourself first. Find out exactly how far you want to be, what angle, where you want them to stand. Then when you finally manage to convince the poor stranger, just hold the camera in place and say “Could you take it just like this?” Then all they need to do is hold it and push the button. It seems most people actually prefer being guided like this – it takes out all the guesswork for them.

    Tip #2: Find someone with one of those huge cameras around their neck. You know the ones I’m talking about it – they look like they cost ten million dollars. You already know that person is going to be an absolute fiend with the camera. Often those people actually enjoy taking other people’s photos, some of them will even start directing you! “Just move a bit to the left, oh wait, let me stand over here a bit, push your hat up there’s shadows on your face, let me get a few more..” That’s always cool when you get one of those.

    Unfortunately, that’s bit of a rarity. That’s actually the reason I rarely ask strangers nowadays: So many people still have no freaking clue how to use a camera! Can you believe the number of people who still don’t know how to focus? Or who will take an absolutely terrible photo of you and just think it’s okay. I’m not a supreme photographer or anything, but I always try and take some amazing snaps if someone hands me their camera. And I know it’s a rarity because they usually thank me endlessly. 

    The other reason is, I like to direct my own pics. Meaning I like to set them up, compose them, think about the kind of caption or story I’ll have behind them, and then take my time trying to get it right. When you interrupt someone’s day to get a photo of you, you kind of need to hurry up – you can’t have them standing there for five minutes trying to trial-and-error the right shot for you.

    You can still get good shots if it’s something basic like this:


    A post shared by Bren (@brenontheroad) on

    This is some street art in Lisbon, I think my brother took this in just a single shot. But even with something like this I prefer to take it myself and try to get it the way I like. So, how do we do that?

    2. Getting the right gear and taking them yourself


    A post shared by Bren (@brenontheroad) on

    Taking photos of yourself requires a little practice, but you actually don’t need anything fancy. You don’t even need a camera. Your smartphone will do just fine. And you definitely don’t need one of those floating drone things that only Forbes Listers can afford. There’s actually only one piece of equipment you need and it costs about thirty bucks. That is…

    A tripod.

    I currently use this tripod from the people at Camrah.

    I bought it about two years ago and it’s come everywhere with me since then! Here’s what’s cool about it:

    It can stand up anywhere

    The Camrah tripod has these bendy legs that let you create any angle you want. If you want your camera to be looking up, down, lopsided, whatever you want, just give the legs a twist until you get it right. Quite often you get a ledge that’s a little uneven or you try to balance your phone on a chair but there are some curves that don’t let it sit right. With this thing it doesn’t matter, the legs are like wires, so you can make it stand however you want.

    That’s how we took this photo in an abandoned house in Finland. I remember I had to balance it on some stuff, but it came out great:


    A post shared by Bren (@brenontheroad) on

    If there’s nowhere to stand it, doesn’t matter!

    Probably my favourite thing about this camera is you don’t even need a surface to stand it on. Whenever I have a picture I want to take, the first thing I do is look around for a wall or ledge to sit my phone on, but often there’s nothing. These tripod legs are so limber though that you can just wrap it around something – a tree, a pole, a fence – any standing structure basically.

    That’s how I managed to get this snap on my train up to the Arctic. I don’t remember exactly how I did it, but I do remember I was fiddling with it for a long time. I think I ended up wrapping it around a fire extinguisher.


    A post shared by Bren (@brenontheroad) on

    You can take pictures remotely

    Back when I was a rookie, taking a photo of myself went like this: I’d balance my camera wherever I could find, I’d set the timer to 10, and then I’d sprint into position and strike a pose.

    After twenty seconds (just to be sure I gave it enough time), I’d run back to my camera, which was sometimes sitting miles away, check the photo, and then repeat until I got it right.

    Obviously I don’t carry my tripod absolutely everywhere, so sometimes I still actually do this. Luckily though there’s a better way.

    The Camrah tripod comes with a bluetooth remote, so you can simply set up your phone, connect the remote and then walk into position. Do your Kodak smile, flex your biceps, and then just click the button. This lets you take the photos remotely so you can just stand there and take a hundred if you want! All you need to do is click click click. I’m sure I don’t need to explain why this is so much easier than running back and forth between your camera to re-take your shot every time.

    I actually took this shot out in the Norwegian wilderness like this:


    A post shared by Bren (@brenontheroad) on

    Took me a little while to get it right – but if I didn’t have a remote I would have never got it at all. You can’t actually see but there was a small stream in between myself and where I parked the car. So I would have needed to set the timer, then cross the stream, then run through that crazy thick swamp and do my cool Terminator pose, all within ten seconds. Then I’d have to run back and reset the camera to do it again until I got it right. Which of course would have been impossible.

    You can use it as a selfie stick

    The Camrah legs aren’t that long, but it’s still probably a good 8-10 inches. I use it quite often as an extender stick to get shots over a barbecue or a bird’s eye shot of something, or just to get a bit more height on my landscape photos. Of course you can use it for the obligatory selfie as well. 

    You can mount both your phone and your camera

    The Camrah tripod has two mounts – a basic screw mount that fits most cameras, and also a clinch mount that you can use to hold your phone. I use them both quite often and they work great.

    Super easy to travel with

    It’s such an easy thing to travel with – it’s about the length of two passports and really thin. Plus you can mold it into any shape you want if you’re struggling to find space to pack it in. I just leave it laying in the bottom of my backpack, I barely notice it’s there. As most of you know, I don’t travel with a lot, so something lightweight and slim like the Camrah tripod is the perfect accessory for me. Plus, it’s so cheap! If you lose it or break it, it’s thirty bucks. Nothing to lose sleep over, just the way I like it.

    Where to get one?

    I bought mine off Amazon – they ship worldwide so you can get it anywhere. Lifetime guarantee too! It currently sells for $24.95 which is a steal of a price for something so versatile! I love it.

    Click here to get one of your own.

    Happy snapping!

    Want to see what other cool stuff is in my backpack? Check out the full list here.

  • The Practical Guide To Making Money While Travelling

    The Practical Guide To Making Money While Travelling

    By far the most common email I get these days is “Hey Bren, I would love to travel the world, I just don’t have the money right now. How do you afford to pay for it all? How do you make money while you’re travelling all the time?”

    (more…)
  • What Is The Best Travel Insurance For New Zealanders

    What Is The Best Travel Insurance For New Zealanders

    This article is a part of my travel tips series for New Zealand travellers. If you’re not from NZ, this post won’t apply to you. You can see the rest of the Kiwi traveller guides by clicking here.


    My travelling whanau.

    What’s up?

    Today we’re talking about travel insurance.

    As with most things, this aspect of travel is a little different for us New Zealanders. In fact, travel insurance has different rules/limits/prices in pretty much every country around the world. Like my previous guides on Schengen travel for Kiwis and banking for Kiwis, I’m going to grind down our options to see what is truly the best Kiwi travel insurance for us New Zealanders on the road.

    Why you need travel insurance

    I’ve noticed a lot of Kiwis tend to skip over this part of travel.

    Nah bro, it’ll be sweet. 

    Nek minnit you’re in a Thai hospital with a broken arm and $5,000 of medical bills at your bedside.

    This is why even on the smallest of trips, you need to get insured.

    Bali for a week? You need insurance. Big six month trip after graduation? Yes, insurance. Even if you’re just heading to Aussie for a weekend? Insurance insurance insurance.

    I would even go so far as to say it is the most important thing to buy when you travel. Yes, more important than your passport. Forgetting your passport can’t kill you. Not having travel insurance can.

    Let me tell you why.

    Not all countries are like New Zealand. Back home, if you get in a car crash on the way to Rotorua the ambulance will pick you up and take you straight to the hospital. They’ll fix your broken leg. Go home and rest. No need to pay a cent. Back to work next week.

    Most of the world is not like this. 

    In other countries, accidents cost money, especially when you’re a foreigner. If you fall down a mountain while hiking in Nepal, the bill to airlift you out of there and get you to an emergency room could be close to $50,000. If you need extended care, some hospitals can cost up to $10,000 per night. These are not bills you want to be left with after your holiday. Can you imagine coming home from a trip $100,000 in debt? 

    Those are extreme (but possible) scenarios, however travel insurance will also cover you for things like car accidents, missed flights if you get sick/injured, missed tours and hotel rooms you’ve prepaid for, even stolen baggage and electronics if someone jacks your bus or train. 

    The best part is, most good travel insurance policies will only cost you $3-$4 per day. For that price travel insurance is always worth it.

    Now of course, there are several choices when it comes to buying insurance. The policy you decide to go with should depend not only on price, but also what kind of coverage they offer. Let’s go through the things you should be looking out for: 

    Absolutely essential:

    These are the things that are non-negotiable. Your insurance policy must have the following:

    • Accident and sickness medical: This includes hospital and specialist care, dental care, surgery, post injury care, ambulances, and medical evacuation. Look for coverage of at least $500,000.
    • Emergency medical: This relates to times where you’re stuck on a mountain or in the jungle, or in a country that doesn’t have appropriate medical facilities to treat you. It should include emergency evacuation by plane or helicopter. As you might guess, this is expensive. It should also cover transport of your remains home in the event of your death (this is important – it will be very expensive for your family to fund this). Look for coverage of at least $500,000.
    • Personal liability: This covers situations where you’ve caused damage to people or property and are at risk of being sued. This will cover your legal fees and any compensation you’re required to pay. Look for cover of at least $500,000.

    Other important things:

    These things are not life-or-death, but will still be important to have.

    • Trip cancellation: If your trip is cancelled for any reason (like the All Blacks lose and you kick a pole and break your leg), you’ll get reimbursed for all the expenses you’ve already paid. That includes flights, accommodation, tour fees etc. At least $5,000 coverage is ideal.
    • Trip interruption and changes: If you have a serious injury on the road and you’re in hospital for a week, you might still want to continue your travels but things would’ve changed. You would have missed flights, missed tour dates, you might have been evacuated to a different country. With this coverage your insurance company will cover the costs of all these changes. Look for coverage north of $2,000.
    • Baggage and personal effects: If your camera, laptop or phone gets swiped on the train, travel insurance should cover the cost of replacement. What is covered will depend between companies. Look for standard coverage of at least $2,000.

    Depending on the type of trip you’ve planned, it could also be important to seek special coverage, like a specific sport or activity you plan on doing. If you’re going on a surf trip, double check that you get full coverage while you’re in the ocean (some companies won’t cover certain activities).

    Everything else

    Most companies will offer coverage for a few other things, like your rental car deductible, missed concert or event tickets etc, but the ones listed above are the essentials. Make sure the coverage is rock solid on each of them. The other stuff will be mostly a bonus.

    What are the travel insurance options in New Zealand?

    There are a many options for you to consider in New Zealand. I don’t have time to investigate them all (pretty much every bank and insurance company will offer something), but I have chosen six of the most popular providers to look into. Of course, feel free to research a few more if you feel the need.

    In the summary below, I’ll compare each of them on the provisions I consider most important, including price, and hopefully I’ll be able to give you a recommendation on who is best and who to avoid. Here’s who we’ll look at:

    Southern Cross: A popular Kiwi insurance company that is a familiar name to many of us.

    World Nomads: Global insurance company with flexible policies and very popular among backpackers.

    Safetywing: Designed specifically for frequent travellers and very affordable.

    1cover: Multinational company with a New Zealand arm that has good, affordable policies.

    American Express: Big American company that offers policies in New Zealand.

    I haven’t looked into every single aspect of their policies, but I have rounded up the most important things: Medical, emergency medical, dental, cancellation, personal belongings and personal liability, among others. Here’s how they stacked up:

    Basic travel insurance plans

    First, we’ll look at the basic, entry level plans. These are the plans that cover just the essentials.

    The below table summary is based on a one week trip to Europe for a single, 30 year old traveller:

    Southern Cross World Nomads1coverSafetyWingAMEX
    Overseas medical $5,000,000 unlimited $250,000 unlimited
    Emergency medical $500,000 unlimited $100,000 unlimited
    Cancellation costs $5,000 $5,000
    Emergency dental $1,000 $500 $1,000 unlimited
    Trip interruption $2,500 $5,000 $3,000
    Personal items $2,000 $5,000 $5,000
    Personal liability $1,000,000 $5,000,000 $25,000 $2,500,000
    Emergency visit home $1,500 $5,000
    Baggage delay $300 $250
    Accidental death $25,000
    Loss of income
    Permanent disability $25,000
    Excess $100 $200 $250 USD $100
    Can purchase overseas Yes Yes Yes No
    Price for basic plan None $118$59$24110

    Note: Some of these numbers might not be 150% accurate, because each company has different names for things so it was difficult for me standardise it. But I’m confident the numbers above are pretty close to what you’ll get.

    Too many numbers? Here’s the short version:

    Safetywing is the clear frontrunner on price, but the policy is really thin – it literally covers only medical and personal liability.

    However I’d be happy with that as long as I wasn’t going anywhere crazy and not planning on doing anything crazy (like a trip to Aussie, maybe).

    American Express has the best coverage but is the most expensive. Also note if you’re an Amex Airpoints Platinum holder, your travel insurance is free if you book your tickets on your card. Usually they have a 300 Airpoints dollars signup bonus too. You can check here!

    Comprehensive plans

    Next up are the premium plans. These are the plans that cover the essentials such as medical and personal liability, but also cover all the other little things like personal items, loss of income etc etc.

    Not all policies are the same though, so make sure you read each policy carefully before you buy. Here’s what the numbers look like:

    Southern CrossWorld Nomads1coverSafetyWingAMEX
    Overseas medical unlimited unlimited unlimited $1,000,000 unlimited
    Emergency medical unlimited unlimited unlimited $1,000,000 unlimited
    Cancellation costs $50,000 unlimited unlimited $2,000 $10,000
    Emergency dental $750 $1,000 $1,000 $1,000 unlimited
    Trip interruption $30,000 $5,000 $6,000 $5,000 not sure
    Personal items $25,000 $10,000 $15,000 $2,000 $10,000
    Personal liability $1,000,000 $2,500,000 $5,000,000 $25,000 $5,000,000
    Emergency visit home $50,000 $1,500 $50,000 $5,000 not sure
    Baggage delay $1,000 $450 $250 $150/item $500
    Accidental death $15,000 $12,500 $25,000 $25,000 $25,000
    Loss of income $6,500 $10,400 $10,400
    Permanent disability $12,500 $25,000 $25,000 $25,000
    Excess $100 $100 $200 $0 $100
    Can purchase overseas No Yes Yes Yes No
    Price for premium plan $86148$76$240 monthly$245

    To me all these policies look pretty similar across the board. I don’t think it would matter too much which one you choose – meaning the deciding factor for me would be price. I’d go with the cheapest – 1cover. The policy is great and covers all the essentials. 

    The exception would be if you’re travelling for months at a time, in which case I would choose Safetywing. Their comprehensive plan is specifically designed for long-term travellers.

    One word of caution here though: Going with the cheapest isn’t always the best option. Let me explain:

    Why not just choose the cheapest plan?

    First of all, no two companies are the same. For example, 1cover might be the cheapest for a one month trip but it might not be the cheapest for a one year trip. Therefore it’s important to check out the prices for your exact travel dates and determine what is actually the cheapest.

    Secondly, you should choose the policy that best suits you. If you are carrying a lot of expensive camera equipment, each company will charge a different premium for the extra cover. You’ll need to get in touch with each company and get a quote for your personal situation. Likewise with the activities you’re planning to do. If you’re climbing in the Himalayas, some companies may not be willing to cover that. You’ll need to check who is happy to cover you for the travel plans you have.

    The above rates are also based on a single traveller. Perhaps you are travelling as a couple or a family – that’s going to change things. Some companies will be tailored more for families and some tailored more for single backpackers, so make sure you check. Some companies will offer better cover for your family at a higher price, which could be important for you.

    As you can see there’s many reasons why the cheapest company may not be the best for you. Before you pay anything for travel insurance, double check the policy and make sure it covers everything you need it for. If you cannot tell from the policy statement, call and ask! A policy is worthless if it doesn’t cover everything you’re at risk for.

    Check if you’re already insured

    Do you have a credit card? Perhaps you’re already insured.

    If you have a free or low-fee credit card, it’s almost certain you won’t have travel insurance included with it. However, if you have any kind of platinum credit card, there’s a good chance you’re already insured.

    Many banks in New Zealand offer you free travel insurance for short trips (usually up to 30-60 days) if you have a premium credit card. Call your bank or credit card company and ask.

    Sometimes it’s even worthwhile to just upgrade to platinum before your trip to get the free cover. Since the annual fee on a platinum card is usually only $100 or so, if your travel insurance is going to cost more than that you might as well just upgrade your card instead.

    Also check any family or business insurance policies you have. Many have travel insurance written in and you may already be covered under a policy that a family member has.

    I recommend getting an Airpoints credit card, so you can earn points for free flights. Many of the platinum cards offer free travel insurance too. I have a breakdown of all the Airpoints credit cards in New Zealand here.

    What to do when shit happens

    The first thing you should do if something happens overseas is call your insurance company. Every travel insurance company will have a 24 hour number you can call. Not only is it important to call and get their advice on what to do, they have contacts and can connect you to the right doctor/hospital/lawyer.

    The exception is when you’re in an emergency. If you’ve been in a bad car crash and you’re losing blood and your vehicle is in flames, just call the police and get to the hospital. Hopefully that’s just common sense, but ensure your safety first. You can sort out the insurance details later.

    This should also be obvious, but make sure you keep all your receipts and invoices. Take photos of them and store them online somewhere as well, your email or Dropbox is a good place. You will need all these documents when it comes time to make a claim.

    Summary for those who were too lazy to read the article

    *Based on a one week trip to Europe for a single, 30 year old traveller:

    • Cheapest basic insurance: SafetyWing
    • Cheapest comprehensive insurance: 1cover
    • Before you buy a policy, call your bank or credit card company – there’s a chance you’re already insured.
    • Make sure you keep all documents like receipts and invoices for claims.
    • Call your travel insurance as soon as any incident happens overseas – they can advise you on what to do. 

    Safe travels!

    Bren

    P.S. The only insurance companies above I have actually purchased policies with myself are World Nomads and Southern Cross. Both were great. I cannot vouch for the others.

    P.P.S. If you’ve had experiences with the above companies or any other NZ companies, leave them below and let us know about it. I can’t dig into every single insurance company in NZ, but any experiences you share will be helpful for others!

    Disclaimer: World Nomads provides travel insurance for travelers in over 100 countries. As an affiliate, we receive a fee when you get a quote from World Nomads using this link. We do not represent World Nomads. This is information only and not a recommendation to buy travel insurance.

  • How To Never Get Traveler’s Diarrhea Or Food Poisoning While Traveling

    How To Never Get Traveler’s Diarrhea Or Food Poisoning While Traveling

    So let me tell you a story.

    This is in Uganda. I’ve checked into this budget hotel and you know, I’m hungry. After I buy a sim card for my phone, I ask the lady where her favourite place to eat is. She points across the road to some little place with a blue door. Awesome.

    I walk in there and ask the guy behind the counter what they’re cooking. He says they’re serving beef stew and rice today. Perfect. I’ll have a beef stew with rice please.

    So I sit down and I’m trying to get my sim card to work, and within a few minutes my food comes. It’s exactly what he said it was – beef stew and rice. I eat some. Nice. I finish the whole plate.

    It’s actually my first day in Uganda. And I don’t really have energy to go exploring or anything, so I just sit there fiddling on my phone. After about 45 minutes, my stomach turns a little. Brrrrrrrr.

    I dismiss it as just a little tummy rumble. Just getting used to this Ugandan beef, yeah?

    Then a few minutes later, another rumble. Hmm.

    This goes on for about half an hour and doesn’t concern me too much, I’ve experienced this before even at home. Sometimes you eat too fast, or just eat something funny. But then suddenly I feel a bit of outward pressure with the rumble. I clench my, err, cheeks together, and now I’m all perked up, like a dog hearing rustling outside the window in the middle of the night.

    Are my bowels about to explode?

    Better visit the bathroom.

    I run upstairs to my hotel, which is just a few doors down. As soon as I sit down, I unleash merciless havoc on the toilet.

    Crap. Literally.

    A class case of traveler’s diarrhea.

    What is traveler’s diarrhea?

    That story was back in 2015, and it was pretty clear to me that I got it from that restaurant. Either the beef was bad, or they didn’t wash their spoons properly. Who knows.

    As for the cause of the diarrhea itself, I don’t know if there’s a difference between that of traveler’s diarrhea and normal diarrhea. Both are usually caused by eating some crappy food that hasn’t been cleaned or stored properly. Bacteria such as E.Coli gets into your guts and then just starts messing everything up.

    However, when we talk about traveler’s diarrhea, we are often referring to sudden diarrhea we get overseas, especially after eating something seemingly innocent such a salad at a food stall, or a piece of grilled meat. 

    It is unlikely to get diarrhea from things we eat in our home countries, even if they are slightly contaminated with something, because we’ve been eating those things our whole lives. Our bodies recognise them and can handle them just fine.

    However, overseas, many germs are brand new to the body. Our body has never seen them before. This often causes the stomach to reject it and we get stuck to the toilet for a few days. You might also have heard this referred to as Delhi belly, Bali belly or Montezuma’s Revenge. 

    The most common culprits are meat that hasn’t been refrigerated or cooked properly, unclean dishes and cutlery, or salads that have been washed with unclean water. Another common cause is people drinking tap water when they shouldn’t. Southeast Asia is a hotbed for travelers diarrhea, as are places like India, China, and many parts of Africa.

    What are the best ways to prevent traveler’s diarrhea?

    After many years on the road travelling to many far-flung places, I’ve had to deal with traveler’s diarrhea several times – notably in Cambodia, Tanzania and Uganda. Some ways of dealing it are just common sense and some work better than others, but after experiencing this unfortunate dilemma several times I now have a decent system on how to prevent it and haven’t had any troubles since.

    The first thing I’m going to tell you here is, YES, you do need to worry about this. You need to take conscious measures to prevent traveler’s diarrhea.

    Having traveler’s diarrhea is a miserable time and will keep you out of commission and maybe even bed-ridden for up to a week or more. That’s a big chunk of your trip.

    If you’re heading somewhere with questionable food safety and want to make sure your guts (and your toilet) stay in good shape, here are my best tips to help you do so:

    1. Dukoral

    This is one of your options. Dukoral is an oral vaccine that I’ve taken several times, particularly on my first few trips to Africa. It should be available from your doctor and in many countries you don’t even need a prescription.

    What does Dukoral do?

    It protects you against both cholera and diarrhea caused by the E.Coli bacteria, presumably in the same way as most other vaccines – by introducing the non-toxic bacteria to your stomach so you can produce antibodies.

    I have used this vaccine on several trips, and it works great. What I love about it though is the set-and-forget nature of it. You drink the solution twice before your trip – each dose one week apart – then you’re protected for three months. Super easy.

    The only issue I have with taking things like this regularly is I feel like they impede your body’s ability to deal with these things on its own. If there’s ever a case when I haven’t taken the vaccine, I feel like my body is going to crumble with the slightest bit of bad food (this is bro science and I have no idea if it’s true, just a personal thing).

    I used to reserve it for when I’m going to a place that’s very questionable – think small villages in rural Ethiopia, something like that, but nowadays I don’t take it at all, instead relying on the preventive measures I’ll describe further below.

    However if you are highly susceptible to gut problems and diarrhea, and haven’t travelled a lot in the developing world, I’d say this is a good option. But that doesn’t mean there aren’t alternatives. What can you take instead of Dukoral? Keep reading!

    2. Probiotics

    Do you know how important probiotics are to your health?

    In our guts we naturally have trillions of bacteria. Most of them are good for us. They boost our immune system, help with digestion and most importantly, keep the bad bacteria in check.

    Unfortunately many of us have ravaged our gut flora through constant use of antibiotics. Not only do we use them when we’re sick, but it’s also in much of the food we eat, especially meat and dairy. Almost all commercial livestock is treated with antibiotics, especially cows and chicken. That means traces of antibiotics are found in our milk, cheese, eggs and meat. Most people are constantly ingesting antibiotics on a daily basis.

    The problem with antibiotics is they don’t discriminate. They kill both the good and bad bacteria in our body. Sadly it is hard to avoid antibiotic exposure in modern life.

    Here’s how this applies to traveler’s diarrhea:

    If you eat a dodgy salad in Cambodia and get a few nasty bugs in your system, there’s a chance it’s going to shut your body down. But if your gut is healthy with trillions of strong and healthy flora, a few bugs like this won’t be a problem. The good bacteria in your gut will knock those suckers out without much trouble at all.

    Research is even emerging that a healthy gut is one of the most important aspects of a healthy immune system (studies here and here).  And in studies like this one, the medical community has been starting to see probiotics prevent food poisoning and can be an effective remedy against traveler’s diarrhea.

    I’m guessing it will start becoming more mainstream soon (and it already is) but honestly I’m not too concerned about what the docs think. If I start taking probiotics and stop getting diarrhea, that’s proof enough for me! And myself and many other travellers have been doing so throughout our travels. Probiotics work.

    Check out my other tips on how to stay healthy on the road.

    What is the best probiotic for traveler’s diarrhea?

    You might be thinking, you’ll just pack some probiotics and take them during your trip, everything will be dandy, yeah?

    Unfortunately it’s not that easy.

    Replacing and building a healthy gut takes time, so I would recommend you start taking probiotics at least a month before your trip. In fact, I recommend you start taking them right now, and continue to do so regularly whether you’re travelling or not! I personally take a 50 billion probiotic supplement every day, regardless of whether I’m on the road.

    The thing is, you can’t just grab any probiotic off the supermarket shelf and think you’ll be okay. You need the right type of gut flora, and also the right quantity. If you’re travelling with it, you also want it to be a shelf stable probiotic.

    Remember, some studies estimate we have up to 100 trillion bacteria in our guts. If you take a probiotic that contains 250 million units, it’s like a drop in the ocean. It’s no better than just eating a spoonful of yogurt.

    So how much do you need?

    I try to aim for between 10-20 billion colony forming units per day. Ideally more. If you’re about to go somewhere where your gut will be really tested, such as rural Asia or Africa, you might to get a product that gives you up to 50 billion units per day.

    I know that sounds like a lot but it’s perfectly safe. You can’t overdose on probiotics unless you really try – any excess will just get passed out in your poop. In fact, this guy actually did try to overdose and still couldn’t do it.

    I’ve taken up to 200 billion units in a single day and was totally fine.

    You also need the right type of probiotic. There are thousands of strains of gut flora out there, and not all of them are shown to be effective against traveler’s diarrhea.

    In this study I cited earlier, the three that were found to be most effective were Saccharomyces boulardii, Lactobacillus acidophilus, Bifidobacterium bifidum. 

    Luckily the latter two are quite common, but the first can be more challenging to find.

    What probiotics should you use?

    The probiotic I’m going to recommend is the Pro 50 by Vitamin Bounty and you can get it directly off Amazon.

    It’s the probiotic that I currently use and have been using for several years now. It’s one of the best probiotics for travelling – both due to its formula and how compact it is to travel with, and it’s also shelf stable. I highly recommend it.

    how to stop travelers diarrhea with shelf stable probiotics

    Each bottle contains 30 servings, and each serving gives you a whopping 50 billion colony forming units (most common probiotic supplements only give you around 1-5 billion).

    It also contains all three flora that were recommended to be in probiotics for travel (Saccharomyces boulardii, Lactobacillus acidophilus, Bifidobacterium bifidum) which can be quite hard to find in one supplement!

    If you’re worried about getting traveler’s diarrhea, I highly recommend carrying a strong probiotic like this. Multi strain products like this are the best probiotic to prevent traveler’s diarrhea and will keep your gut in fighting shape during your trip. 

    Of course you can also use any other “good” probiotic from your local pharmacy or health store, but this is the one I like and recommend. Just make sure whatever you use has a sufficient number of units and the right strains!

    You can click here to get Vitamin Bounty’s Pro-50 Probiotic on Amazon.

    Remember, taking probiotics before travel is important! You want to start working on your gut health at least a month before your trip, so make sure you get enough. I’d recommend getting a bottle for the 30 days before your trip, and then a second bottle to use during the trip itself. But ideally you should be taking them regularly regardless of whether you’re travelling or not.

    Again, I have never had any tummy problems on the road since taking daily probiotics, and I travel to some pretty dodgy places and eat some pretty dodgy things. They really work. It’s easily one the best travelers diarrhea treatments I’ve tried.

    How to travel with probiotics

    The most important thing when buying a probiotic for travel with is to make sure it is shelf stable. 

    This means the probiotic does not need to be refrigerated for the bacteria to stay alive. The obvious reason is – it’s unlikely you’ll be able to keep your probiotics in the fridge at all times, especially if you’re on the move a lot. The Vitamin Bounty probiotic I’ve recommended above is shelf stable.

    Secondly, buy a probiotic that has a very high unit count, at least 50 billion plus. When you’re at home, it’s fine to buy 10 to 20 billion unit products and eat them periodically with your meals throughout the day. However when you’re travelling this isn’t practical. You want to be travelling with as few bottles of probiotics as possible, so get the highest count you can. Anything over 50 billion is perfect.

    Lastly, take them properly. I find the best way to take probiotics while travelling is to take it first thing in the morning with a big breakfast. Probiotics populate the gut best with food.

    Extra tip: Prebiotics

    One thing that probiotics need for optimal function is an equal amount of “prebiotics” to support them. Prebiotics are highly fibrous foods that feed probiotic bacteria and help them flourish in the gut. Without sufficient prebiotics, your probiotic supplements will not survive in the gut and will simply die and go to waste.

    Some of the richest sources of prebiotics are oats, asparagus, chicory root, jerusalem artichoke, leeks and dandelion greens. I usually try to get my prebiotics from foods, and always eat a lot of oats and asparagus, every day if possible. However during my trips I usually take a prebiotic supplement as well. I’m not too fussy about prebiotics and just take whatever is available at pharmacies around the world. Something like this is the type of thing I usually take.

    3. Probiotic foods

    Have you ever heard people tell you that you should eat more yogurt if you’re having tummy problems? People used to say this to me all the time. Especially when travelling in places where diarrhea is common, the girls would always be telling me to eat more yogurt.

    Even doctors and nurses have told me this in many places.

    The reason is simple: yogurt is a fermented food, and therefore contains live cultures (probiotic bacteria) which populate and protect your gut, just like the probiotic supplements we talked about above. They basically achieve the same thing. The same goes for other fermented foods that are recommended for probiotic reasons, such as sauerkraut, kimchi, kombucha and kefir.

    When I learned this I started adding yogurt to my travel diet immediately, usually stopping by a supermarket to buy some every day.

    However, there’s a few reasons I don’t recommend relying solely on probiotic foods and here’s why:

    Unless there’s a swanky health store where you’re travelling to (unlikely in most places where you’re susceptible to traveler’s diarrhea) it can be hard to find a high quality yogurt with live cultures. Even then, you don’t know how many or what strain of probiotics you’re getting, plus a lot of the yogurts these days are processed and flavoured with sugars and preservatives. The same goes for other fermented foods.

    There is also a problem with storage and refrigeration. In fact, my friend Jodi actually got food poisoning from yogurt that she suspects wasn’t refrigerated properly. Ironic.

    But the main reason I don’t rely on foods is – you can’t travel with them. It’s just not practical to pack a jar of sauerkraut or yogurt in your suitcase or backpack and take it around the world. Unlike probiotic supplements, which are ideal for travelling with, it can be hard to guarantee that you’ll get enough probiotics each day when just relying on food sources.

    For that reason I don’t recommend relying just on probiotic food. Of course, do eat it whenever you get the chance – I try and have a bottle of sugar free yogurt or kefir every day while travelling (check the packaging to make sure there are live cultures present).

    But in my opinion it’s best to have probiotic supplements with you as well to ensure you get a constant daily dose.

    4. Anti-diarrheal medicines

    how to stop travelers diarrhea

    When I first started travelling, my doctor gave me Loperamide tablets, also known as Imodium. This is a drug that gets to work in the large intestine and slows down bowel movements, meaning your poop has more time to “bulk up”, so to speak. I’ve used this a couple of times earlier in my travels and while it works, I haven’t used it since then.

    The reason I don’t like these pills is because they are reactive rather than preventive. Usually you’re supposed to wait until you actually get diarrhea, and then use the pills to treat it. I prefer to be a bit more proactive and just not get diarrhea in the first place. Using a vaccine like Dukoral or preparing your gut with healthy probiotics makes a lot more sense to me. However, I do still have Loperamide tablets in my toiletry bag from many years ago – I guess they’re there for peace of mind more than anything!

    If you’d like to take some Loperamide with you on your trip, you can grab some basic Imodium pills, or even just get a generic brand off Amazon. Something like this Kirkland product would be fine.

    Other tips for preventing food poisoning and traveler’s diarrhea

    There are also many common sense things you can do to keep you and your stomach safe.

    • Always sanitise your hands before you eat! I carry a basic hand sanitiser everywhere (just like this one). The world is filthy and every car door, bus seat, dollar bill and ticket machine is crawling with germs. Of course this doesn’t mean you need to wear gloves or anything stupid like that, but always clean your hands before you eat.
    • Drink bottled or boiled water. At home the tap water may be safe to drink, but in many countries around the world you are not supposed to drink tap water. In most developing countries bottled water is ridiculously cheap anyway – a day’s worth of water often doesn’t even cost a dollar.
    • Try to eat in busy places. This means the food turnover is high and they won’t be serving you meat and vegetables that has been sitting around for days. Contrary to what most say, I find street food is also great because you can watch the food getting cooked right in front of you. If anything looks unclean, you can see it! This is unlike many restaurants where everything is done behind closed doors.

    Hope that helps. Good luck and safe travels!

    Bren

    Disclaimer: Obviously I am not a doctor, and this article should not be taken as medical advice. The above is based on my personal experience only. You should consult your own medical professionals before starting any treatment plan.