Category: Making Money

  • How To Start Your Own Blog (In 10 Simple Steps)

    How To Start Your Own Blog (In 10 Simple Steps)

    So, you’ve seen how wickedly awesome my blog is and you want one of your own (cough). Not a problem.

    Starting your own blog is actually a lot easier than you think. You can be up and running in a couple of hours, depending on how fast you work, and could even have your first post up by the end of the day.

    Everyone blogs differently, but things are mostly the same at the start: You choose a domain, get some hosting space, find a design you like, stuff like that. It’s not difficult, but will cost you a little bit of money and you might want to punch your screen a couple of times.

    I’ve laid everything out step-by-step below, in as simple a way as I could. Hopefully it’s all crystal clear but if not, don’t be afraid to leave your questions in the comments.

    Let’s go!

    Quick note: If you’re blogging as a hobby, a good option is a free blogging platform. My recommendation is WordPress.com, which is 100% free. There will be some limitations when it comes to customisation. For a serious blog that could potentially become a business, you’ll want a self hosted blog which is what I’ll talk about below.

    Why start a blog?

    Why are blogs important? What purpose do they serve?

    There are a million different answers.

    A blog is a platform. It represents your voice. You can use it to share stories, influence people, inspire, educate, debate, entertain. It is a creative outlet. It allows you to express yourself freely in a world where we can’t always do so. It allows you to share your message, and most importantly, it allows people all over the world to find you.

    I’ve had conversations with people from places as remote as Iran and Ecuador about how they can travel more, live simpler lives and follow their passions in life. It is the blog that makes these connections possible.

    When you’re passionate about something, you usually have a desire to share it. You can think of your blog as your own newspaper or magazine, where you control the stories. If you have something valuable to say (and most of us do), a blog can allow you to explore your passions further, and connect with people who share the same passions as you.

    In other words, a blog connects you to the world.

    Step 1: Choosing your blog name and domain

    Choosing the right name is important.

    It’s what identifies your little space on the web. You want a name you’re proud of, a name that is memorable and a name that uniquely identifies you.

    You also want to get it right the first time. Changing your domain name is like going through a re-brand (a lot of work).

    Some tips:

    • Think long term. Choose a name you can expand on. If I had called it www.breninthephilippines.com, I would’ve been stuck with a domain restricted to Philippines related content. What happens when I travel somewhere else?

    • Make sure your blog name is available on all major social networks (Facebook, Twitter, Instagram, Pinterest), and sign up for them immediately.

    • Spend some time reading other blogs in your niche and find out which ones have stood the test of time. What did they name their blog? Use this to help you generate ideas, but also remember you need to be original.

    • Don’t choose something people might misspell easily. For example, www.travellingwithbrendan.com isn’t ideal because in international English it’s spelt “travelling” but in American English it’s “traveling”. Make it as easy as possible for people to find you.

    • Write it out in your email signature. How does it look? Introduce your blog to the mirror. How does it sound? Make sure you like it!

    Once you’ve chosen a name you’ll register the domain with your web host, which we’ll talk about in the next step.

    Step 2: Choosing a web host

    Web hosting is like renting a piece of land for your blog. You pay a hosting company for some space on the internet and they let you build your blog there.

    It sounds daunting, but don’t worry – it’s very straightforward.

    Who should you host with?

    After using around 10 different web hosts over the years, I’ve got a pretty good idea of what you need when hosting.

    After several hosting disasters, and now as the owner of a large portfolio of sites, my #1 recommendation for new blog owners is Dreamhost. Almost all of my sites are hosted with them, except for my biggest site (this blog, which is hosted with Pressidium).

    For hosting a new site, Dreamhost is easily the best I’ve found in terms of affordability and service – it’s just as cheap as the budget hosts, but the support is still great! Here’s what I love about them:

    • WordPress pre-installed for you (saves so much time).
    • Super affordable, $2.49 per month for your first site.
    • Free domain name
    • Free SSL certificates
    • SSD storage
    • Unlimited traffic!
    • Great support

    Simply head to their homepage to get started, or if you’re brand new to site building and need some help getting set up, just click the blue box below for a step-by-step guide.

    Getting started with Dreamhost (click to expand)

    Let’s get your web hosting set up! This should only take us 5 minute (or less).

    First, head to the Dreamhost homepage by clicking here, and click the WordPress hosting button:
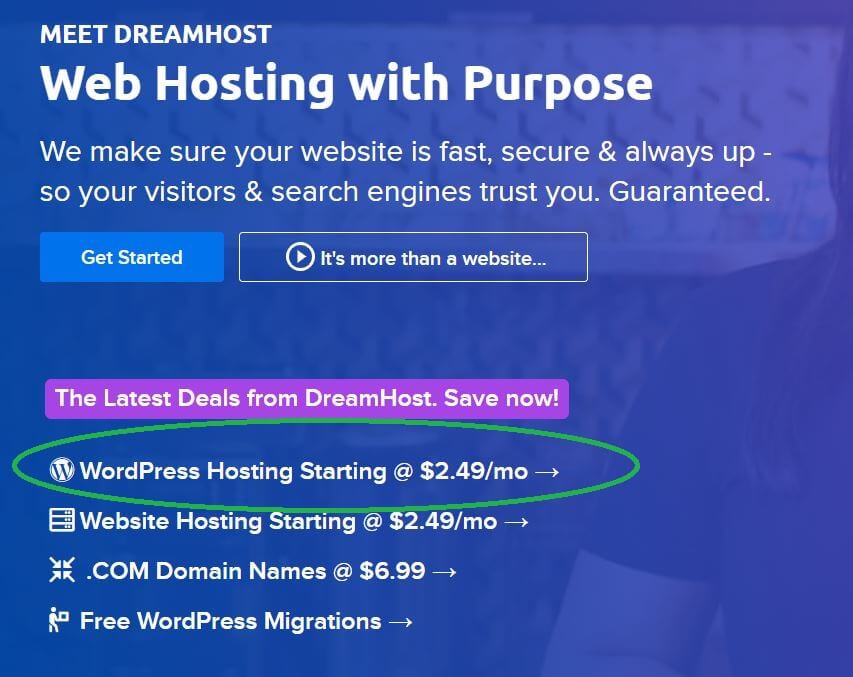
     

    Then you’ll want to select the Starter plan.

    This is the cheapest plan and if you’re starting a brand new blog, will be more than sufficient for you:
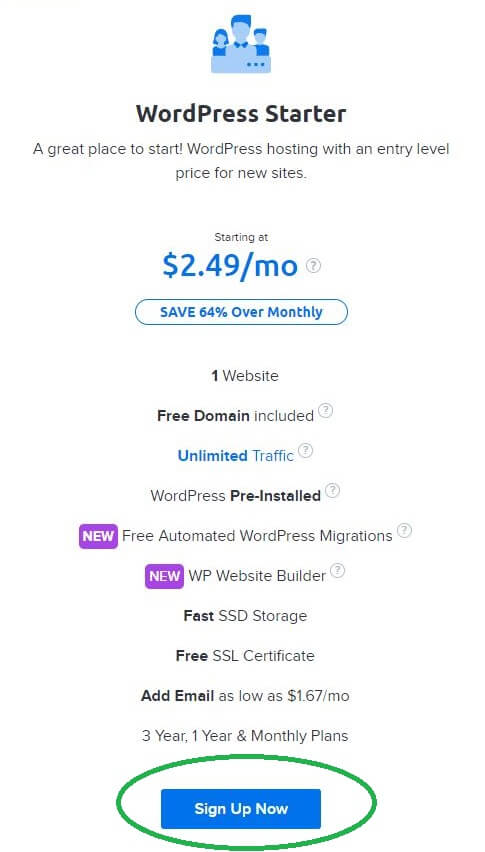
    Click the “Sign up now” button and you’ll get taken to domain registration.
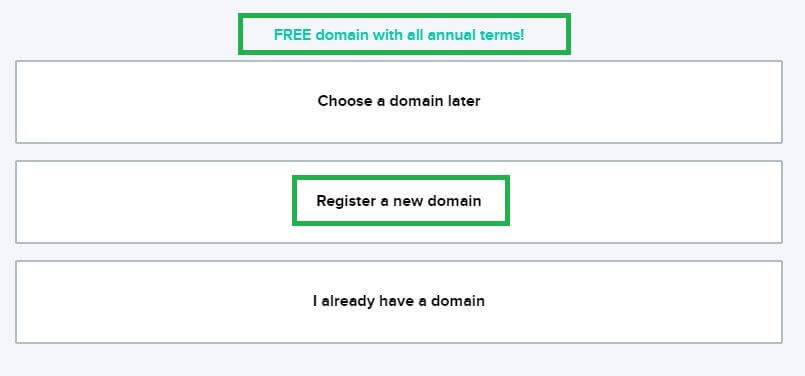
    You get a free domain name when you host with Dreamhost, which will save you around $10 per year (nice!)

    Click “Register a new domain.”
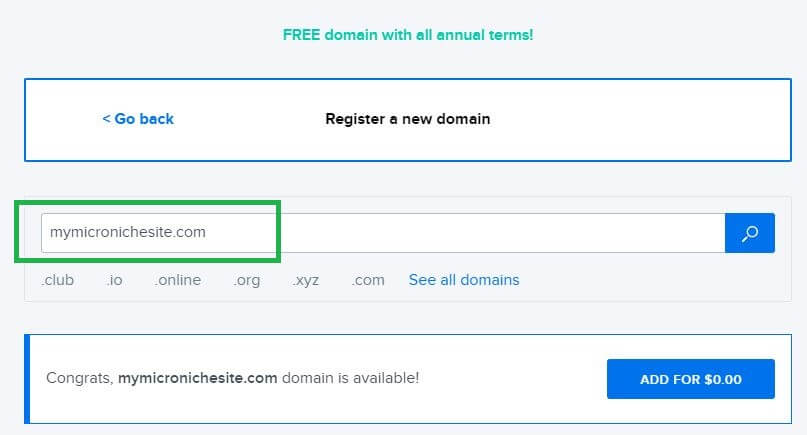
    If you know what domain you want, enter it here.

    Otherwise, go back to the previous step in this guide, and have a think about what domain you would like.

    Once you’re ready, enter the domain and click “Add for $0”, and you’ll be taken to payments.
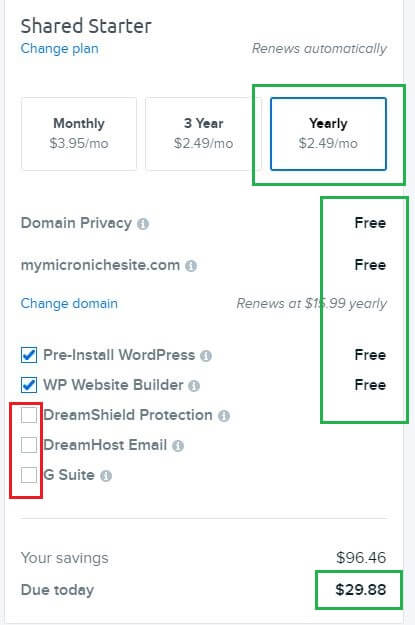
    At the payments page you’ll have the option to pre-install WordPress. Keep this checked! It will save you some time and trouble, and will allow you to get building your site right away.

    The DreamShield and Dreamhost Email add ons are not necessary and will cost you extra, so you can remove them.

    Once you’re ready you can click Pay and you’re done. You card will be charged and you’re now the owner of a brand new WordPress site!

    Step 3: Install WordPress

    WordPress is the most widely used and widely supported blogging platform there is, and I highly recommend you use it. Most hosts have an install wizard for you, and even if they don’t you can install it yourself if you’re not a complete computer newbie.

    If you’re hosting with Dreamhost it’s even better – they pre-install WordPress on your hosting account for you. So if you’ve signed up with Dreamhost, you can skip this step and go on to the next one.

    If for some reason you unchecked the “pre-install WordPress” option during signup, don’t worry. Dreamhost has a one-click WordPress install you can use.

    Just head to the One Click Installs option in your Dreamhost dashboard:
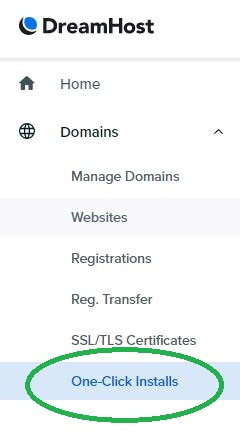
    That should take you to the WordPress Installer. Just choose your domain name from the drop down box and click “Install it for me”. 
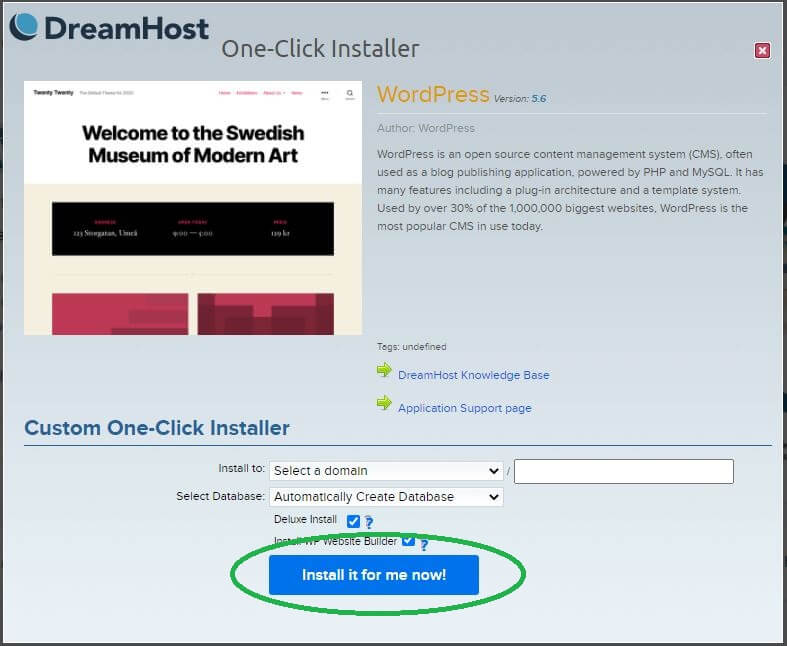
    The installer will do its thing and in a few minutes you have WordPress ready to go 😉

    Step 4: Login to your WordPress site

    Once you’ve gone through the steps, Dreamhost will present you with the URL to log in to your WordPress site.

    It should look like: www.yourblog.com/wp-admin (obviously you’ll replace yourblog.com with whatever your domain name is).

    The login page should look something like this:
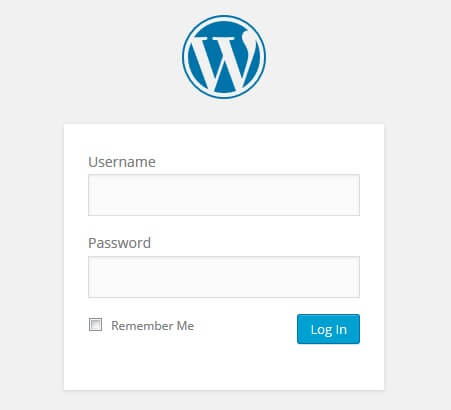
    wp login

    Simply log in with the username and password you’ve been provided. If you don’t know what it is, contact support and they will resend the credentials to you.

    Step 5: Choose a theme

    You need to decide what your blog is going to look like.

    To do this you are going to need to choose a “theme”. You have 3 options here – free, premium and custom. I’ll explain all three below.

    Note: I want to stress that you don’t need to buy a theme right away. It’s perfectly fine to build your blog on a free theme for a few months, even a year, while you find your footing. If you can’t afford to fork out cash for a theme from the beginning, don’t worry about it. Just start writing!

    Free theme

    In the left hand side of your screen you’ll see your WordPress menu. Go to Appearance > Themes.
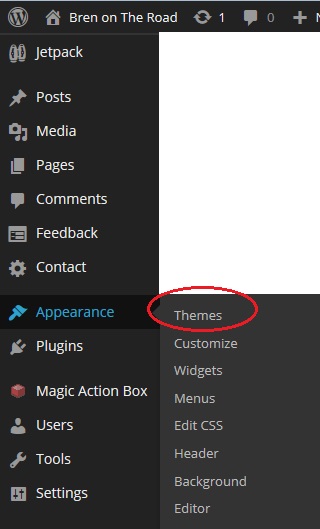
    wordpresstheme

    There you’ll be able to search through a library of themes, and many of them will be free. Just try them out and see which one you like! You can also Google “free WordPress themes” and you’ll be spoiled for choice.

    Premium Theme

    The downside to using free themes is they’re often lower quality than ones you pay for (obviously) and sometimes the developer of the theme will stop updating it, leaving you with an out-of-date theme which can lead to security and functionality issues. The alternative is to buy a “Premium” theme which will provide a slicker, more secure design.

    The blog you are reading right now is created with Thrive Theme Builder.

    This is a premium theme that allows you to completely customise your site to look exactly the way you want. It’s all drag-and-drop and very intuitive to use. I also made a video showing you exactly how I created the design you’re looking at right now, step by step. Check it out here:

    Step 6: Set up your pages

    Your blog is going to have several different pages. By default your theme should already have a home page, but you’re also going to want to set up an About page and a Contact page (and any other page you can think of).

    This is easy – just go to Pages > Add New:

    pages

    Then, write your page content and click Publish.

    After that you’ll need to add the page to your menu. To do this, go to Appearance > Menus. Select the menu you want to add it to from the dropdown box at the top. Then select your newly created page from the left hand side and click “Add to Menu”. Easy, right?

    Step 7: Write your first post

    You’ll now be ready to finally write your first post. Just go to Posts > Add new and start writing!
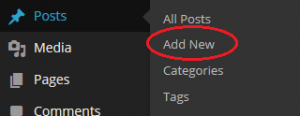
    posts

    By now you might be feeling a little overwhelmed, but relax. Everything in WordPress is pretty easy to figure out and after a couple of weeks of messing around inside the dashboard you’ll know your way around. Don’t be afraid to click things, it won’t break!

    Step 8: Create a logo/brand

    If you want to stand out, you’re going to need some sort of brand or logo that people recognise you by. I noticed most bloggers have modest little logos (which I’ve since learned is a good idea), but I wanted mine to be big and loud. So for my first blog design, I created a big huge fancy logo, which was easier than I thought.

    The problem was, even though I knew exactly what I wanted in my head I had no idea how to create it on a computer. So, I went to Upwork and found someone to do it for me. I sketched my design the best I could on paper, took a photo of it, and then sent it to a cartoonist to actualise it for me.

    Here’s what I sent him originally:

    DSC03749

    I’m no artist, but that doesn’t matter – all you need is an idea. He discussed a few more thoughts with me and after some sketches we turned it into this:

    BREN_ON_THE_ROAD_Sketch4 And then this:

    HEADER_300DPI_COLOR

    And finally this:

    Final header cartoon

    You don’t need to be a computer whiz or even a very good artist to make a logo for yourself. You just need an idea and someone will be able to bring it to life for you.

    What’s it cost to get something like this done? You’d be looking at maybe $100-$200, depending on who you choose. If you’re on a tighter budget, Fiverr is a really good place to get a simpler logo done, and there are decent designers there who will put something together for as little as $5! If you have a bit more money to play with, give 99designs a go. They’re pricey, but they have a money back guarantee and a good crop of active designers.

    Lastly, remember this fancy design part isn’t vital. There are a ton of blogs infinitely more successful than mine that just use simple text titles with no fancy artwork at all. Google’s logo is a good example – a six year old could’ve made it.

    Step 9: Before you go live

    By now you should have a web host, a domain name, some posts and pages, a cool WordPress theme and your own blog logo. However, you’re not ready to go live just yet.

    Here are a few things I’d recommend doing before you start sharing your site with everyone:

    Write around 10 posts

    It seems kind of dumb to take your blog live when you’ve only got one post. My goal was to have 10 posts already written so when people came to my blog for the first time they had a few articles to keep them around for a while.

    As it turned out, when my blog first went live I got friends telling me they’d read all my posts and were waiting for more – something that would never have happened if I only had one or two posts up.

    Set yourself up on social media

    Set up pages on Facebook, Twitter and Pinterest so that people who like your stuff can follow along and stay updated.

    In my first month pretty much all my traffic came from Facebook, and quite a few posts went viral from there too.

    You might also consider setting up accounts on Youtube, StumbleUpon and Instagram (many bloggers use their personal Instagram and Twitter accounts, however you definitely will need to start a separate page for Facebook).

    Start an email list

    I love using email to keep in touch with my readers, and have a newsletter and various courses that get sent to my subscribers.

    As a newbie blogger, I highly recommend using Mailerlite. They’re easy to use and they’re free for up to 1,000 subscribers.

    To start building your list, you’ll need to sign up to Mailchimp and then start adding subscribe boxes to your site. All the instructions are there when you sign up and it’s straightforward.

    Install important plugins

    To add functionality to your WordPress blog you will be using add-ons known as “plugins”. Plugins add cool functions to your blog, such as adding “Like” buttons to your posts and securing your site so spammers won’t mess with you. To install a plugin just go to your menu, then go to Plugins > Add New:
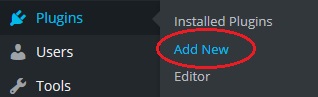
    wordpressplugins

    Then, search for the plugin you want in the search box and click “Install”. Once it’s finished installing, click “Activate”. After that it should be plugged in and working!

    Here’s a few I’d recommend starting off with:

    Wordfence Security – Monitors who logs in and out of your account and provides real-time security, anti-virus and firewall.

    Akismet – Spam filter for comments (you will get a lot of spam comments).

    BackWPUp – Allows you to schedule regular backups of your site in case shit happens.

    Jetpack by WordPress.com – Provides a whole bunch of cool features like site stats, subscriber lists and comments sections (and heaps more).

    iThemes Security – All-round security to keep your site safe.

    W3 Total Cache – Improves your site load time.

    WordPress SEO by Yoast – Helps optimise your blog’s content so it can be found easily by search engines.

    Get feedback

    Before I went live I shared my blog with a few close friends and asked them what they thought.

    It’s important you can ask people who aren’t afraid to be honest with you. If your blog looks shit, you want them to be able to say it looks shit without worrying about offending you, because when real visitors come to your blog and it looks shit they’ll leave and never come back.

    Ask your friends to tell you what they don’t like about your site, rather than what they do like – that will be far more useful criticism to help you turn your blog into something people will enjoy reading. By this time you’ll probably have spent many hours staring at your site so don’t underestimate the value of a fresh pair of eyes. They will see things that you don’t.

    Step 10: After you go live

    Promoting your blog

    The first thing with promotion is to make sure your content is actually worth promoting. Nobody shares stuff that’s mediocre, people only share stuff that’s awesome. This is often termed “Wow content”.

    Make sure all your stuff is Wow content before you start asking people to promote it.

    For a small tugboat blog that’s just getting off the ground, social media is going to be one of your best friends. Places like Facebook, Twitter, Stumbleupon and Pinterest can be great traffic generators. Make sure you’re active on these platforms and are sharing your work as it’s published. Sharing your work on your personal accounts is good too – your friends will be some of your most loyal fans!

    Guest posts are also great for exposure. For example, my guest post on Our Awesome Planet brought me several thousand page views. You can also host guest posts or interviews like my interview series on Solo Female Travel. Both are good ways to bring in new readers and make connections.

    Another good strategy is to ask relevant Facebook pages (keyword here is relevant) if they’d be willing to share your work. For example, if you write something about New Zealand, reach out to different Facebook pages about New Zealand and ask if they’ll be willing to share your article. If your content is awesome you’ll get a few yeses!

    Lastly, reach out to other people in your niche and get to know them.

    Get in touch with the bloggers who inspire you and give them props on their work.

    I have a few blogging role models – Migrationology, Legal Nomads and Wandering Earl to name a few, and they all know I think they’re awesome because I’ve reached out to them and told them. I also ask them for advice now and then, and even arranged meetups in person.

    I’m always connecting with new bloggers and it’s been beneficial in many ways. The blogging community is cool and friendly for the most part; I’ve gotten a lot of help and I always pay it forward too when newbie bloggers contact me often asking for advice.

    SEO

    Search Engine Optimisation is the practice of making your website rank highly in search engines so people can find you. It’s a large topic and impossible for me to explain here, plus to be honest I don’t know that much about it.

    If you’re interested in learning, two good (and free) beginner’s guides are The SEO Strategy You Can Build An Empire Around and The Beginner’s Guide to SEO.

    Personally, I don’t do a lot of SEO (I use the Yoast plugin I mentioned above and that’s pretty much it). It’s a constantly changing environment which makes it hard to keep up with.

    For me, I focus my time on writing content that I (and hopefully my readers) love. That’s what’s important to me.

    Monetisation

    Now, you’re probably wondering when the money starts flowing. Sorry to disappoint, but if you ask any travel blogger they’ll tell you the money is better flipping burgers at McDonald’s. Many bloggers will go at least 6-12 months, working hundreds of hours on their sites without even earning a dime. If it’s money you’re after, you’re better off spending your time elsewhere.

    There are various ways to make money from your blog. These are the most common:

    Advertising – Through either direct advertising or ad networks, you can place banners and text ads on your website and get paid either per click or a flat rate. Google Adsense is probably the most popular and easiest to get approved for.

    Selling products and services – You can create your own products to sell, such as my ebook Triple Your Travel, or offer services such as freelance writing, consulting or design.

    Affiliate marketing – You can promote other people’s products and earn a commission when you make a successful referral. This is a great option because you don’t need to develop a product but can still offer something of value.

    As an example, my Resources page contains several affiliate links. If someone makes a purchase through the links there I will earn a commission (at no extra cost to the buyer). It really is a win-win-win. If you would like to find affiliate products to promote, I would recommend using an affiliate network. Here are some I can recommend:

    • Flex Offers – It is a bit of a process to get approved for this network, but they have very good merchants so it is worth the effort.
    • Share A Sale – This is a smaller affiliate network and easier to get approved for, and it still has many good merchants. There is not much here for me to promote but depending on your blog you might find something that fits with your theme.
    • Affiliate Window – Another good affiliate network with a good selection of merchants. There are one or two items for here that I’ve promoted regularly.
    • Commission Junction – Quite a large network that has a large range of advertisers.
    • Amazon – Amazon’s affiliate program is one of the largest on the web. Commissions are very low but since Amazon sells almost everything you will definitely find something that fits.

    Sponsored content/reviews – Companies will pay you to publish a post promoting their product/service, such as a hotel, an app or a gadget. I don’t do this, but many bloggers make an income this way.

    Partnerships/ambassadorships – Longer term relationships where certain brands will pay you to endorse and promote their product/service. Common arrangements in the travel industry are tourism boards paying bloggers to promote a destination or experience or companies asking bloggers to use and endorse their products (such as cameras/apps/travel gear).

    As a portfolio to land freelance work – Whether you’re into photography, video or writing, your blog is the ideal portfolio to showcase your work. I’ve landed various freelance writing gigs from my blog and always include my blog in my pitches.

    There are many other ways to make money from your blog, but the above are what I’ve seen to be the most common. It starts with having an audience. This comes from writing a blog that you’re passionate about. Without a readership the money is unlikely to come, and if you’re in it for the money you’re probably going to be disappointed anyway. Do it because you love what you’re writing about and have a desire to share it with the world. The money will present itself eventually.

    A complete guide to making money from your blog:

    For a more detailed guide to monetisation, check out my post The Practical Guide To Making Money With A Blog. This post is far more in depth and shows you, step-by-step, how to implement the methods mentioned above.

    Bonus Step: Tools to help make your blog awesome

    Here are a few tools and resources I actively use on this blog. Some you need to pay for and some are free, but all of them will help you create a faster, cooler, more successful blog.

    Do note that you probably won’t need to worry about the tools listed below right away, and many of them won’t make sense to you right now. However, after a few weeks or months you’ll understand why they’ll be handy, so make sure you keep these on your “check out later” list.

    Cloudflare – A free CDN service that speeds your website up considerably! No one likes waiting for websites to load, so if you want loyal readers, make sure your site is fast. If you’re hosting with Dreamhost, this tool will already be integrated and you can activate it with just a few clicks in your Dashboard.

    Uptime Robot – A free service that monitors your uptime. Every time my site goes down I get an email, and then another message when it goes back up. Very handy.

    Picmonkey – Photoshop is way too cool for me, so I use Picmonkey to make all my website’s graphics. Sometimes I also use Canva.

    Smugmug – I use Smugmug to host all my photos. It means I can keep my photos at optimal quality, keep my bandwidth down, and have my entire photo collection organised in a easy to navigate portfolio. Flickr is a free service with the same functionality, but Smugmug is just simpler, faster and has better support, which I’m happy to pay for.

    Thrive Leads – I use this plugin for creating all my subscriber sign up forms and it’s been super helpful in building my subscriber base. It’s not free but it’s easily the best email list plugin I’ve used so far.

    Hootsuite – I use Hootsuite to help manage my social media accounts. It allows me to queue my updates so I don’t need to be online 24/7 fiddling with my different channels. Huge time saver and really easy to use.

    Mailerlite – I use Mailerlite for my email list, and I highly recommend it. It’s free for your first 1,000 subscribers, and you get all the features too! Perfect for newbie bloggers.

    Sendowl – I use Sendowl for managing sales and distribution of my ebooks. It is excellent. You probably won’t need this until further on in your blogging career but it’s good to know about!

    For the full list of tools I currently use, check out my Blogging Resources page.

    That’s it!

    So, for those of you who’ve been asking how I built this blog, that’s how!

    I self-taught myself most of this stuff so you might find differing advice out there, but this is what has worked for me. As a blogger you’ll need to spend a lot of time experimenting with your site and finding what works for you. It’s all part of the fun.

    If there’s anything I’ve missed or you have questions, leave a comment below and I’ll answer it the best I can. Otherwise best of luck, and hope to see you in the blogosphere soon!

    -Bren

    Note: Some of the links in this article are affiliate links. All items recommended above are resources I use here on my own blog and are honest recommendations. No items are sponsored and I pay for all my resources in full. For further clarification you can read my Disclosure Policy here.


  • The Practical Guide To Making Money While Travelling

    The Practical Guide To Making Money While Travelling

    By far the most common email I get these days is “Hey Bren, I would love to travel the world, I just don’t have the money right now. How do you afford to pay for it all? How do you make money while you’re travelling all the time?”

    (more…)
  • How To Build A Micro Niche Site That Makes Money From Day 1!

    How To Build A Micro Niche Site That Makes Money From Day 1!

    So I’ve got another fun little experiment to share with you guys today.

    A while ago I heard about the idea of a “micro-niche site”, and a few months back I finally decided to build one. Not for any particular reason – out of procrastination more than anything. But it turned out to be a pretty fun project.

    As you know I’m always interested in new ways to build a life on the road, and along with blogging, freelancing, travel jobs, and the many other random ways to make money, this seemed like another interesting thing to try.

    For those of you ready for a new pet project, below is my complete guide on how to build a micro niche site that makes money from scratch. I’m going to share the whole process with you, how I built it, and how much money it’s made.

    What is a micro niche site?

    A niche site is just a fancy name for a website about a specific topic.

    For example, you might make a website all about school snacks for kids. You could post recipes or snack ideas or summaries on which snacks have the most sugar – whatever you want.

    A micro niche site is just a more narrowed down version of that. For example, you might build a site about school snacks for kid’s with allergies (or vegetarians or diabetes). Not the best example but hopefully you get the idea. The goal of the site is to give information to people about a very specific topic. Because your site is so niche, it makes it easier for people to find you.

    How to build a micro niche site

    As you know I like to keep things super simple around here, so I broke this down into 4 simple steps. To build a micro niche site you need to:

    1. Get a website up and running (duh).
    2. Choose a good niche.
    3. Write a bunch of helpful articles (keyword: helpful).
    4. Get traffic to the site.

    That’s really it.

    The best thing is how low-risk it is. You can do it from your bedroom, you don’t need to take a course or go to a special school, and it should cost you around $50 to get started. To start a mini-business that could make you a passive income from anywhere? That’s pretty cool.

    My micro niche site took maybe 30 hours to get it a money-making stage (I wasn’t really counting). I didn’t take any courses or read any books on how to build a micro niche site, I just read a few blog posts and tried it.

    Now it only takes me an hour a month to maintain and has already made a tiny bit of money – nothing I’ll be able to retire on, but it has paid back my investment in the first two months and is now just making me a cool $30-$50 per month on auto-pilot. If I want to scale it up I can, and if I want to just let it run, I can. So that’s pretty cool.


    Update: As of May 2020 the site is now making around $300-$500 per month. I now spend my time on my other bigger sites, so I only spend about 1 hour per month on it mostly answering comments. So it’s still mostly on auto-pilot!


    Let’s go through the process step-by-step:

    1. Get a website up and running

    If you haven’t owned a website before, this step may sound complicated. It’s actually super easy (shouldn’t take more than an hour). Getting your micro niche site up and running requires 3 things:

    1. Choosing a web host
    2. Installing WordPress
    3. Installing a theme

    All super simple steps – I’ll walk you through them.

    Setting up your web hosting account

    Getting hosting is like renting a piece of land on the internet where your website will sit. Without hosting space, you can’t own a site.

    Luckily web hosting is super affordable these days and even ten year olds can afford to have their own blogs.

    While there are thousands of web hosts to choose from, not all of them are good. And if you are going to start a website, trust me, you want a good host.

    I can’t stress that enough.

    A bad host where your site always crashes and is slow and the support team never answers your emails – it’s hell and you might as well not have a website at all (believe me, I’ve been there).

    I’ve been a site owner for almost 10 years now, have been with many hosts, and there is only one host I recommend now for new site owners: Dreamhost.

    • Super affordable! $2.50 per month on their Starter plan with this link.
    • Great support. When I migrated my sites to Dreamhost, the support team were great and responded to everything super quick.
    • SO EASY to use. They have a one quick WordPress-install, and you can even ask support to just do it for you.
    • Free domain name!
    • A great (and fast!) premium plan to upgrade to if your site starts to grow.

    Also, they are one of the official hosting recommendations by WordPress, so if you plan on using WordPress (if you’re reading this guide, then yes), they’re an ideal choice.

    Of course, you are free to choose any host you like, but Dreamhost is easily my #1 recommendation for new site owners. Simply head to their homepage and click on their Starter plan to get going:

    If you’re not sure exactly how to open your hosting account, I’ve got a guide below that will take you through it step by step. Simply click the orange box below.

    Getting started with Dreamhost (click to expand)

    Let’s get your hosting account set up! This should only take 5 minutes (probably less).

    First, head to the Dreamhost homepage by clicking here.

    This should take you to a page that looks like this:

    Click WordPress hosting as shown in the screenshot above, and you should get taken to their hosting options.

    If this is your first site, I highly recommend choosing the Starter plan. You’ll get hosting for one site, a free domain, one-click WordPress install, unlimited traffic and a free SSL certificate. That’s more than you’ll need!


    Just click the Sign up Now button, and you’ll get taken to registration.

    The first screen is your domain registration. Since you get a free domain name with Dreamhost, this is where you choose it. Click the “Register a new domain” button:

    It will then take you to a screen to enter the domain you want:

     If you know what domain you want, simply enter it now.

    Choosing a domain is bit of an art, there’s not really any right or wrong answers. However, you do have a choice of whether you want your domain to be more “branded” or for it to be informational.

    For example, a niche site on golf clubs could be “golfclubreviews.com” or it could be something more like “thehappygolfer.com”. It’s really up to you, I have seen both types of domains work perfectly fine, so I wouldn’t say one is more effective than the other. Just choose something that feels right to you!

    Once you’ve chosen your domain, you’ll get taken to the final screen for payment:

    The DreamShield and Dreamhost Email add ons will cost you extra, so I would just remove them, they aren’t essential.

    You can also keep the “Pre-Install” WordPress button checked so WordPress is already installed on your website for you. This is super convenient and it means you can skip the following section and simply get started on building your site.

    Once you enter your credit card or Paypal details and finalise your payment, you’re ready to go. Congrats! You’ve now got your very own website.

    Installing WordPress

    WordPress is the most popular website software in the world.

    If you want a fast, secure, nicely designed website, I would highly recommend using WordPress. Best of all, it’s 100% free. The other great thing about WordPress is it’s super simple to use. No nerdy stuff, no weird programming or coding. Just install and go.

    If you’re hosting with Dreamhost, WordPress will already be pre-installed for you, because they’re awesome like that.

    If you’re using another host, or if you forgot to check the “pre-install” WordPress button in the previous step, don’t worry. Installing WordPress on Dreamhost is as simple as clicking a button.

    Once you’ve set up your Dreamhost account, go to your Dashboard and click “One Click Installs” in the left hand menu:

    You will get taken to the WordPress install screen.

    Simply choose your domain name from the drop down box (it will be the same domain you chose during signup) and click Install It For Me Now:

    That’s seriously it.

    Wait for it to do it’s thing, and you now have a working WordPress site 😉

    Installing a theme

    Now, your WordPress theme.

    A theme is like a pre-made design for your website. Instead of paying a web designer thousands of dollars to design a pretty website for you, you can just install a WordPress theme with one click and your site will look great. This is perfect for dummies like you and me 🙂

    If this is your first website, I’m going to recommend that you don’t buy a theme right away.

    Why? You’re probably going to spend days shopping through different themes, and it will just be a distraction from the more important tasks. There are millions of free themes you can use in the meantime.

    In fact, you can just use the default theme that WordPress gives you – that will suffice for now.

    Once you’ve written some articles and you have a better idea of how you want the site to look, you can look at investing in a theme. Changing a theme is as simple as one click, so no need to worry about this so early. Focus on building your site content and traffic.

    Of course if you want to buy a theme right away, that’s totally fine too. You will want to get a theme eventually anyway. Once you’ve written some articles and have an idea of how you want your site to look, it’s time to start theme shopping.

    My #1 theme recommendation right now is Thrive Theme Builder. It is simply the best theme if you want to customise your theme to look exactly how you want, without writing any code or going crazy.

    The blog you are reading right now was designed with Thrive Theme Builder in a few days. Highly recommended! Check out a demo of it right here.

    You can also see exactly how I designed this site using Thrive Theme Builder in my Youtube video here.

    2. Choosing a micro-niche

    Now that you’re all set up we can work on building the site itself. First, your micro niche. What’s your site going to be about? There are two things to think about here:

    1. Is it a subject you are knowledgeable/passionate about?
    2. Is it a subject other people are searching for online?

    To help you with this I’ll tell you about my own micro-niche. There’s a little backstory here:

    A while ago I had a big rash on my leg. I grew up with bad eczema so I figured it was just a flare up – the stress of blogger life maybe, no big deal. But then it started getting really red and itching like crazy, so I went to the doc. He looked at my skin and told me the bad news: Scabies.

    If you don’t know what scabies are, it’s a skin parasite that burrows under the top layer of the skin. It’s not a killer parasite like malaria or giardia, but holy crap are they annoying. I’ve no idea where I got it – probably from jiu jitsu, but anyway.

    The doc gives me some scabies cream and tells me to smother it on, it’ll be gone overnight. I think cool, no biggie.

    However, the cream doesn’t work the first time, and I’m kind of a hypochondriac. So I freak out a little bit.

    I spend the next two weeks reading absolutely everything I can about scabies on the web – the history, all the different treatments, all the horror stories, some people saying they’ve had it for 5 years and want to kill themselves.

    Now I’m thinking shit! I’m going to die from scabies! (nobody has ever died from scabies). So now I’ve gone really crazy, and I’m reading all the latest scabies studies, taking notes, reading up about all these weird plants and oils that are used in rural Indian villages and by the Aborigines and by the Ancient Romans. Then I go and try all the treatments, and spend a few days smothering different concotions all over my body.

    A week later I’m cured.

    I start writing up an email to my doctor about all the research I did, and I figure this information should really be public. Especially since many of my Google searches weren’t really fruitful, they just came back with people crying “Waa I’m dying” and things like that. Since not everyone has the time to be reading through pages of scabies studies like I did, I figured I could summarise it all and give people answers to treat scabies properly. Surely a site like that could be really valuable to people!

    So that’s the long story of how I became an armchair expert on scabies and decided on my micro-niche.

    Not the most glamourous subject, but perfect for a project like this.

    This might not be the best example of choosing a micro-niche, because it sounds like you need to go through some weird experience like that which is not the case at all. I actually had about 7 or 8 micro niche ideas, but I just chose scabies because it was (a) on my mind at the time, and (b) felt like the easiest the subject to write about.

    Also there probably weren’t many other sites to compete with, because who the hell wants to spend thirty hours writing a micro niche blog about scabies…

    The truth is, you can get a good micro niche out of any subject (yes, any). Games, parenting, fishing, avocados, BB guns.

    Seriously, anything.

    Try and think about an experience that caused you to start researching/buying new things, or a particular problem that you needed information on recently and started Googling.

    If you actually had trouble finding information, even better!

    Since a good site doesn’t exist yet, you can make it.

    Here are a few idea starters for helping you choose a micro niche:

    • What is something you have bought online recently?
    • What is something you purchased at the store recently?
    • What is a question you have asked a friend for advice on recently?
    • What is something you cook/make often? (niche recipe sites are excellent).
    • What is something you’ve typed into Google recently?
    • What is an item you spent a lot of time researching/shopping for?
    • What is something you bought that was expensive but you really needed it?
    • What was something that stressed you out recently that you needed help with?
    • What is something you’ve bought that has made your life easier?
    • What is something your friends are really into or spend a lot of money on?

    Remember, micro niches are about information. People are searching for information – you need to give it to them! 

    If you bought a juicer recently, you could make a juice recipes site, even micro niche it down further into specific juices for specific health conditions.

    If your kids are playing with new toys or games you could build a site around toys for “insert blank”.

    Another really good micro niche site idea:

    What is a hobby or interest you’ve taken up recently? If you have none, what is a hobby or interest you would like to take up?

    Start that hobby today, and start documenting your progress in a micro niche site.

    Example: Let’s say you want to get into archery. Go and buy a bow, gloves, arrows, find an archery club, start learning to shoot. After you’ve done all that, you now have five blog posts you’re perfectly placed to write:

    How to buy your first bow
    Which arrows to buy as an archery beginner?
    Do you need gloves as an archery beginner?
    What to look for when deciding on your first archery club
    Five things I learned at my first archery lesson

    Cool, right?

    There really are endless possibilities.

    Take thirty minutes to jot down some ideas of things that you’ve experienced/are knowledgeable about/are interested in. Write down everything – there are no wrong answers.

    In the next step, we’ll help decide which one is a winner.

    Validating your micro niche. Is it a site people want to read?

    Now you’ve thought of a niche(s), we need to see if people are actually interested in it.

    Are there enough people searching for your niche to make a site worthwhile?

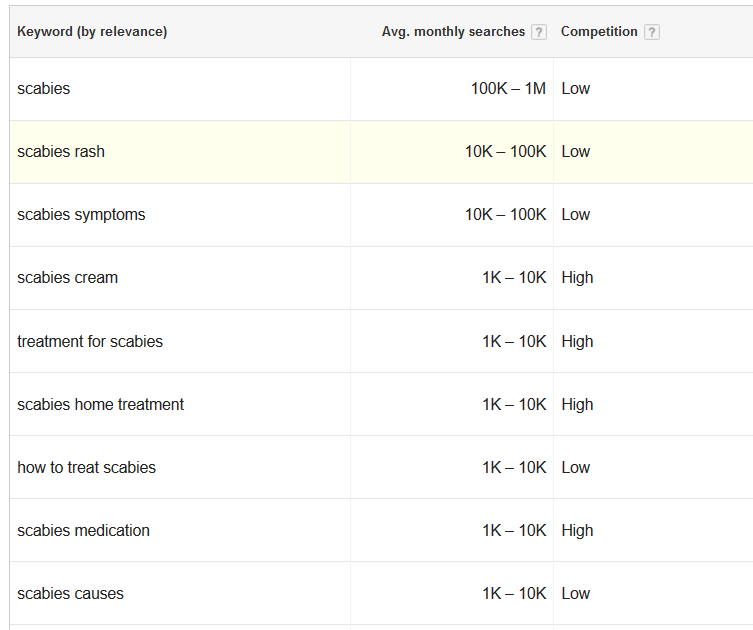
    Luckily, Google has a free tool where you can type in a subject and see how many people are searching for it. Frikkin perfect.

    Now the following process might sound a little heavy. If it confuses you, don’t worry. Once you start doing it, it will start to make sense.

    So in my example, we want to find out how many people are searching for stuff about scabies on the webs. If only 500 people per month are searching for scabies information, probably not a great niche idea since nobody is interested it. However if it’s getting many thousands or millions of searches per month, we could be in luck.

    Here’s what Google shows:

    keyword research for building micro niche site

    100k-1 million searches per month.

    That’s cool.

    Makes sense too – it’s one of the oldest ailments known to humans.

    But it is unlikely I’m going to rank highly in the Google search results for a term as broad as “scabies”. You’ll be competing with the Wikipedias and WebMDs of the world.

    Instead, it would make more sense to focus on long-tail keywords, or niche keywords.

    An example might be, “How to treat scabies with tea tree oil” or “How to kill scabies with natural treatments”.

    When people Google search those specific terms, it’s less likely that many sites have targeted those phrases, giving your micro niche site a better chance of ranking in Google.

    We are looking for phrases that have:

    1. Low competition
    2. Good search volume

    Luckily the Google keyword planner will suggest many keyword phrases for you. Here are some suggestions for scabies:

    keyword research for building micro niche site

    Now for a micro niche site you don’t need a shit ton of search traffic, but you still want as much as possible.

    1,000 searches a month would be a minimum. That means 1,000 people are going into Google typing that search term, meaning 1,000 potential visitors to your site. If you can target 10+ keyword phrases, that’s a decent amount of potential traffic.

    Then look at the competition. If the competition is high, it means a lot of sites are targeting that keyword. You’ll have a hard time ranking highly in Google search results. If competition is low, you have a better chance of landing on the first page and being found.

    To do this research I actually use a software called Keysearch.

    While this makes things easier, remember you can do all your research with free online tools such as Google’s Keyword Planner. Software like Keysearch just saves you a lot of time. As a guess, the information you can get in an hour from Keysearch might take you 3-4 days with the free Google tools.

    Keysearch is $17 per month. You probably only need it for a month anyway for your first site. If you can afford the extra $17, I strongly recommend it. It will make your life 100x easier.

    You can sign up for a Keysearch account here. Use the code KSDISC for a 20% discount 🙂

    The other reason I like Keysearch is, not only is it faster, it provides much more information.

    For example, it shows you the sites that are actually on the first page for that search term, so you can see who you’re competing with, how old those sites are, and gives you more detailed search numbers.

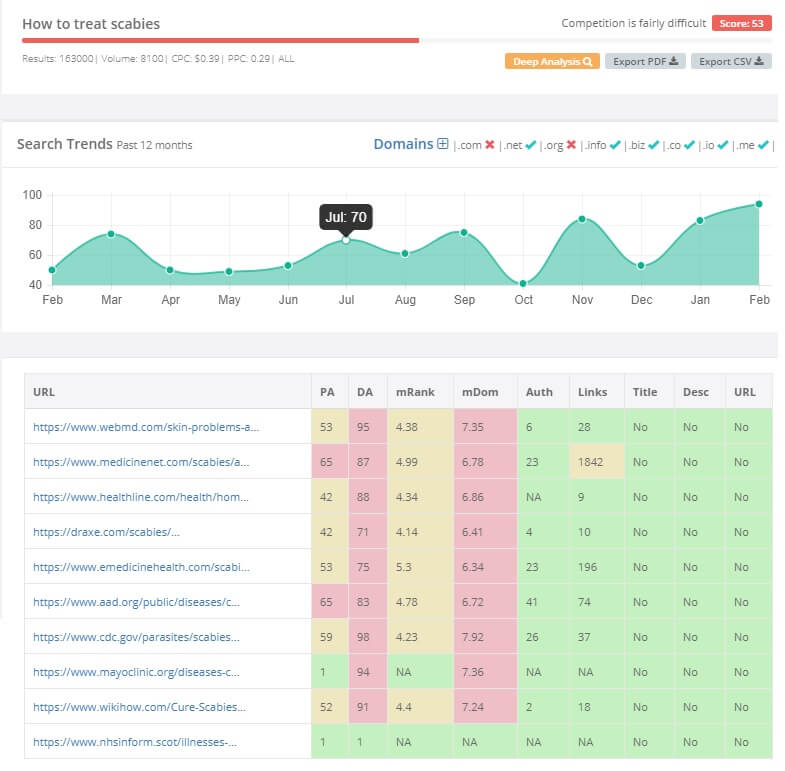
    Take a look at what comes up when you analyze the search term “how to treat scabies”:

    Now I won’t go and explain all those columns for you, but basically red means very competitive (bad) and green means not competitive at all (good).

    Obviously we want to compete for words with low competition, so we want a lot of green in that table.

    This search term above has quite a bit of red, so it’s not a keyword phrase I decided to target.

    You can also see I’d be competing with sites like Healthline and Mayo Clinic which are super established – that will be difficult.

    After spending about 4-5 hours on this I did find some great low competition/high search volume keywords, which are the phrases I’ve targeted in my articles.

    A quick note about keyword research: It’s not everything!

    Some say good keyword research is everything in niche sites and if you can’t find many good keywords you should abort and choose a different subject.

    I disagree.

    I think the most important thing is you actually enjoy writing and learning about your niche. For me building a micro-niche site is not a job – it’s something you do on the side – a fun little challenge, like building a model airplane.

    If you make some money, great, but if not, it should still be enjoyable.

    The other, more important reason is, search stats change all the time. Maybe what you’re writing about isn’t popular today but it might be in 12 months from now.

    So as long as you’re writing about a subject you love and find interesting, then go ahead and make the site. In a few years maybe every 18 year old will be searching for your niche, and guess who’s site will be popping up first on Google? Your cool established micro niche site, of course!

    The truth is, if you’re interested in this niche, there’s bound to be other people in the world interested in it too. Like I said, this should be enjoyable. Of course do some research, but also ensure you choose a topic you love and have fun with it.

    3. Write quality articles for your micro niche site

    Now that we’ve found some keywords to target, what do we do with them?

    We integrate them into our articles.

    There are two types of articles you will need to write for your micro niche site:

    1. Two or three epic, in-depth, expert articles on your subject (1,500 words plus).
    2. A collection of smaller articles to publish regularly (500+ words).

    For example, one of my cornerstone articles is a huge 3,000 word guide on scabies treatment. Super well researched, lots of cited studies, super high quality.

    I have about three of those types of articles.

    All the other articles are minor, less important articles. “How to stop scabies itching at night” and things like that. Why do you need to publish these smaller articles?

    1. To show Google your site is being constantly updated (Google loves this).
    2. To target the less popular keywords and bring more people to your site.

    Now to keep publishing content you’re going to need a lot of article ideas. I’ll recommend you come up with at least 30.

    Why 30?

    Because that gives you enough content to publish an article every week for six months.

    After 3-6 months you should have a better gauge of your site’s profitability and can decide whether you’re going to continue and can work on your next 30.

    Now you might be thinking 30 articles is a lot, but it really isn’t. If we take my site for example, I’ve got all the usual articles like:

    “What are the symptoms of scabies”
    “How to treat scabies”
    “The best natural treatments for scabies”

    Those were the obvious topics and I came up with maybe 10-15 of them.

    But remember, not all articles need to be 1,000 words long and super detailed. I went back into my search history and looked at all the things I searched for when I was dealing with scabies.

    I had typed in things like:

    “Can you get scabies from the gym?”
    “Can you get scabies from jiu jitsu?”

    Ding! Those are two more article ideas I can add to the list. That led to all kinds of other possibilities like:

    “Can you get scabies from a spa pool?”
    “Can you get scabies from a massage?”

    Just think of the types of things people will be typing into Google. Those are the exact articles you want to write.

    Another hack is to find another site about your niche, and steal a few article ideas (obviously don’t copy the actual article, rewrite it in your own words and try to make it better).

    Remember your 2 or 3 cornerstone articles will account for 90% of your traffic. The main purpose of the other articles is to build credibility with Google and show your site is active.

    That means you can really post anything – answers to specific questions, some random thoughts on your niche etc. Even if the post is only 500 words, that’s fine too. As long as they add some value, it’s a good addition to your site.

    As for scheduling, I would suggest publishing your “epic” content straight away, and maybe 3 or 4 smaller articles. That should give your site a good foundation to start with, and from then you can aim to publish one article per week. Writing those initial articles may take some time, but niche sites are typically labour-heavy in the beginning and the workload starts to taper off after a few months. Hopefully by then, you’re already collecting revenue each month.

    For my particular site, the first few articles I wrote took more than an hour each, but now I’ve done all the big detailed guides, the shorter articles I write only take 15 minutes. That’s 15 minutes a week, or an hour a month! So it definitely gets much easier, just grind it out at the start.

    Target your keywords!

    To get found in Google, you need to target keywords in your articles. That’s why we spent all that time in the previous step finding good keywords to use.

    The way to “target a keyword” is to add that string of words within your article in a decent number of places. Why do we do this?

    Because this is how Google knows what your site is about. For example, if someone searches for “best vegetarian snacks for kids”, Google goes and scans the web for a relevant article. Obviously if your article has the phrase “best vegetarian snacks for kids” in it several times, Google will pick it up as relevant and return it to the searcher. This means it’s in your interest to make it as clear as possible to Google what your site is about.

    From a practical standpoint, this simply means including the keyword phrase within the body of your article 3 or 4 times, preferably near the start.

    You can also try and put the phrase in the URL of the article, and also the article title itself.

    SEO (Search Engine Optimisation) is a lot more complicated than that, but that should set you on the right path for now. If you’re new to this, I don’t really recommend diving into SEO right away – it’s heavy and will suck up almost all of your time.

    What I’ve told you above is enough to get started.

    Focus on getting your site up and targeting keywords in your articles. We can worry about the super geeky stuff later.

    4. Getting traffic to your site

    This is easily the most difficult and least enjoyable part of the process.

    Why?

    Because so much of the advice out there is scammy, secret tricks, “spam your website all over the internet” type stuff.

    This is why I haven’t really done that much traffic generation, but of course it’s a necessary part of the building your site.

    One source of traffic we’re going to rely on is Google, but this doesn’t happen instantly. Because your site is new, Google doesn’t know whether it’s good or not. Usually gaining traction in Google takes around 6 months or more. That’s okay, in the steps above we’ve set ourselves up for Google success in the long term. But we also want to get results from Day 1, remember? Here are some traffic sources that will help us do that:

    Facebook – If your site is about one of your hobbies, and it’s something people often ask you about, you can share your stuff on your Facebook page. Obviously treating scabies isn’t a hobby of mine and not something I think everyone wants to hear about, but it might be different for you.

    Pinterest – This is actually a really great tool for promoting your site. I would recommend starting a new Pinterest account for your site, make some professional looking pins in Canva and then start sharing them. You can share on your personal Pinterest too. Pinterest has been my main traffic driver so far.

    Youtube – You can rank videos super easily in Youtube. If you do a specific title like “How to treat scabies with tea tree oil” you’ll probably rank on the first page within a day. However the challenge is actually making a good video that people will watch. I just uploaded a crappy Powerpoint presentation and it ranked almost instantly, but never drove any traffic. At this stage I don’t think I’ll be investing any time making a proper video, but if this was more than just a side experiment I’d definitely consider it.

    Quora – Lots of people ask questions on Quora all the time, like “I dropped my iPhone in jelly will it still work?” If you search for questions like this related to your micro-niche, you can then post an answer and link back to your site. It’s a rather untapped resource that you should definitely check out.

    Reddit – There is most likely a subreddit related to your niche. Post your articles up there, you might be surprised.

    Forums – Always a great place to promote your site. If anyone has questions related to your niche, answer them and then direct them to a relevant article on your site. Great way to build backlinks too.

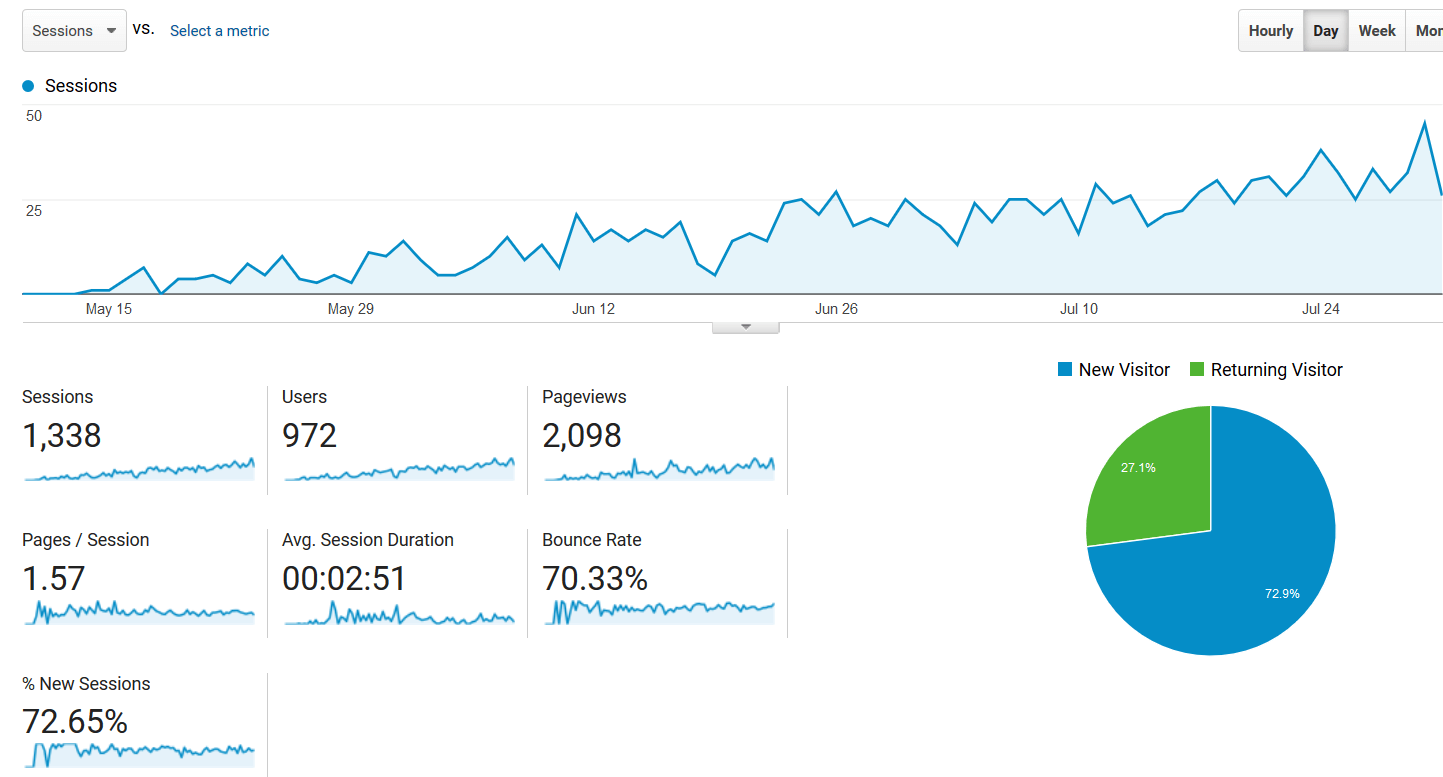
    Stumble Upon – Super easy to use – just submit your pages and see how they do. I would choose 1 or 2 sources to start with and focus on those. If you see any success keep going, and if you don’t, try something else. Which one is most effective really depends on your promotion style and the niche itself, so just keep trying. Just for reference, here’s what my site traffic has looked like in the 2.5 months since going live:

    how to build a micro niche site

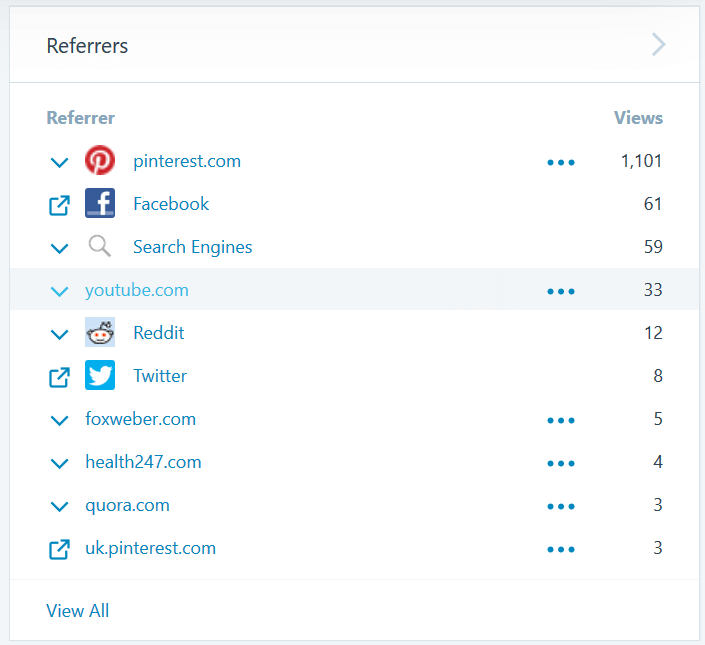
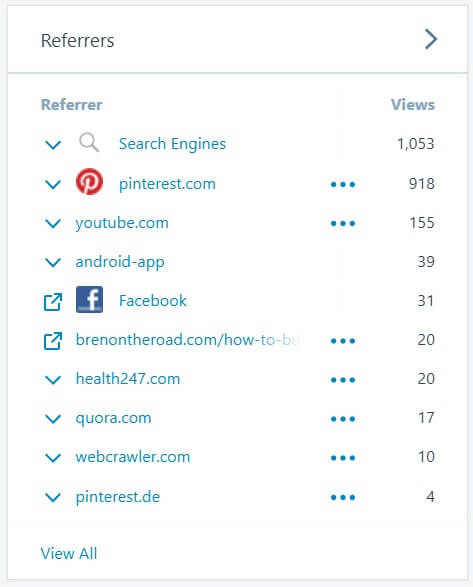
    And here’s what my referrals look like:

    getting traffic to your micro niche site

    As you can see Pinterest is the clear leader. I’ve also been getting a bit of traffic from search engines already, which is nice and hopefully will grow as the site gets older. Honestly two months is still early days, so if you’re struggling with traffic after that long, don’t flip out. Traffic generation takes time.

    Update 2018

    The site has been growing! I haven’t really been doing much, as there’s not much left for me to write. If I can I write one new post per month, otherwise I just keep pinning on Pinterest and that’s about it. Here’s what the traffic growth has looked like:

    how to build a niche site 2018

    And here’s how the traffic sources have changed:

    As you can see, Google has picked up the website and delivered much more traffic over the last few months. Search is now the biggest traffic driver, with Pinterest a close second. I think the reason traffic is grown is because Google is getting smarter and my posts are really in-depth. It goes to show hacking SEO isn’t everything – if your content is top quality, Google will find you eventually.

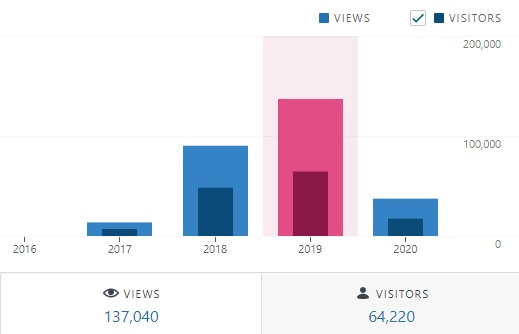
    Update 2020

    Traffic in 2019 was almost double 2018 at 137,000 page views. I did barely any updates in 2019, maybe just a few new articles, but most months I didn’t do anything. The site has simply grown organically:

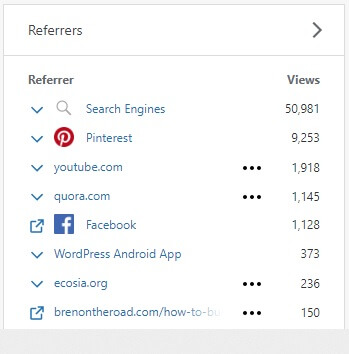
    As for traffic sources, it’s almost all Google traffic now. I still get some from Pinterest and Facebook, but it’s a much lesser percentage:

    Earnings have also grown, which I’ve shared in the monetisation section below.

    5. How to make money from your micro niche site?

    Now you’ve got people visiting your site, we need to turn this traffic into dollars. There are two ways I’m going to recommend for making money from a micro-niche site. One is advertising, the other is affiliate marketing.

    Advertising

    Advertising is most easily done through Google Adsense.

    Simply sign up for an account, enter your site details and if your site isn’t a spam factory you should be approved. Then you can start copy-pasting the ads up around your site. When a reader clicks one of those ads, you’ll usually earn between 10 and 50 cents. Simple.

    The downside with advertising is it requires a lot of traffic before you see any results. To me, advertising is a more long term strategy for once your site and traffic matures. If this is your first micro niche site, I would highly recommend using affilate marketing.

    Affiliate marketing

    If you want your site to make money from Day 1, I would suggest using affiliate marketing. Affiliate marketing is when you earn a commission for recommending a product or service. You put a special link to a product on your site, then if someone clicks that link and makes a purchase, you get a commission.

    If this is your first site, I’d recommend using the Amazon affiliate program. How this works is you post affiliate links on your site for anything on Amazon (Amazon will provide the links for you). If your readers click that link and then buy something, Amazon will pay you commission of between 1-5%.

    The program is particularly great because their affiliate links are valid-store wide. That means if someone clicks a link for coconut oil on your site, but while on Amazon they end up purchasing a laptop, you’ll get commission for that too. Once you get more familiar with building sites you can start looking at other, more lucrative programs, but Amazon is a great one to get started.

    Other things to think about:

    • If your micro niche involves products people will need to buy (for example, if you made a site about coconut oil recipes your readers will obviously be buying coconut oil) it makes more sense to monetise with Amazon. Why? Because you can link to coconut oil (or whatever product) on Amazon and collect commissions.
    • If your micro niche is more informational and people generally won’t be buying things (for example, philosophy or meditation) then it makes more sense to monetise with Adsense.
    • Lastly: Make sure you build your site first before submitting an application for either Adsense or Amazon’s Associate program. Post some articles to your site and make it look full and active. When you apply, they are going to review your site to see if it fits their guidelines. This sounds daunting but it’s really not. As long as your site doesn’t look like shit (and it shouldn’t if you’ve followed my guide above) you should have no trouble getting approved!

    How much money did my site make?

    Since my site was based around home remedies (lots of oils, powders, plant products etc) I included Amazon affiliate links to all those things in my articles, and people have been clicking them and buying them.

    At first I was pretty surprised that this was happening, but then I remembered when I was treating myself I was also ordering all the same things! The whole point of the site was to recommend people the same treatments that I used, so it made total sense in the end. The site was working exactly as I intended.

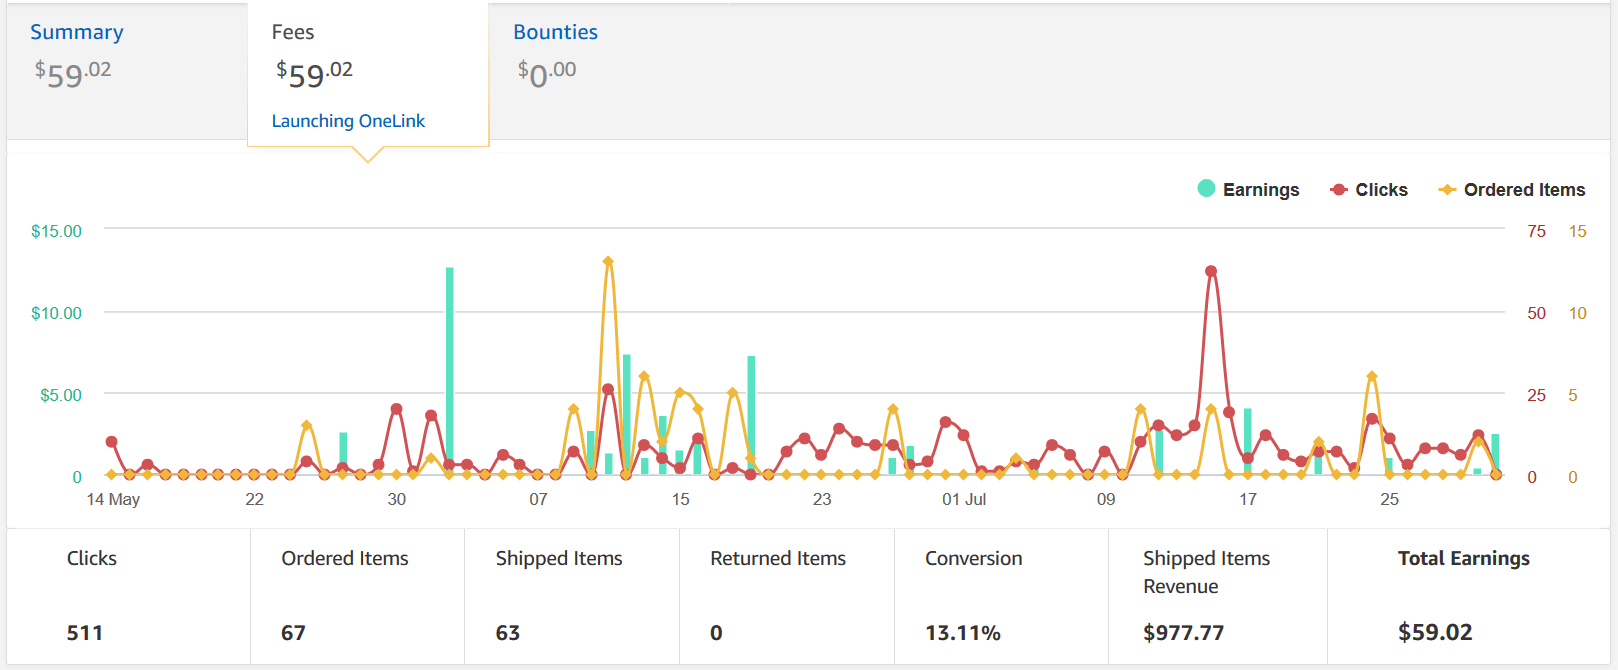
    Here’s what the first couple of months looked like:

    how to build a micro niche site

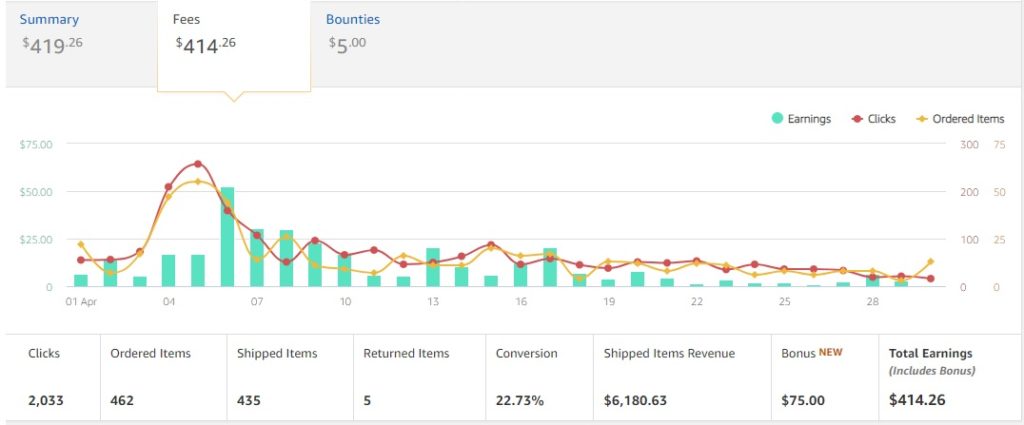
    If you can’t read that, it means the site made $59.02 in its first two months. That doesn’t sound like a lot, but it’s actually more than this blog you’re reading now! (which made zero dollars in its first two months).

    Having a site make money from its first month is actually quite rare. However, if you write good content and promote it with a monetisation plan in place, there’s no reason you can’t do it. Even if this site just chugs along making $60 every two months, that’s still $360 per year, with potential to go a lot higher.

    Pretty cool for a little side hustle you can put together in just a couple of weekends.

    It’s also not uncommon for niche sites like this to be making $1,000+ per month after a bit of love and growth. I’m sure if I dedicate significant time to this site it could reach that level. For reasons I’ll share below I probably won’t do that, but if you want to build a serious niche site income stream it’s definitely possible!

    Update 2018

    When I first wrote this article the site was making $30ish per month. Now it’s making around $100. Considering I’ve barely done any work on it, that’s pretty cool. Obviously I don’t rely on this site to make a living or anything, so I’m happy just leaving it making pocket money, but it’s fun to watch it tick along.

    Update 2020

    Earnings have definitely been growing consistently since the site started. It’s been fun to watch. The income has been mostly passive, and even though there are things I could do to improve the site, I’ve tried to leave it as passive as possible for experimentation’s sake. The goal was to create a passive income asset so that’s what it’s being treated as.

    Below is last month’s income (April 2020) which came in at $414.26. It’s a little higher than usual, normally it’s closer to $300-$330. Just shows that if you invest a few weekends to build a micro niche site, and do it properly, it will continue to pay you for years.

    Update 2022

    The last monetization method I hadn’t tried was selling a product.

    Of course the goal was to experiment with everything possible on this site so I wrote an ebook, which was basically a treatment plan summarised into about 20 very short and easy to follow pages. The goal was to create something that someone could read through in 15 minutes instead of spending an hour scouring through all the blog posts for the information they needed.

    I created the book in Canva (free) and split tested it — one page was selling at $10 and the other was selling at $27. 

    Surprisingly, they sold exactly the same amount of copies, so obviously I went with the $27 price point.

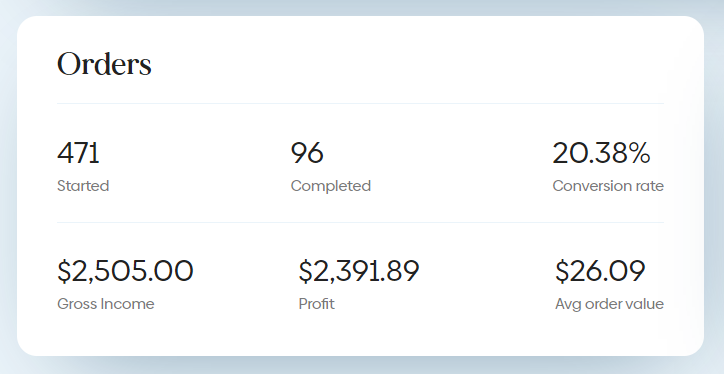
    I really wasn’t expecting much from ebook sales, but it’s actually turned out to be the top income generator for the site (a testament to the importance of experimenting and testing everything!) The ebook has now brought in $2,500 in sales: 

    To sell ebooks, I use Sendowl.

    Rinse and repeat

    I have since used this exact same method to build several more micro niche sites which around more lucrative topics. Obviously I can’t share all of those with you, but this site I’ve shared with you is a good example of how you can make a profitable niche site about pretty much anything!

    Get started today, maybe your first site will bomb, but it’s the learning process that is important. Once you have successfully built one site, there is nothing stopping you from building 10 or 50 or 100.

    My advice? Start today! Here’s a cheat sheet for you to get started below:

    Summary: Building Micro Niche Sites That Make Money From Day 1

    1. Get a website set up. I use Dreamhost and highly recommend them. If you’re ready to get started, click here.
    2. Choose your micro-niche. Try and choose something you’re knowledgeable/interested in.
    3. Think of 25-30 article ideas.
    4. Write 2-3 epic articles to start with (ultimate guides etc). Monetise with affiliate links. I recommend using Amazon Associates if this is your first site.
    5. Target your keywords to make sure Google can find your site. I recommend Keysearch.
    6. Start making your site look reputable with a professional design. You can do this yourself with a WordPress theme. I use Thrive Theme Builder.
    7. Start promoting on social networks like Pinterest, Facebook and Stumbleupon.
    8. Publish one article a week to keep search engines happy.
    9. Watch your site grow and collect your money!

    It’s seriously that simple. There’s nothing intellectual or difficult about it. Just set aside the hours to do the tasks and you’ll have a micro niche site that makes money.

    If you have any questions, hit me on my Facebook page. I’m here to help.

    Most importantly: Have fun!

    One last piece of advice I want to give to anyone trying this is don’t take it too seriously. People always say you need to treat your websites like a business and struggle struggle struggle etc.

    I disagree.

    It’s going to cost you maybe $50-$100 to get this thing going – there’s no risking your life savings here. Choose a subject you enjoy reading and writing about, say stupid things in your articles, swear if you want to, add stupid photos. There’s nothing worse than slaving over a site about some boring shit that reads like a high school textbook. Treat your new website like a video game and just have fun with it. Even if you only make $2 from it in the end, at least you learned something new and had a good time. And if you do genuinely enjoy what you’re doing, I promise you’ll make much more than that 🙂

    Bren

  • The (Very) Practical Guide To Making Money With A Blog

    The (Very) Practical Guide To Making Money With A Blog

    Woooooaah!

    What’s up people.

    Today we’re going to talk about money. And blogging.

    There are a few reasons I’ve finally decided to write this post. The first is, you’ve all been asking me about making money with a blog since forever ago. The second is, there is a lot (a lot!) of crap getting sold around the net right now teaching people how to make money online, and the last thing I want is for you guys to buy one of these courses for only $2,997 promising to make you a millionaire.

    For those of you looking to get into blogging, I’ve already written a super in-depth guide about setting up your own blog and getting it to a point where you can start to monetise, so check that out if you haven’t already. This post is the other half of the puzzle.

    Making money with a blog is actually really simple. You sell something, somebody pays you for it. That’s how McDonald’s makes money, it’s how Justin Timberlake makes money, it’s how blogs make money.

    A better question would be, How do you find something to sell? Where do you find people to buy it? How do you know if they will actually pay for it? Hopefully, I can answer them all for you today.


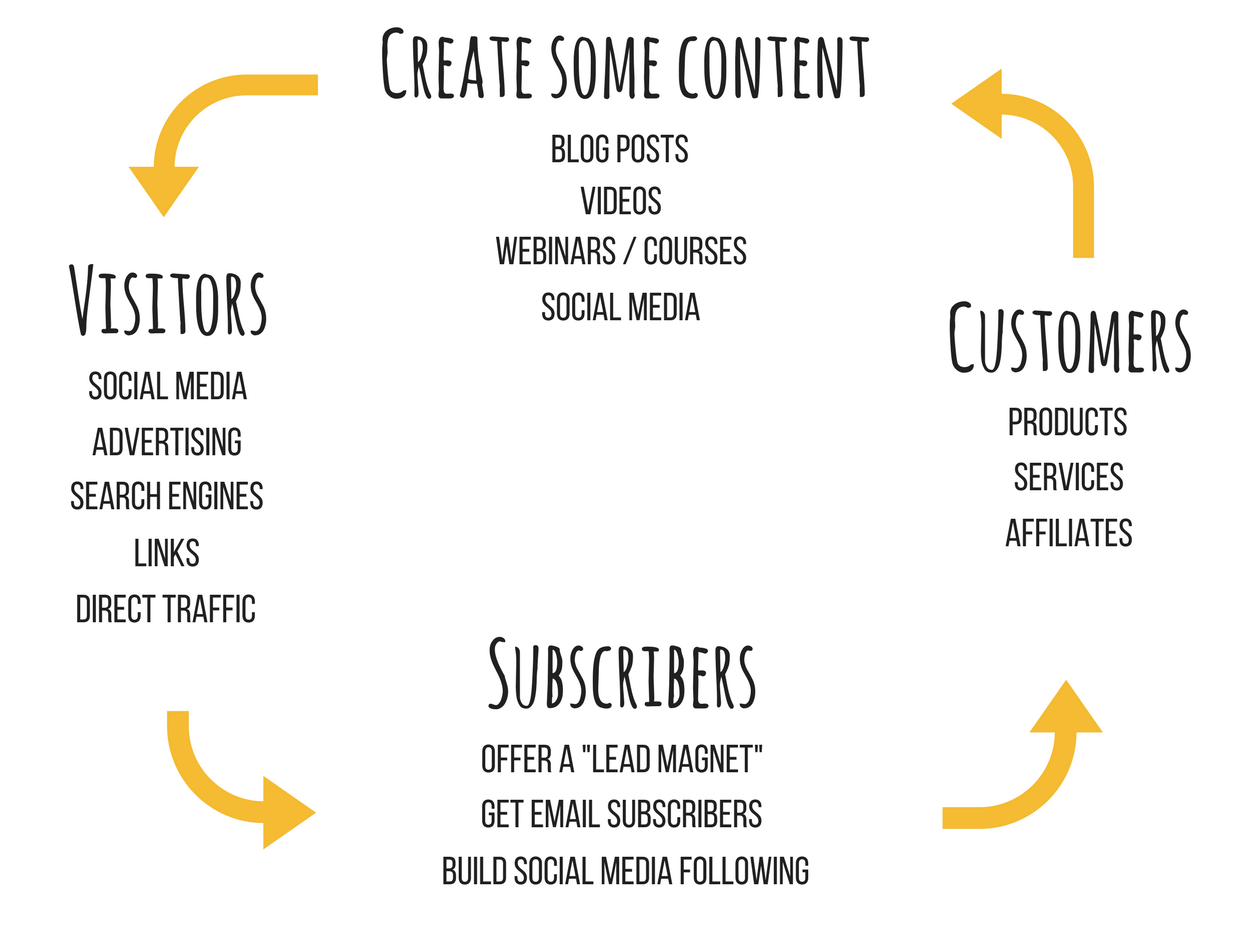
    Making Money With A Blog: From start to finish

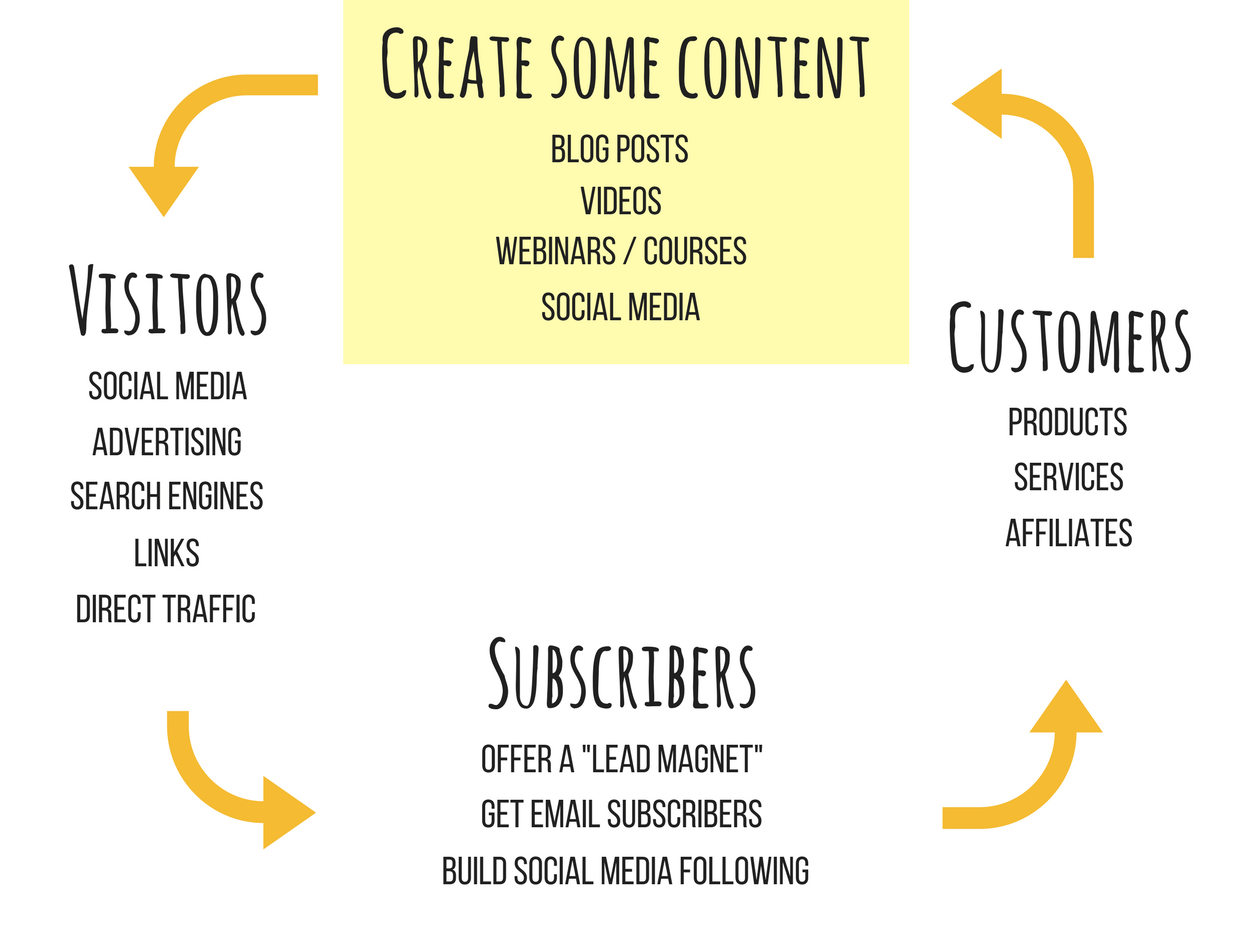
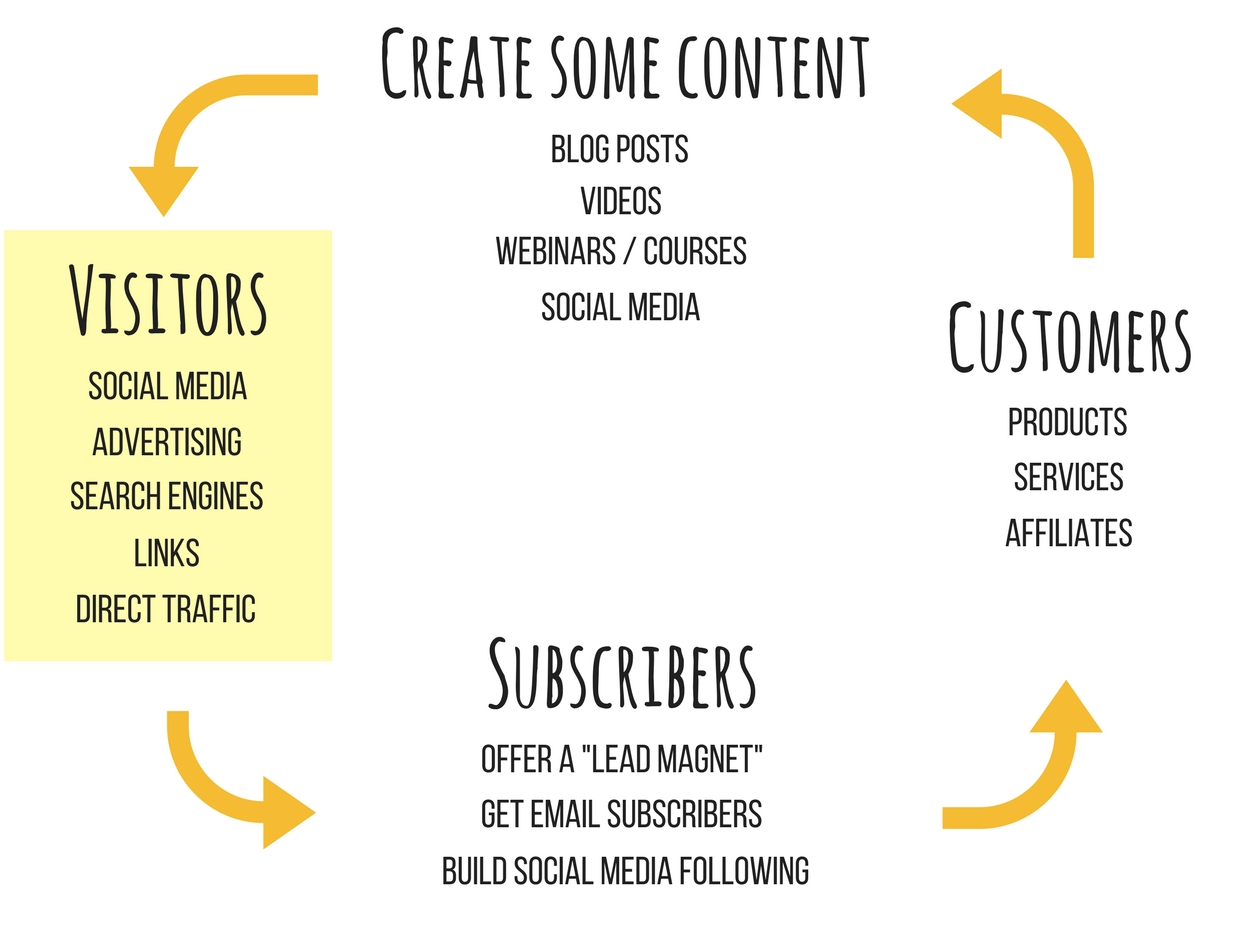
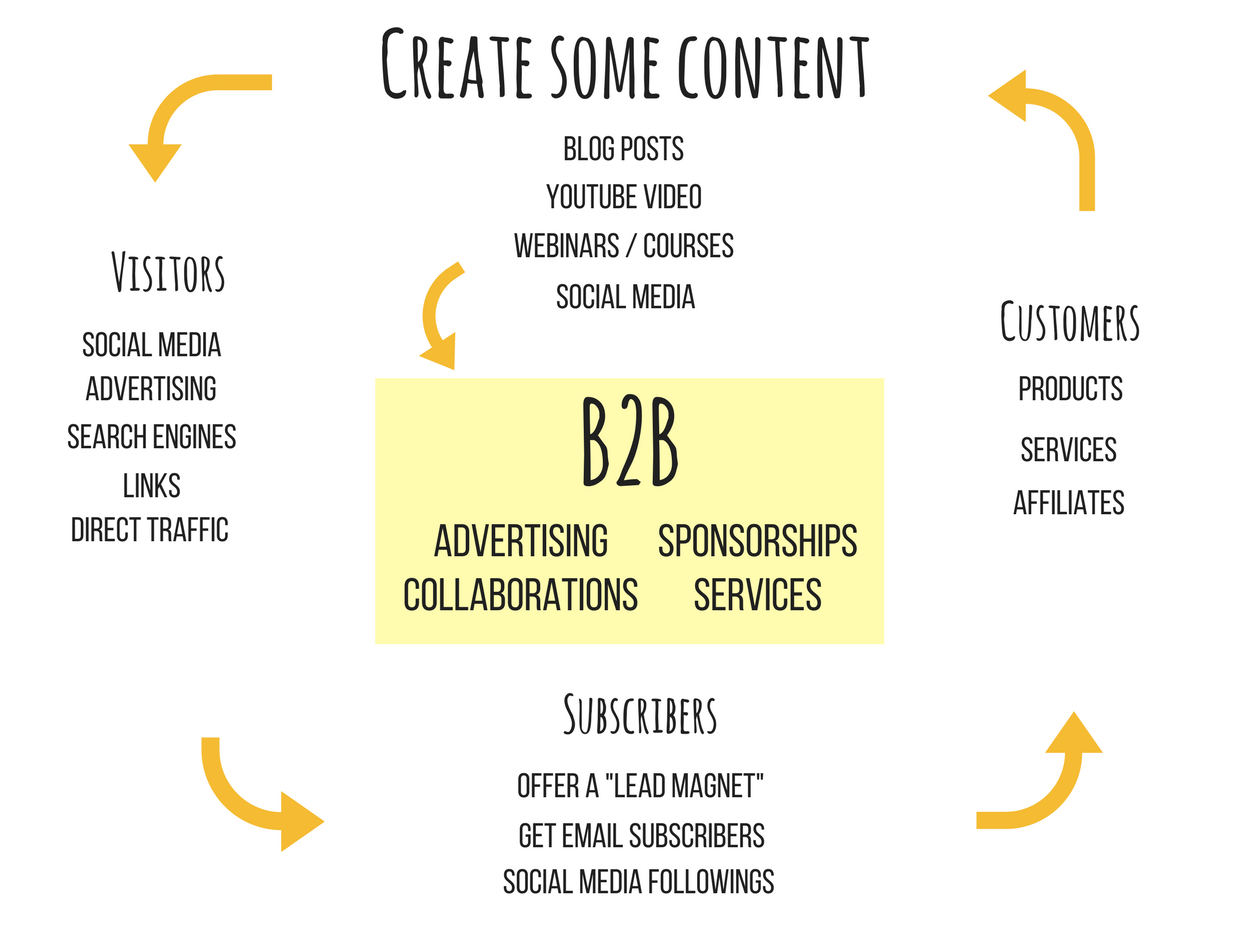
    The above diagram shows a typical cycle that a blog “customer” goes through. It starts with a stranger, let’s call him Mario, and he’s poking around the internet. He finds you somewhere, maybe on Google or Facebook. When he visits your blog or your Instagram page or your Youtube channel, you’ve turned Mario from a stranger to a visitor.

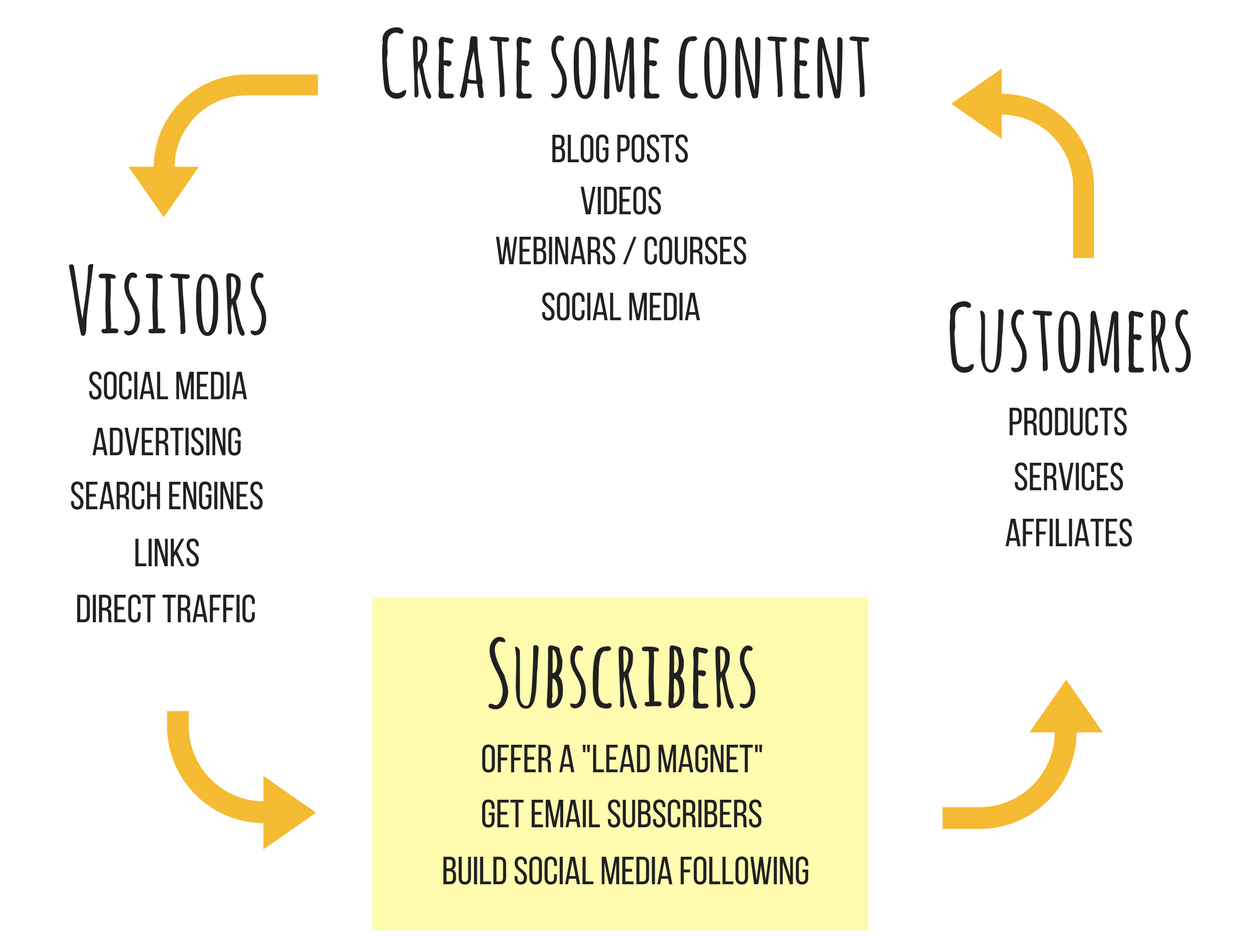
    When somebody visits your site, your goal is to turn them into a repeat visitor. You want them to keep coming back again and again. To do this, you usually need to form a connection of some sort – you get them to Like your page on Facebook, follow you on Twitter. But the most effective form of connection is email. When a visitor gives you their email and subscribes to your blog, you now have a direct form of contact with this visitor. Marketers would call this converting visitors into leads. I prefer to call them subscribers.

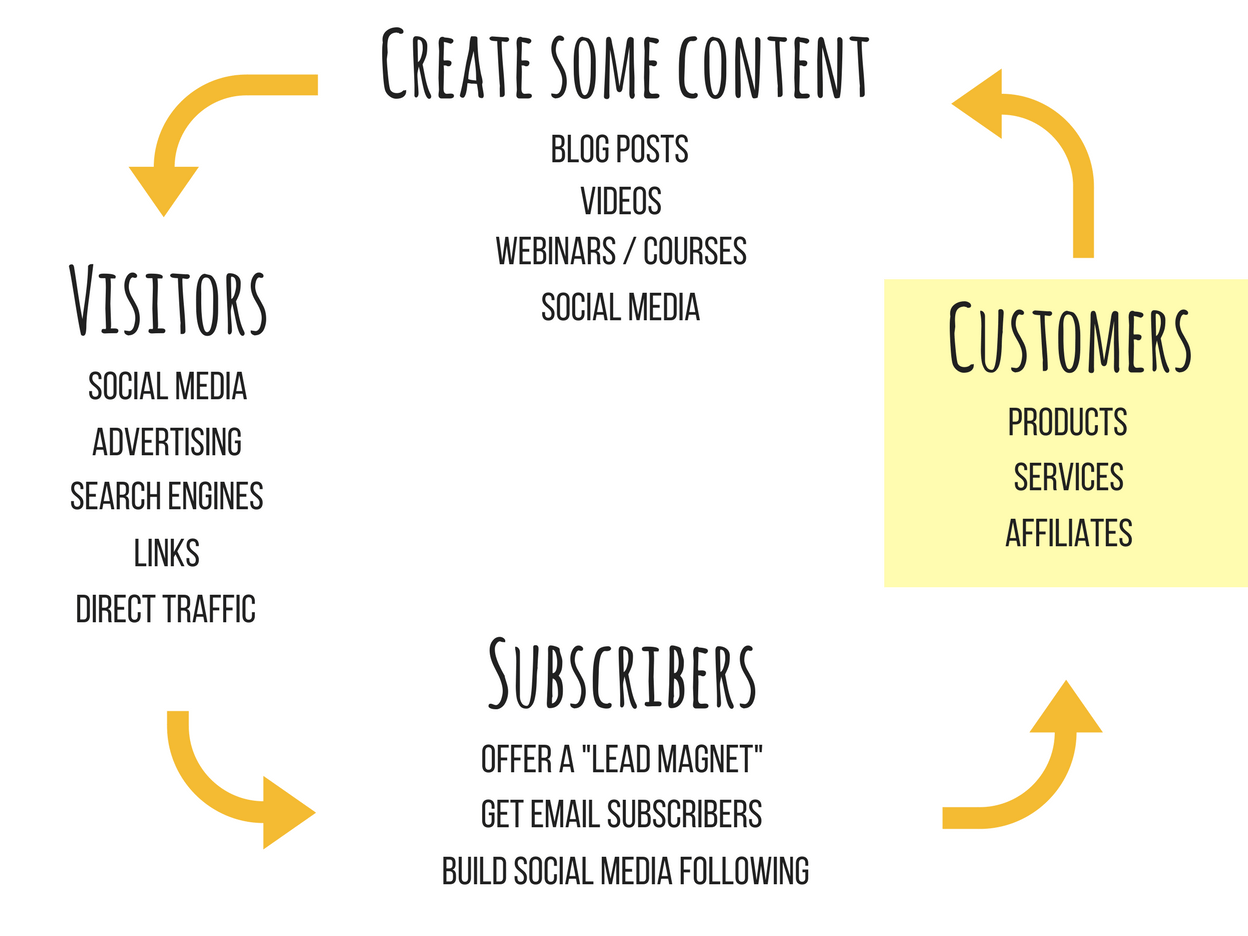
    Once you have some subscribers, you can contact them about anything you want. You can send them an email telling them your dog is sick, or you can send them a funny video, you could write them poems every day if you really want to. But you can also send an email to sell something. Ding ding ding. If anyone does end up buying, you’ve successfully converted your subscriber into a customer.

    You had something to sell. Somebody bought it. You made money.

    Of course it is possible for customers to skip steps in the process – for example, someone might visit your blog from Google and buy your product straight away. That happens too. But most connections loosely follow the process above (there are also income streams that run on a tangent to this process, such as advertising and partnerships – we’ll talk about them later).

    Let’s take a look at the process in more detail.


    1. Creating content

    The first thing you need to do is create some content for your blog. Normally this would be a blog post, but it could also be a Youtube video, a webinar, or maybe it’s just a video on your social media page. The idea of the content is to give people something valuable, show them something interesting – basically get their attention. Some people are not so subtle with their content, and they’ll just make a video about how they live in a mansion and drive a Ferrari – you’ve probably seen those a lot. But you can literally make any kind of content you want – funny videos, stories, photography, vlogs, songs, it doesn’t matter. The key is that people love it.

    Try and think about the first piece of content that brought you to my blog. Maybe it was a travel guide, or a story, or maybe it was this post you’re reading right now. Why did you click on it? Why are you still reading it? That’s basically what you need to create for yourself. Something that people want to read/watch/hear/see. Ideally it will be something you’re passionate and knowledgeable about also.

    Again, the overall goal here is to create something that people will love. What do people love? Things that make them happy, things that make them laugh, things that help them, things that educate them, things that inspire them, things that solve their problems. So create something that will do one of those things.


    2. Getting Visitors

    Now that you’ve made something amazing, the next step is getting some eyes on it. How do you do this?

    There are many ways. You could share it on your social media accounts, like Pinterest, Twitter and Instagram (one of the main ways I bring traffic to the blog is through my Facebook page). You can post on places like reddit and other forums. You can make Youtube videos that redirect to your blog. You could optimise your content so people will find you on Google or other search engines.

    If you don’t have any traction on any of these platforms, you can simply pay for advertising on Facebook or Google.

    Truthfully, if your content is actually awesome it will often promote itself. You’ll just need to give it a little nudge, and people will start sharing on their Twitter and BongoChat and whatever other social network is hot right now. But of course it always helps to promote it as hard as you can.

    Again, ask yourself how you found this post. Did you find it on Google, Facebook, did a friend send it to you? That should give you some clues as to how to get visitors to your own content.


    3. Converting visitors into subscribers

    When you get a visitor to your page, they’re usually looking for something. For example, I get quite a few people searching for information about cheap flights, or travelling alone. They arrive from Google, they read about how to get a cheap flight, and then they leave. I never see them again.

    I don’t have a problem with that, and you shouldn’t either. That’s why the blog post is there – for people to read. But ideally I’d like that person to return to my site again sometime in the future, and maybe he or she will become a customer.

    Therefore, perhaps the most important step in this process is converting your visitors into subscribers.

    The way to do this is to collect their information. If you can collect their email address, it means you can contact them again in the future, telling them about new blog posts, old content they might be interested in, and even products that you’re selling.

    The trouble is, very few people are going to just give you their email address. We live in a “what’s in it for me?” world. People rarely give something for nothing, however, people absolutely love getting something for nothing. Therefore, to get more subscribers, try offering them something for free.

    If you scroll down to the very bottom of this post, or visit my Subscribe page, you’re going to see a box that asks for an email address.

    This box is known as an “opt-in box”. It gives your reader the opportunity to subscribe to your blog. You can see that my subscribers receive a free 75 page ebook about how I started my life of travel. In marketing speak, they call this a “lead magnet”.

    Now you can’t just offer anything for free. If your lead magnet sucks, nobody will subscribe. And even if they do subscribe, they will look at your sucky lead magnet and then hate you for wasting their time. That person is never going to become a customer. They’re never going to visit your blog again. If you’re offering a lead magnet, it needs to be above excellent. You need to offer something that will actually help people, something of massive value. There are no shortcuts here. You need to give.

    Again, the goal is create something people will love.


    4. Making the sale

    Now that you have subscribers, you are in a position to offer something for people to buy. You simply email your subscribers and tell them about it. But what can you sell?

    The first option is to sell your own product. It could be an information product, like an ebook, it could be a physical product, like a bag of coffee, or it could be a service, such as consulting or advice. You create the product or service, then you sell it. Pretty simple. My premium ebook Triple Your Travel is an example of my own product.

    What if you don’t have a product? You could sell somebody else’s product and earn a commission. This is known as selling as an affiliate. When you become an affiliate of a product, the creator of that product will give you a unique link. If someone uses your unique link to make a purchase, you will earn a commission. If you look around my website, you’ll find many examples of affiliate products – my blog post What’s In My Backpack? is a good example. In that post many of the products listed are from Amazon. Because I am a member of the Amazon affiliate program, I earn a small commission (about 4%) on any products that people buy through the links in that post.

    Another example is my Triple Your Travel guide, which is also sold by affiliates. Whenever another blogger promotes the book and makes a sale through their link, I pay them a commission.


    This is how most online businesses make money

    This process is not exclusive to blogging. Most people making money online loosely follow this same process. Go scroll through your Facebook feed right now. Do you see any sponsored posts? You’ll probably see one within the first ten seconds. That’s people advertising for visitors. But it’s not just any content. I’m willing to bet my pinky that it’s offering you a lead magnet – a free report/guide/training/ebook/donkey. In exchange for the lead magnet, they’ll be asking for an email address. That’s them collecting leads. Once you enter your email address, they’ll probably send you an email with something for sale within the next few days. If you thought their free product was good and helpful, there’s a chance you’ll buy their premium product. That’s them turning leads into customers. It’s exactly the same process.


    5. The Fifth Element: B2B

    Blogs make money in a lot of ways. Although the four steps above shows the primary process, there is also a fifth component; B2B, or business-to-business. This represents things like advertising, partnering with brands, sponsorships, and selling professional services. Although rare, some blogs do not sell any products or services to readers, and make all their income through B2B relationships. However, these income streams are all still dependent on the four step process above.

    If you want companies to buy ad space from you, you will need awesome content, whether it’s a Youtube series, a podcast, blog posts, photography, or anything else, because you still need to attract visitors, and you’re still going to build a subscribers’ list and social media followings to keep visitors coming back to your site. No company will be paying to advertise on a site with no readers.

    If you want to get sponsorships or collaborations, you need amazing content that people love so that you can bring visitors to your site and build an audience that a company will want exposure to. No company will sponsor a blogger with no following.

    If you want to sell professional services, such as writing or photography, it still begins with your content. Companies will not be hiring you to write content or take photos for their websites if the writing and photos on your own site are not amazing.

    Again, it’s the same process; leveraging an audience by creating something that people will love.

    Here is a list of different B2B possibilities:

    • Display advertising
    • Email advertising
    • Brand sponsorships
    • Brand ambassadorships
    • Sponsored posts
    • Instagram marketing
    • Offer services (writing, design, video)
    • Press trips

    Where most bloggers fail

    Bloggers struggle at most steps of the process, myself included (especially myself included!) but I find it’s having the wrong mindset that holds most of them back, because it forces them to ask the wrong questions.

    When people ask me for blogging advice, the first question they ask is always (yes, always) how to make money.

    How can I earn at least $5,000 per month? How can I sell more books? I need at least $2,000 to support my travels. How can I do that?

    My answer is always the same. It’s the wrong question. The real question is, How can you create something amazing? How can you write a blog post about X that is more helpful than every other blog post about X on the entire internet? How can you create something that makes people go wow? How can you create something that makes people smile? How can you create something that solves people’s problems? How can you create something that helps people live a better life?

    If you can answer those questions, the rest of the process falls into place. You won’t need to ask people to subscribe – they’ll already be hunting for your subscribe box. You won’t need to ask people to share your content, they’ll do it anyway. And as you’ve seen above, those things will eventually lead to you making money in the end anyway.

    It’s the same issue that feeds into every part of the process. How can I collect more leads? Some bloggers will read somewhere that the trick is to create a lead magnet, and they’ll rush some guide or e-book together and slap it on their site. Of course, the crap lead magnet doesn’t get them anywhere, because the question isn’t “How can I get more leads?” The question is “What is a problem I can help my subscribers solve? What questions do they need answered? What is something that will help them today?”

    My free ebook So You Wanna Be A Traveller? took three months to write, edit, design and publish, and I update it every year. That’s a product that people value. It’s a lead magnet that sticks. I’ve even had readers insist on paying for it even though it was free. Others emailed me asking for other books of mine they could buy.

    Notice how in this situation I didn’t even have to try and sell anything. People were literally asking if they could buy something. Like I said, the goal is to create something that people love. The rest will fall into place.

    Notice the mindset change that is necessary. Blogging is not like an office job where you show up, punch a time card, collect a check and go home. You need to actually care about your customer, or in this case, your reader. You need to be invested. You need to genuinely want to improve their lives. You need to offer massive value for free – 99% of the people who visit your blog will never buy anything, never pay you for anything, never say thank you, and you need to be okay with that. You need to take joy in helping people for the sake of helping people. Can you do that? Be very frank in that assessment. If you’re only willing to help people when they pay you, blogging is not for you. It is estimated that 96% of blogs on the internet are abandoned, and this is why. The money can never come first. It is always reader first, blogger second.

    As a homework exercise, go and subscribe to twenty or thirty blogs and see how they interact with their audiences. I’ve subscribed to maybe a hundred over the years, mostly for research purposes, and some bloggers send out offers every month, some every week! And unsurprisingly those are blogs I never care to read. In fact, I don’t even remember their names. The blogs I actually enjoy and follow all have one thing in common – they give, give, give, give, give.


    Use these resources to get started

    It can be hard to find a (free) resource that teaches you this entire process. However, now that you know the process, it is much easier to find resources that teach a single part of it. For example, if you have trouble finding visitors you can find several good blog posts about that particular topic. If you have trouble creating a product, there will be many good blog posts about that topic also, and so on. Here are a few things to get you started:

    • If you’re new to blogging, I have a free step-by-step guide to setting up your own blog. It covers everything from getting a brand new blog online to earning your first dollar. You can click here to go there now.
    • If you are ready to set up your blog, I highly recommend hosting with Dreamhost. They are one of the most affordable hosts out there, and unlike most big hosts, their support is great! I haven’t had a blog-related mental breakdown since (and I was having them often). You can get your blog up and running today by clicking here.
    • To create email sign up forms like the ones I have on my blog, I recommend using Thrive Leads. It’s one of my favourite plugins and makes creating sign up forms super easy. It also has A/B testing, integration with all the email providers and lots of other good stuff. Super powerful – it’s worth every penny. Click here to check it out.
    • The email service I use is called Mailerlite. It is so affordable and has all the necessary features for building an effective list.
    • For a summary of all the other tools and resources I use on my blog, you can check out my Blogging Resources centre.
    • To get started with affiliate marketing and finding an offer to promote, it helps to join an affiliate network. The four I currently use are Flex Offers, CJ, Share-a-sale, and Affiliate Window.


    And finally, if you have any questions about these resources, or the blog post, you’re welcome to email me or leave them in the comments below. I’ll answer them the best I can!

    Bren


    Check out this super helpful guide to making money with a blog. Breaks down all the steps, honest and practical. Perfect for beginners!

    Note: Some of the links in this article are affiliate links. All items recommended above are resources I use here on my own blog and are honest recommendations. No items are sponsored and I pay for all my resources in full. For further clarification you can read my Disclosure Policy here.
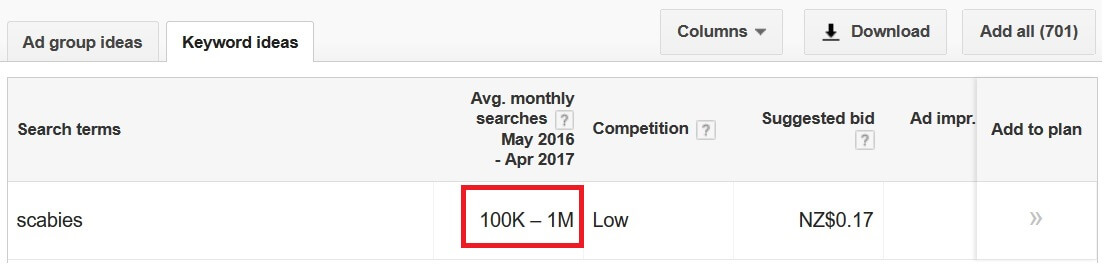
  • How I made over $4,000 in my first month on Elance (Upwork)

    How I made over $4,000 in my first month on Elance (Upwork)

    Update: Elance has now merged with Odesk to form Upwork. The platform is more or less the same, and operates in the same manner. The advice below is still applicable. Good luck!


    Surprisingly, the world of freelancing had eluded me until recently. It was by complete accident that I stumbled across a website called Elance – a kind of eBay for freelancers. Fuelled by enthusiasm and a rapidly declining bank account I dove in headfirst and was astonished at the earning potential of the online freelance market.

    Below I’ll detail how I went from an empty Elance profile to making over $4,000 in my first month working as a writer online, all without an ounce of freelance writing experience.

    What is freelancing?

    Freelancing is similar to contract work. It’s basically marketing yourself as an individual, offering your skills to businesses to do a task. You have no boss, no office hours and no public holidays. You work for yourself and it’s up to you to find work and pitch yourself to clients.

    Elance is an online marketplace for freelancers. It’s a place where both freelancers can find work and businesses can find freelancers to work for them.

    As a traveller freelancing is an ideal income source. If you have any desire to travel long term and get out of the office you need to start building a freelance income. You can work anywhere, anytime with just a laptop and wifi. This is where sustainable long term travel starts!

    How I started

    As soon as I surfed on into Elance I signed up and created a profile. I used to be an accountant, so naturally I starting browsing the jobs in the Finance section. Most were bookkeeping jobs and the type of crap I hated that caused me to quit my job in the first place. Not only that, every job seemed to have hundreds of bids from Indian freelancers offering to do the job for $2 an hour. $2 an hour! I wouldn’t even sit through Gossip Girl episodes for $2 an hour! (I wonder if Blair Waldorf has received my fanmail yet…)

    So there I was, so easily uninspired and seconds away from clicking the big red X in the top right hand corner when I caught sight of the “Writing and Translation” category. I vaguely remembered someone telling me about people making a decent wage working as a writer online and decided to check the listings out.

    I had no idea what I was doing, but a lot of the jobs seemed interesting and I knew I could do a decent job. I turned to my best friend (his name is Google) for a bit of advice. Pretty much all my searches about becoming a freelance writer on Elance came back with the same message:

    “Indians and Filipinos are highly skilled, more dedicated, and spend 18 hours a day on this site bidding for literally every single job that comes up. What’s more, they offer to do this work for $1 an hour. You simply cannot compete. Forget about it.”

    One thing about me is I’m super stubborn. When someone tells me I can’t do something it really annoys me, and no matter how stupid it is I’ll generally do everything I can to prove you wrong. What!? You said I can’t eat a whole bag of french fries through my nose?! That’s it. McDonalds, now. You’re driving.

    Bidding for jobs

    So with my stubbornness in hand I started bidding. Unfortunately for me what Google had told me was true. Every single job was being swamped with lowball bids from India and the Philippines. Truth is, I did want to give up at that moment, willing to accept the fact that they were all probably smarter, more hard working and more experienced than I was, not to mention they were much, much cheaper than me too. Nonetheless, I soldiered on, bidding for about 15 jobs and getting awarded exactly zero of them.

    After thinking about this for a while, I realised that the most likely reason people weren’t interested in hiring me was because I had no feedback. I also looked like a hamster in my profile photo. But without at least one feedback, there was no way that they could tell whether I was a rockstar writer or a complete illiterate idiot. On every job that I bid for, the writer who ultimately won the job had at least a couple of jobs completed and at least 4/5 star feedback.

    So I asked myself, what do businesses do when they’re trying to build up customers? They give stuff away for free!

    The next 3 jobs I bid for, I decided not to write my usual “I have an accounting degree and I’m a very hard worker and I love a challenge and I won’t let you down and please hold on while I think of something even more boring to tell you”. Instead, I decided to do part of the job for free as my proposal.

    My first job

    The job posting looked like this:

    Accounting blog

    I had no idea what a ‘creative brief’ or ‘SEO’ was. I still don’t.

    But that didn’t matter to me because since accounting is my expertise, I knew I could kill this job. However, if I just wrote my typical “I work really hard” proposal I would just look like another amateur writer with no experience, probably even a homeless one bidding from a stolen laptop. Therefore I decided to actually write a blog post for one of the requested topics as my proposal instead. That way he would know that I could write a blog post in good English and also would not be left wondering whether I really knew anything about accounting. Here’s what my proposal looked like:

    Accounting blog proposal

    I also bid quite a high price. I bid $250, which amounts to $25 for a 250 word blog post. For a new freelance writer that’s a very high rate. Most writers when starting out work for around $3-$5 for a 500 word article. Why did I do this? Simple – to stand out. Buying psychology 101 – high prices give a perception of high quality. Also, I’m from New Zealand where the minimum wage is $13.75 an hour. If I’m supposedly a qualified accountant willing to write for $3 an hour in a country where any other job would earn me 5x that, then the client will probably conclude that something is off, i.e. that I’m a moron.

    To my surprise, the whole thing worked perfectly. Within a couple of days I was awarded the job and it’s embarrassing how proud I was. I really couldn’t wait to get started. I was now officially a freelance writer, and had a client to prove it!

    celebration dance

    Lesson: Bidding high helps you stand out, and tells the client you’re not some desperate wannabe (even though you are). On this job I could see that the majority of the bidders were only bidding $3-$5 per post, and many were from India and Pakistan meaning they probably weren’t native English speakers. The highest bid on the job was around $300, so I bid just under that, making me stand out but not making me look extravagantly expensive.

    After 10 days I had completed the job, been paid $250 and received my first feedback:

    feedback accounting blog

    I also need to stress that you must get a 5 star feedback. A 3 star feedback is probably worse than having no feedback at all. So how do you do this?

    Firstly, strive to be the best freelancer your client has ever worked with. Submit work before the deadline. Write 700 words when you only needed 500. Make it clear that you will rewrite and edit your piece until they are 100% satisfied. Put effort into your writing and make your articles the best your client has ever read. In other words, exceed every expectation.

    Then, make it clear you need a 5 star feedback.

    “Hey Joe,

    I’m glad you liked the final article. If, for any reason, there’s still a part of it you’re not quite 100% happy with, please let me know and I’ll rewrite it until it’s exactly what you’re after.

    If there’s no further work to be done, I’d really appreciate it if you could leave a 5 star feedback for me on Elance. This would be so helpful in me securing further work and continuing to write. If you feel any aspect of my work wasn’t to 5 star standard, please don’t hesitate to let me know and I’ll do everything I can to fix that.”

    Remember, finding good writers on Elance is a complete headache for most editors. Well established freelance writers earn up to $500 an article, so for $20+ they don’t tend to expect too much. If you’ve been blowing their socks off with your professionalism and commitment to quality throughout the project, they really should have no problem leaving you the 5 star feedback you’ve asked for.
    [thrive_leads id=’10652′]

    The ball starts rolling

    After that everything became exponentially easier. With my first 5 start feedback behind my name I landed my next job a couple of days later. Here’s what the job posting looked like:

    Indian job

    My proposal:

    Proposal indian job

    While I can’t see the other proposals, I can see who the other bidders are. There were 13 bidders for the job, which I have listed below:

    bidders

    As you can see, of the 13 bidders 4 are from Pakistan, 7 are from India, 1 is from the Philippines, and 1 is from New Zealand (me). Assuming the job poster was looking for a native English speaker, he can choose either me or…me.

    Lesson: Don’t get disheartened by a large number of people low bidding on jobs. While many of them may be great workers, Elance is renowned for having a large number of English second language speakers submitting poor quality writing that can’t be used. For this reason many job postings explicitly ask for native English speakers only. In this case I was the only native English speaker that bid, and eventually I was awarded the job. Funnily enough, almost every other bidder was also a Chartered Accountant and some had CFA’s/MBA’s, making them far more qualified than I was (probably way smarter, too). They also were cheaper than me – my bid of $550 was far higher than the average bid of $180, which reinforces my earlier point of bidding high and not selling yourself short.

    Trying a different niche

    After completing this job and getting another 5 stars, I decided to see if I could land a job outside of accounting and finance. I did this for fun more than anything else, and to get some experience in a different niche. Pretty much all my proposals went along the lines of:

    “My background is in financial writing but I can apply my skills to a variety of topics….I work hard blah blah…I’ll be happy to write the first article at no charge as a trial to see if it suits your audience.

    After submitting around 10 bids for travel articles, food articles, fitness articles, sports articles and pretty much any job that got listed, the one I got a hit on was a collection of articles for a mens lifestyle blog (hooray). 10 articles at $11 each. Granted, a significant paycut from my previous gigs, but was a job nonetheless and I actually had a lot of fun doing it.

    Because the article was outside my niche I had to put a bit more effort in to ensure a 5 star feedback. I read through the clients blog and a lot of similar blogs to get a feel for the right writing style, I made sure the writing was delivered way before the deadline, and of course I offered to rewrite it as many times as he needed. Out of the 10 articles, only 1 needed to be rewritten, and he seemed very impressed with the work:

    Elance7

    Lesson – You can land jobs outside your niche – you’ll probably get paid less and need to offer a freebie for the first few, but it’s worth it for the extra experience and feedback. Research well and strive to submit the highest quality work that your client has ever seen. Soon you’ll have a good amount of experience in different niches and be able to command higher prices.

    My first “big” client

    The next job I landed ended up paying me quite a bit more than the others. It was for writing Chartered Accountancy teaching notes, which is:

    1. A crap job that nobody wants to do
    2. Requires a very specific skillset

    Those are two ingredients for a high paying gig. Here’s what the posting looked like:

    accounting notes

    My proposal:

    Elance99

    In my proposal you’ll see that I made sure to address every requirement listed in his posting. What you can’t see in the screenshot is that the job budget was up to $5,000, so I knew he was willing to pay good coin for the right candidate.

    I spent most of the evening researching and putting together the sample notes requested in the posting, as I knew that would most likely be the deciding factor. I wanted to submit something exceptional. The client emailed the next day saying how my proposal and sample notes had really stood out from the rest, and awarded me the job. The first job was a trial, which involved writing a single chapter of notes for $230. I did everything I could to make it the first set of interesting accounting notes in the history of mankind (I failed, it’s not possible), and he later offered me a full 10 chapters, for which I negotiated a price of $2,900.

    Lesson – Don’t be afraid to spend time on your proposals – it’s like preparing for a job interview. I’ve found that the clients who ask for specific samples in their listings are generally the ones that require writers with a very specific expertise, and if you can deliver on this the payday can be pretty good.

    Earnings for the first month:

    Job 1: $250

    Job 2: $550

    Job 3: $110

    Job 4: $230

    Job 5: $2,900

    Total : $4,040 USD worth of work awarded in just over a month.

    Disclaimer: While I managed to “win” all these jobs within a month, it actually took around 2 months for me to complete everything. This is because those were the deadlines I negotiated. I did this because:

    1. I was travelling at the time
    2. I’m lazy

    I was probably working around 10-15 hours a week. Had I been working on them full time this could have been easily completed in around a month.

    I was earning around $25-$30 an hour on average, which is not far from what I was earning when working full time as an accountant. The interesting thing is, this is considered peanuts for a writer! Many established writers earn closer to $100 an hour, some substantially more. While I’m a long way from those rates, the potential itself is exciting.

    Things to remember when starting out on Elance:

    Bid for jobs within your expertise (particularly for writing). This will be your best shot for producing quality writing and building up your feedback. If you’re a personal trainer bid on fitness articles; if you’re a banker bid on financial articles; if you’re a nurse bid on health articles etc. You don’t necessarily need to be a professional – you could bid on parenting articles, travel articles; I’ve even seen several jobs for gamers to write articles and reviews on Playstation games, so there really is something for everyone.

    Take whatever jobs you can get at the start. You get 40 bids on Elance when you start out – you should use all of them. With my first 40 bids I got awarded 3 jobs, and then I paid the $10 fee for another set of 40. If you’re serious about building an income, you’ll need to put a decent amount of effort into marketing yourself and bidding for work. Once you get some decent feedback you will be able to be more selective with the work you accept.

    Don’t limit yourself to writing – Writing can get boring, so it’s nice to have something else to work on to give yourself a break. For web developers, programmers and IT nerds in general, the freelance world is a goldmine for you. I’ve flirted with the idea of finding accounting work but I can’t bring myself to do it just yet. Still gives me nightmares. Another great moneymaker is translation – if you speak multiple languages there are people that will pay big money for accurate translation work.

    Write for free – I’m a big advocate of writing articles for free and including them in your proposal, at least when you’re starting out. If anything, it’s a great way to practice your writing and if you don’t get the job you can still add the piece to your portfolio. For example, if the poster requires 10 articles on the benefits of green tea, research and write an article on the topic. Even if you don’t win the job, convert the file to pdf and add it to your portfolio as “Green tea article written for established health magazine”. Win win!

    Look at other successful writers. See how their profiles are laid out and what they include in their portfolio. Look through their resume, their photo and the profile layout in general. Use this as a model for your own profile.

    So anyway, that’s how I started out in freelancing and I was pretty satisfied with my results. What’s been great about it is that I’ve developed a new stream of income that I can earn while travelling, which is always the goal for me. I’m sure there are many different strategies that people use to freelance and if you’re willing to share I’d love to hear them! Also, I’d be keen to hear how the above strategies of mine work out for you if you decide to use them. I’ll probably write another post on the topic in a few months, hopefully with a new and improved approach to share with you all. Hopefully this post has showed you that it really is possible to make money on Elance; maybe not millions, but enough to make it worth giving a try.

    My challenge to you:

    Set up a free account at Elance (Upwork) and spend some time creating your profile. Then, start bidding like crazy on any writing jobs you think you can do a decent job of. It might be writing about parenting, about working out, about dieting, about insurance, about cars, about computers; anything! At the very least you should use all of the 40 bidding credits that you start out with. With some effort and a little bit of luck, you should be able to land at least one job.

    Then, do an unbelievable job. Exceed every one of your client’s expectations. Let them know that you’re committed to quality and will produce exactly what they need in order to get a 5 star feedback.

    Finish the job, get paid, request a 5 star feedback and blow the payment on something to reward yourself.

    Congrats! You’ve just built yourself another income stream 😉

    Happy freelancing.

    Ready to start your freelance career? This in-depth guide shows you real proposals to real clients that have landed real jobs, complete with the tools and resources you need to get started.
  • A review of Teach and Travel China (TTC) by i-to-i

    A review of Teach and Travel China (TTC) by i-to-i

    I normally don’t publish guest posts but today I’ve made an exception. JY is a good friend of mine who recently completed TTC (Teach and Travel China) with i-to-i. I actually remember wanting to do this programme back in 2011, but couldn’t find a review of it anywhere! So, I’ve decided to publish this recap of his; hopefully it’ll be of some help to you budding ESL teachers out there.

    I first heard about TTC (Teach and Travel China) after being recommended it by a friend. There are literally hundreds of sites offering the same thing, but i-to-i is one of the more reputable ones out there (note: The TTC program is offered by various other agencies too, such as IESGlobal and Bunac, among others).

    The price I paid was a little cheaper than the listed $1,800 as I caught it on special (thinking it’d be totally worth it, since it included the $399 TEFL certificate course and a two week training course in Beijing). We were able to choose a start date in either February or August, and I decided to take the August semester.

    i-to-i calls this program a “voluntary internship”. The pay is not great, around $400 a month, but accommodation is included as well as 3 meals a day, Monday to Friday.

    The year I went (2012), there were 141 of us – 4 from NZ, about 8 from Aussie, 20ish from the US and 93 from the UK. We all met in Beijing, got split up into 5-6 groups and got put through the 2 week course. In reality, it was more like a two day course – 2 days on actual teaching methods and mock classes and the rest of the time doing things like tai chi, calligraphy and basic Mandarin classes.
    Interestingly the process went like this – while we were in Beijing, the schools in the TTC program actually chose us. We didn’t really have a say on where we went. We got to put down 3 preferences, and I chose South as my first choice, then North, then Central. In the end I got placed in Chengdu which is Central. We also were randomly given pre-school, primary, intermediate or high school (luckily I got primary, which is what I had hoped for). As for the location, it seemed like the boobie area was Inner Mongolia. I still remember on our 3rd to last day in Beijing, everyone was running to the pin board as if they were getting their exam marks, but it was just the placements. As soon as one of the girls found out she got Inner Mongolia, she cried.

    Then we were given the stats. Of the 141, 30-40% were expected to leave the internship. This was due to culture shock and homesickness, as well as many teachers getting poached by other agencies offering much higher salaries (up to $1,900 per month compared to the $400 paid by TTC).

    For the duration of the internship you get assigned a person who speaks English from your school, so if you ever have any problems or questions you have someone to talk to. This is good and ensures that you’re well looked after during the entire 5 month internship. You can also request to be placed at the same school as your girlfriend/boyfriend/husband/wife.

    As for the actual teaching part, we were required to work a maximum of 16 hours a week. Usually that worked out to around four 40 minute classes per day, and sometimes it was as little as two. That might not sound like a lot of work, but honestly, it is! We also had to plan our own lessons, so there was a fair amount of prep time too.

    There’s quite a few downsides to the TTC program. First, it’s expensive. Then there’s the uncertainty and mystery on where you’ll be placed and with which age group. Accommodation quality can be a problem too – I visited some of my friends’ apartments in Chengdu which were appalling.

    Lastly, there’s the pay situation – it’s natural to wonder how much TTC is taking of your salary considering a normal English teacher’s salary is around $1,500 a month and you’re only receiving $400. This is probably why it’s so common for interns to get poached by other agencies and in some cases people just go looking for other work themselves. However for me, it was all for the experience and never about money. I made some really good friends, had an experience I’ll never regret and definitely reconnected with my inner roots.

    In the end it was quite a costly way to experience China but luckily for me it all worked out -accommodation was awesome, school was awesome, students were awesome and teaching experience was totally awesome. Every man to his own opinion and experience. Even if I had been placed in Inner Mongolia or some place rugged, I wouldn’t have minded at all – would’ve just made the experience my own and appreciated everything.

    For those thinking about teaching in China, here’s my recommendation – get TEFL qualified by doing the i-to-i TEFL course online (around $399, click here to check it out) and then find work through your own agent (the challenge is to find a reliable one and not get scammed – do your research!) Also, travelling in China can be a scary place if you don’t know the language, so make sure you have reliable sources and a backup plan if things don’t work out. As for me, I’m adding a little detour to my next trip to visit my old school in Chengdu. I miss my kids, definitely had an experience to remember and don’t regret it one bit.

    Teach and travel China by i-to-i
    Typical day in class

    teach and travel china review
    Teachers office

    accommodation for teach and travel china
    Accommodation in Chengdu

    Got questions? Taken a Teach and Travel China internship of your own? What’s your experience? Let us know in the comments below!

    Note: This is a guest post by a friend of mine. If you have questions about the program, leave a comment below or send me an email and I’ll do my best to connect you.

    Travelling soon?